

May 19 15
Unconventional Free Motion Quilting Border Designs
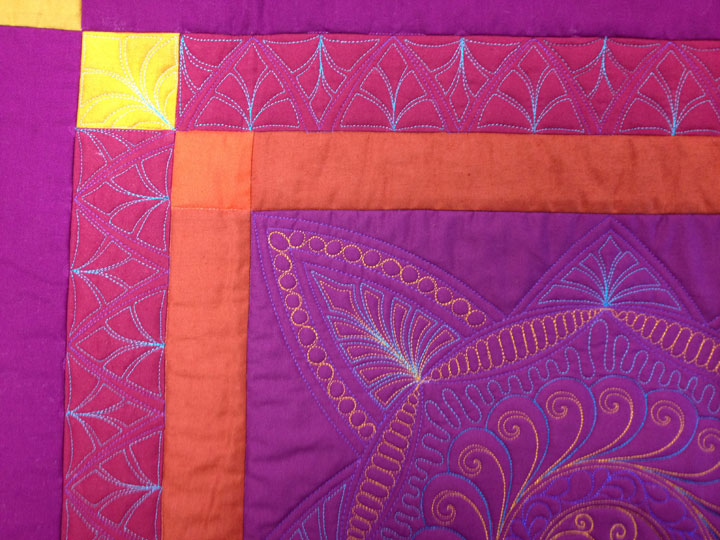
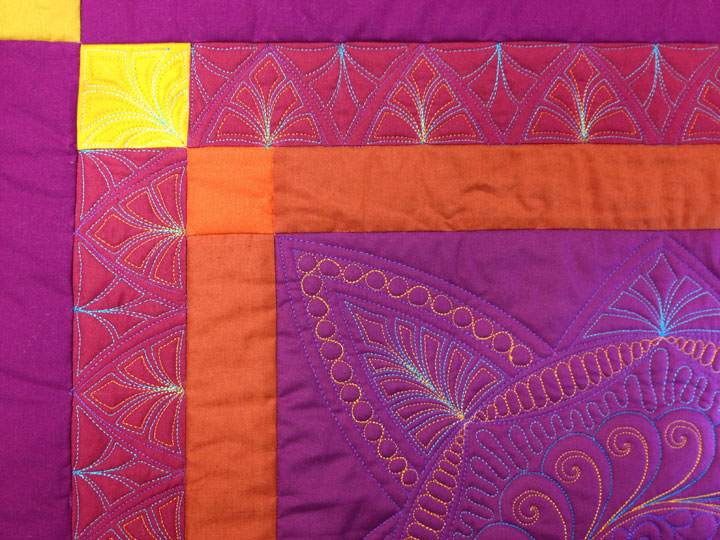
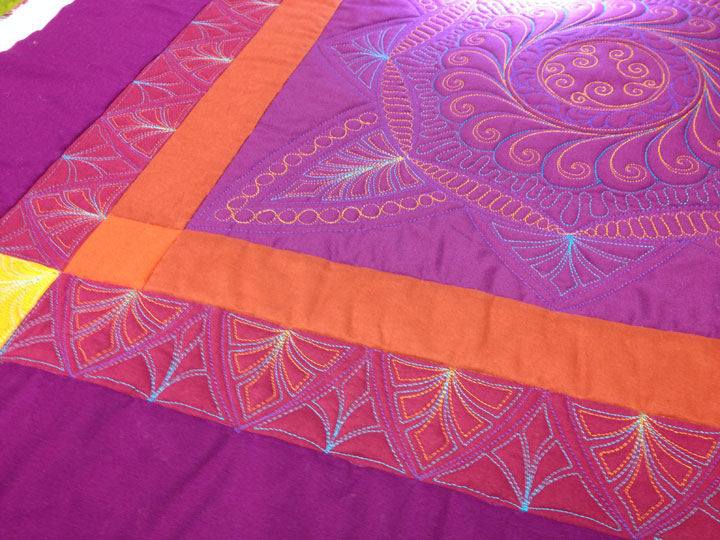 A couple of years ago, QuiltShopGal asked me to participate in her monthly Free Motion Quilting Challenge and I chose the topic of border designs. Until that year, the only interesting border designs I stitched were variations of feather designs. If I didn’t stitch a feather border, then my border designs were pretty lack-luster. Not so anymore! Border designs thrill me and I love the challenge of coming up with new border design ideas. The design above is a good example of the kind of design that evolves merely through playing around and improvising along the way. Sometimes, I will draw out a border design on scratch paper and sometimes I will stitch out a small sample on a throw away practice sandwich. The design above is an example of just “winging it” on a real quilt and I love how it came out! If you want to try something like this, here are the steps I went through to make the above border.
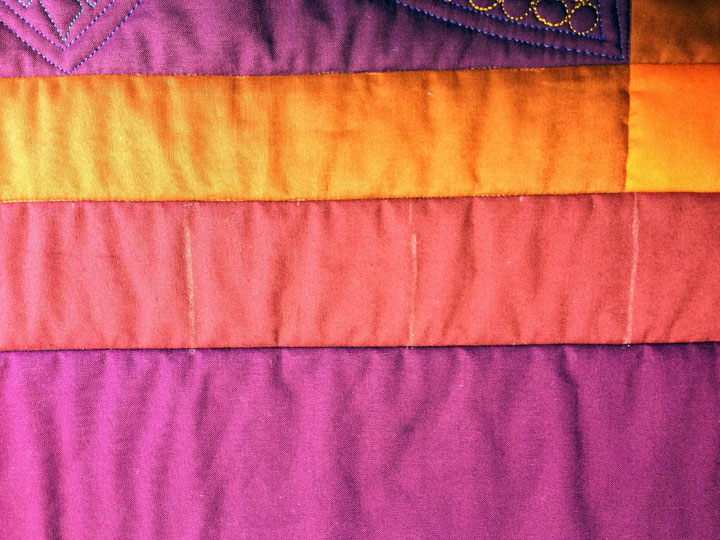
Step 1: Create the skeleton or frame work using ruler work. For this, I used the #12 arc ruler from the medium set of Quilters Groove Rulers by Stone House Quilting and you can find them by clicking here. In truth, you don’t need that exact ruler, and any softly curved arc ruler will do just fine. (Note: when you’re working w/arc rulers, the curve will become softer, or more subtle, as you increase the size of the ruler.) I placed small tick marks along the base of my border for where I wanted each arc to begin and end, and placed a corresponding tic mark in the midpoint of the space on the opposite side of the border. You can see in the photo below that I elongated every other tic mark so it was easy to see where I wanted the “peaks” of my archways:
A couple of years ago, QuiltShopGal asked me to participate in her monthly Free Motion Quilting Challenge and I chose the topic of border designs. Until that year, the only interesting border designs I stitched were variations of feather designs. If I didn’t stitch a feather border, then my border designs were pretty lack-luster. Not so anymore! Border designs thrill me and I love the challenge of coming up with new border design ideas. The design above is a good example of the kind of design that evolves merely through playing around and improvising along the way. Sometimes, I will draw out a border design on scratch paper and sometimes I will stitch out a small sample on a throw away practice sandwich. The design above is an example of just “winging it” on a real quilt and I love how it came out! If you want to try something like this, here are the steps I went through to make the above border.
Step 1: Create the skeleton or frame work using ruler work. For this, I used the #12 arc ruler from the medium set of Quilters Groove Rulers by Stone House Quilting and you can find them by clicking here. In truth, you don’t need that exact ruler, and any softly curved arc ruler will do just fine. (Note: when you’re working w/arc rulers, the curve will become softer, or more subtle, as you increase the size of the ruler.) I placed small tick marks along the base of my border for where I wanted each arc to begin and end, and placed a corresponding tic mark in the midpoint of the space on the opposite side of the border. You can see in the photo below that I elongated every other tic mark so it was easy to see where I wanted the “peaks” of my archways:
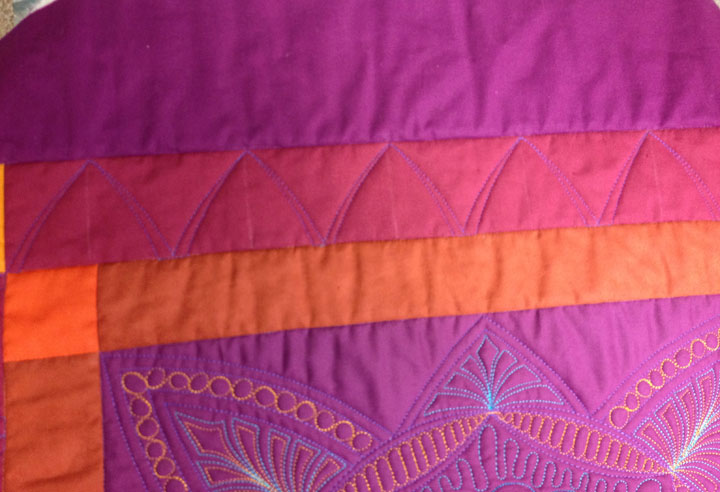
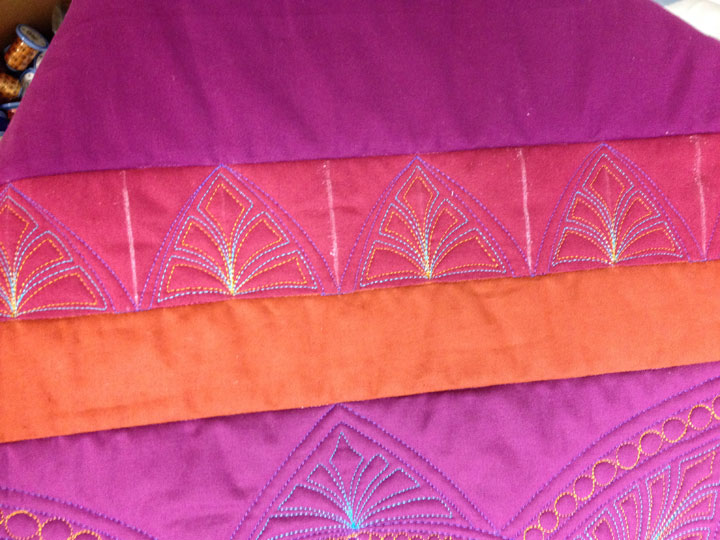
 Using the tick marks as my guide, I stitched out a long row of single-line arches, then went back and stitched a small, tapering channel between them. This is very fast and easy to do as ruler work. The thread I used for this stage was a purple polyester Isacord thread:
 Step 2: Begin filling in your framework. For me, this next part is where it gets really fun. I think it’s all the time I’ve spent hyperquilting, but I just love coming up with “fill-in” designs. I’m going to show you a couple of options for fill in work. In the photo below, I stitched small cut-off feathers that make me think of Aztec designs. I used them because I was trying to echo some of the same types of designs I had stitched in that center block and I used a Sulky turquoise rayon thread for this step:
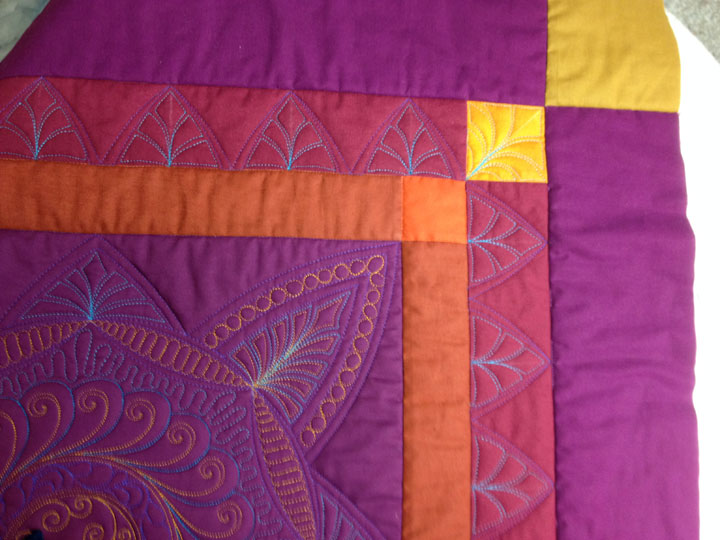 Interesting, but also a little boring! (Before I go any further, note that I stitched some “Aztec” designs in the cornerstone blocks at this stage as well.) Here’s where you can go in a couple of directions. In this next shot you’ll see what it looked like after stitching a similar (yet a teensy bit different) in the opposite arches from the opposite side of the border. I used the same turquoise rayon thread for this round of stitching:
 Stitching these “Aztec feathers” is actually pretty simple. I began with a long soap line down the center of the arch, and this served as my “spine guideline.” If you approach it as if you’re stitching a regular feather but simply cut-off the rounded plume tips, you’re good to go. The goal is to completely fill the space w/the feather, so stretch out where you need to and contract where you need to, just as you would with a more traditional feather.
Step 3: Hyperquilt those Aztec feathers. The nice thing about borders is that there are 4 sides. This means that if you’re like me and you enjoy playing around with different design ideas, you can be doing different things on different sides of the same border to get an idea of “what if?” So, I’m hoping that I’m not confusing you, but here’s what the original border design would have looked like if I left it as arcs on just one side but then went in and hyperquilted the Aztec designs. I used Floriani gold polyester thread for this round of stitching:
Stitching these “Aztec feathers” is actually pretty simple. I began with a long soap line down the center of the arch, and this served as my “spine guideline.” If you approach it as if you’re stitching a regular feather but simply cut-off the rounded plume tips, you’re good to go. The goal is to completely fill the space w/the feather, so stretch out where you need to and contract where you need to, just as you would with a more traditional feather.
Step 3: Hyperquilt those Aztec feathers. The nice thing about borders is that there are 4 sides. This means that if you’re like me and you enjoy playing around with different design ideas, you can be doing different things on different sides of the same border to get an idea of “what if?” So, I’m hoping that I’m not confusing you, but here’s what the original border design would have looked like if I left it as arcs on just one side but then went in and hyperquilted the Aztec designs. I used Floriani gold polyester thread for this round of stitching:
 Isn’t it nice to see different options? My final border was hyperquilting the one side of the arches but adding the turquoise Aztec designs to both sides of the arches as in this shot below:
 Could you hyperquilt both sides of the arches? Of course! In this case, I was hoping to accentuate that the arches and feathers on either side were actually a bit different from one another, so I left the hyperquilting off. I don’t think there’s a right/wrong way to do this.
I know I’ve said it before but it bears repeating. If you’re interested in learning about using ruler work as a sit-down quilter on your home sewing machine, you really need to start reading Amy Johnson’s blog which you can find by clicking here. It is a wonderful free motion quilting blog and it’s “the place to go” if your goal is to learn about ruler work on your home machine or on any sit-down machine. She explains things in a very easy-to-understand kind of way and she always has good illustrations, so head on over there now! In the mean time, I promise at least 3 blog posts in the next week. I haven’t been neglecting this blog on purpose, my life has just become too hectic lately. If you took the time to read this post, though, check back as I really do promise some more posts this week!
Could you hyperquilt both sides of the arches? Of course! In this case, I was hoping to accentuate that the arches and feathers on either side were actually a bit different from one another, so I left the hyperquilting off. I don’t think there’s a right/wrong way to do this.
I know I’ve said it before but it bears repeating. If you’re interested in learning about using ruler work as a sit-down quilter on your home sewing machine, you really need to start reading Amy Johnson’s blog which you can find by clicking here. It is a wonderful free motion quilting blog and it’s “the place to go” if your goal is to learn about ruler work on your home machine or on any sit-down machine. She explains things in a very easy-to-understand kind of way and she always has good illustrations, so head on over there now! In the mean time, I promise at least 3 blog posts in the next week. I haven’t been neglecting this blog on purpose, my life has just become too hectic lately. If you took the time to read this post, though, check back as I really do promise some more posts this week!
Patsy, your hyper quilted Aztec feathers are an outstanding way to fill in the arches! I LOVE this design. Am I correct in my understanding that each feather motif is stitched individually, i.e., that you are tying off threads in between?
I still absolutely lover your feathers any place in your quilts, especially in your borders. But there is something to say about ruler work and borders. Love what you have created with and without the hyperquilting. Definitely gets creative ideas going and I think the possibilities are endless.
QuiltShopGal
http://www.quiltshopgal.com
This is an entire class of information, Patsy. And big thanks for including what threads you used.
I love the ruler work you combine with your hyper-quilting. I think the structured ruler work against the softer free motion is so pretty!!
As always, beautiful quilting. Thank you for sharing. I look forward to seeing all your quilting. I already follow Amy’s blog and love that too.
Thanks for your kind note. Yes, I did stitch each one independently (but I must confess that I just cut the ends instead of tying them off!) I think you could carefully stitch in the ditch between each Aztec feather to travel between them but I was using high contrast thread colors and was too chicken to try it!
Patsy
Thank you for making it all look so easy. Breaking it down as you do and starting simple then embellishing your designs help. Thanks for the referral to Amy. Will follow her as well.
As usual, your quilting is exquisite, Patsy! Thanks for the pictures and explanations describing the process. Can’t wait to try it myself!
Thanks for the shout out, Patsy and I love what you’ve done here. That orange hyper quilting in the sashing is fabulous! It almost makes the fabric change colors just slightly, giving the hint that it just might be applique!