Designing Quilt Blocks and Designing Quilts

September 8th, 2013


thistle-block-single

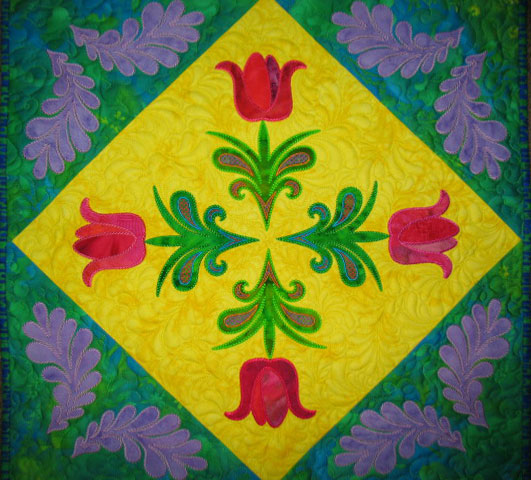
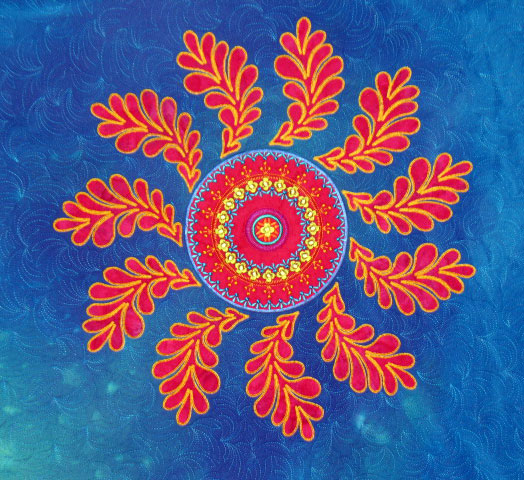
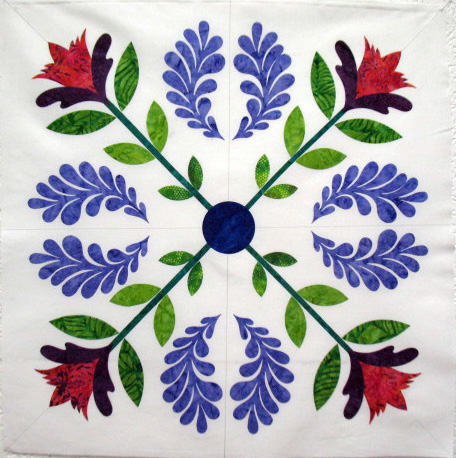
The more quilters I meet, the more I realize that we all “see” things differently.  I have been quilting for more than 35 years now, and I have designed my quilts using an “as-you-go” design method from the start.  This has always what been what seemed to come naturally to me, and I was really surprised the first time a friend showed me a piece of graph paper where she had drawn out and colored all the pieces of a quilt she was designing.   I immediately thought “I could never work like that,” yet as I think about it, her method really fits better with the way I do pretty much everything else in my life.   I pre-plan  and outline everything, so I’m not really sure where this spontaneous method of designing comes from.  But, it works for me and is still fun for me, so I thought I’d share how I come up with designs.  This next quilt block is a very good example of my basic approach:

blue-block

I began by cutting a block in the size I wanted, then drew a light soap line from each corner to the opposite corner, creating a large “X” across the block.  This divides the block into 4 equal quadrants and creates the groundwork to create a design that is set on point inside a block that is set on square.  Again, this gets back to how you visualize things.  I could set this whole block on point, and now the design inside it would appear different as in the image below:


blue-block-on-point

But, for the sake of making this easier to understand, let’s go back to that first orientation:


blue-block

Once I have those quadrants outlined, I have an idea of how large a space I want to fill.  Since the point of intersection is the center of the block, anything I place there will be in the dead center.  In this case, I wanted to place that large daisy in the center.  My mom gave me a brightly painted wooden mirror in that shape when I was about 13 years old, and whenever I have gone back to visit her, I have seen that brightly colored mirror.  My mom moved a few years ago and we needed to clean out her house, so I took that mirror home and traced its shape to get my center flower and the smaller flower inside it.  The only thing I did to alter it was to texturize some fabric with Texture Magic and I used that to fill the center-most section.   If you’ve never used Texture Magic, here is a link to a video we made about how to use it.


So, back to designing this block…I plopped my center flower in that center position and this left “blank space” in the 4 diagonals that spring from the center.  I took a ruler to measure the length of a quadrant, then I folded a piece of paper in half and placed 2 pencil marks on it that gave me a rough idea of a starting base point for my design and my upper ending point, or “tip” of my design.  (I deliberately made the length of these marks less than the measured length of a quadrant since I didn’t want to overcrowd the block.)  I drew one side of the light blue shapes above in pencil, then I cut them out along the folded side to ensure I had  a design with symmetry.  I placed my paper version in one corner to make sure it would fit, then used my paper template to trace around onto Wonder Under fusible web and then fused/cut my fabric applique pieces.  I did that same thing for the smaller yellow shapes that you see inside the light blue shapes.


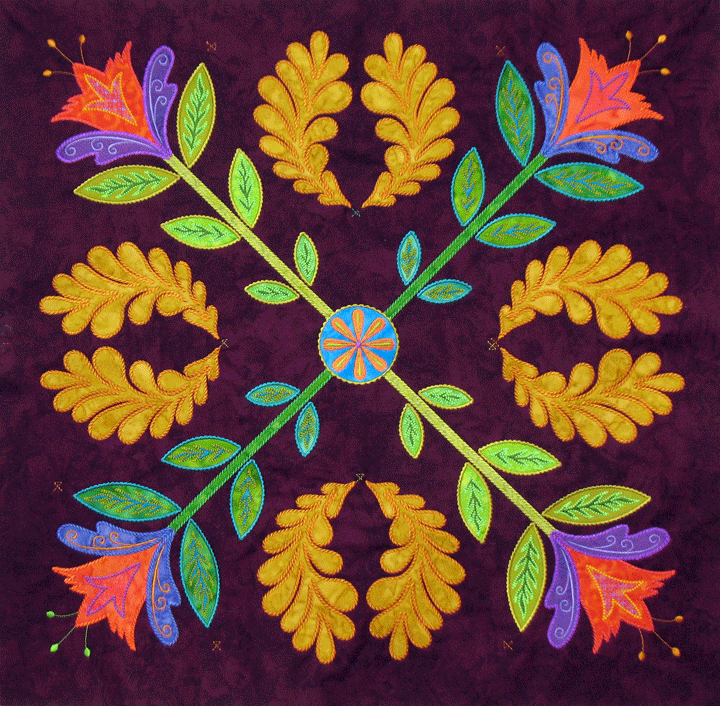
For years, I made my quilt blocks in this way, then finished to edges with some type of decorative stitching. In the last 2 years, though, I’ve been almost exclusively making machine embroidery applique blocks.  I’ve had to switch some of my work habits for these, and the process takes much longer because there is a lot of “tweaking” that happens along the way.  This next example is  of a block whose designing began about 4 1/2 months ago and it is still not completely done.  I first created a “mock up” of the block but I used muslin  for the background since this mock up will never be finished:
22 in block2

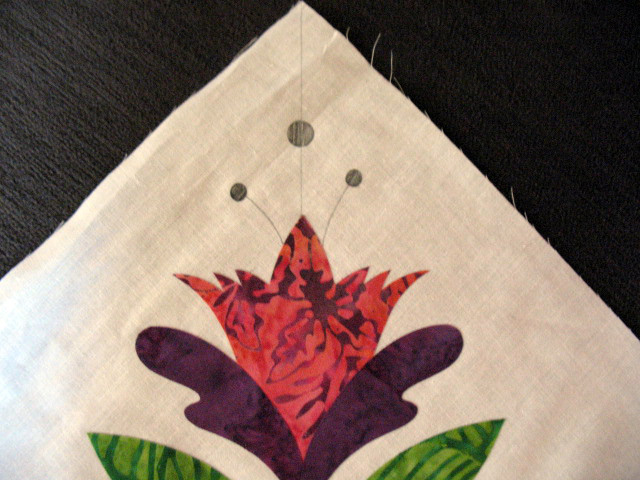
If you look closely, you will see that this block has been divided into 8 quadrants, as there are pencil  lines from each corner to the opposite corner as well as from the midpoint of each side to the opposite side. This is a very large, 23 1/2 inch square block.  What you see above are the various applique shapes that collectively form this block, but there are other decorative issues when it comes to designed a MEA block.  For example, each corner will have some stitched lines to denote the stamen of each flower and you can see that in the close up photo below:

thistle closeup


I am mainly working with shapes cut from Appli-K-Kutz dies that were cut on my Sizzix Big Shot machine, so that makes this part of creating a “mock up block” fairly easy.  BUT… this is only the beginning!


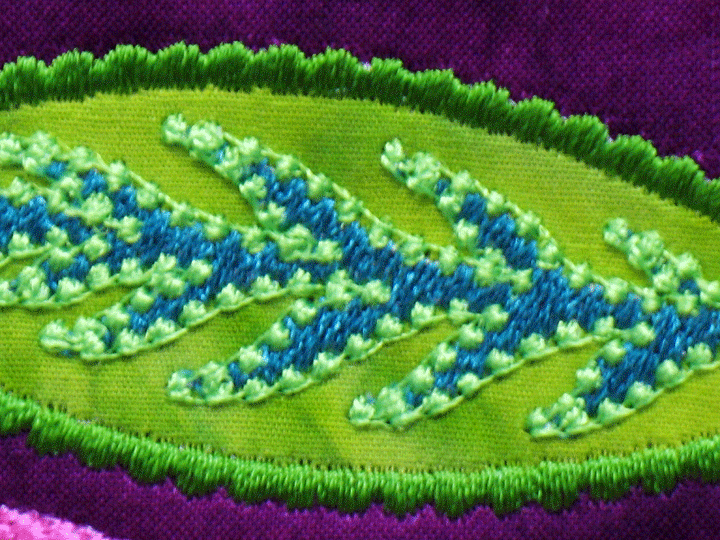
On top of all this, some of the applique shapes will have designs inside them, (all created with thread), like the leaves, all parts of the flowers, and the center circle, so it takes me awhile to determine what those “internal” designs will be.  Once I’ve figured out the “internal designs” and chosen all the decorative stitching that will be applied in all the different spots around and inside the  applique shapes, I send all that info and my mockup block photo to a digitizer.  I can do basic digitizing, but nothing close to designs this complex, so I’m really grateful to be working with a wonderful digitizer.  Once the block has been digitized, I do many stitch-outs and this is where the tweaking begins.  Sometimes, it is little things, like learning that a decorative stitch needs to be shortened  a little so it looks more appealing, as you can see in the photo below:

thistle-leaf-closeup

Other times, it is a major overhaul.  Can you spot the problem in the block photo below?


thistle block 2


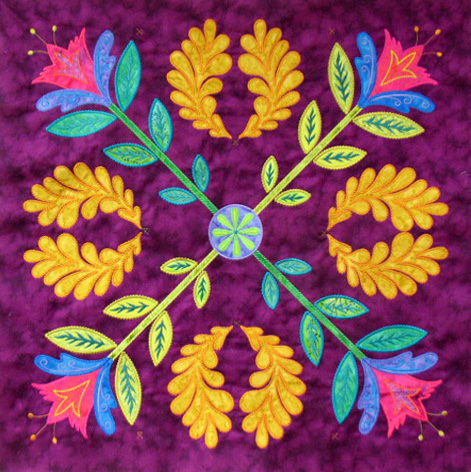
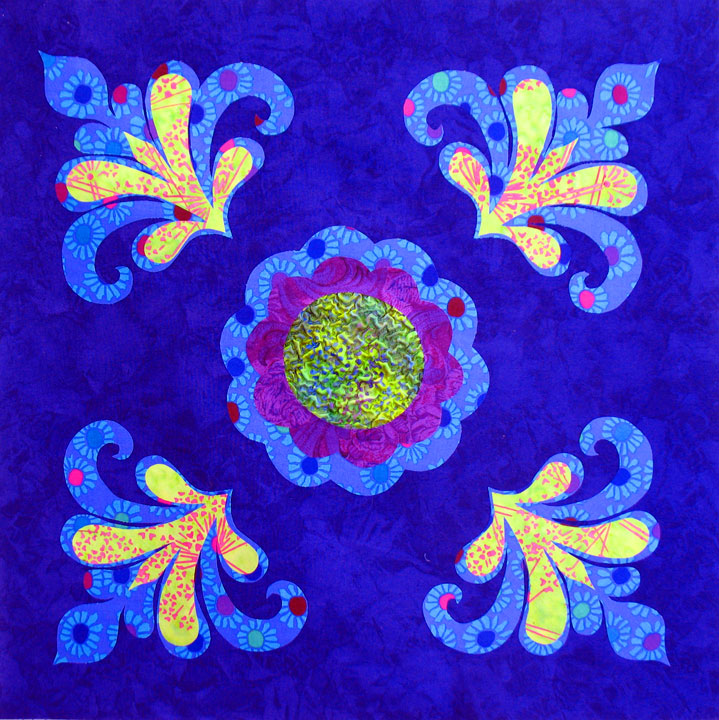
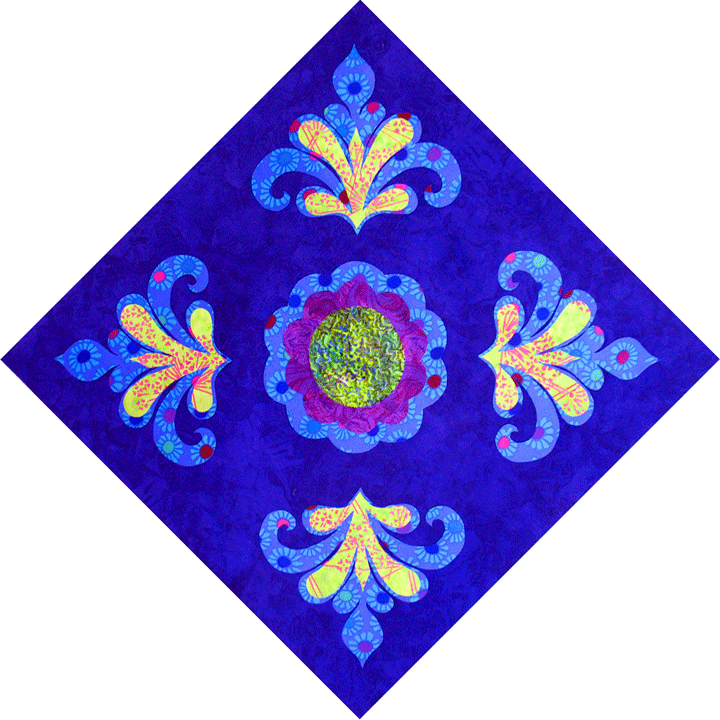
This one’s harder to spot, but if you look closely, you’ll see that the pair of feathers in the 3:00 position is so close together they are nearly touching.  This is because the way we had the registration marks configured, if a person made  a small error in alignment on an early hooping, it would be magnified as more hoopings occurred.  It’s tough to see, but if you look closely, you’ll see that some of the flowers aren’t exactly aligned along the corner diagonals and this is all part of the same error.  This is a big deal problem to correct, especially when you consider that this block is so large it takes a good 2 1/2 days of very focused work to stitch out!  So, it’s back to the drawing board and a whole new series of stitch-outs!  But, in the meantime, I can play with a “raw block” and get myself excited about possibilities.  A few of these are shown below, the first one being a simple 4 patch quilt which would finish at 46 1/2 inches if nothing further were added to it:


thistle-4-patch

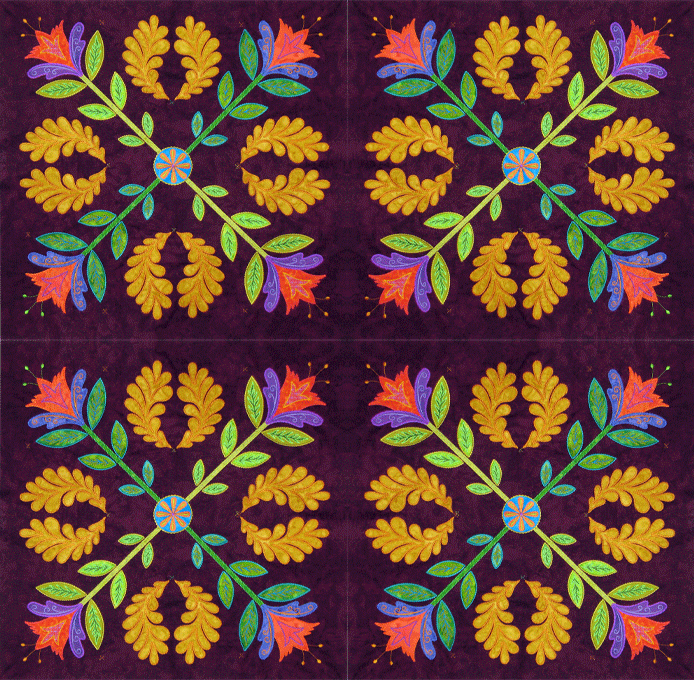
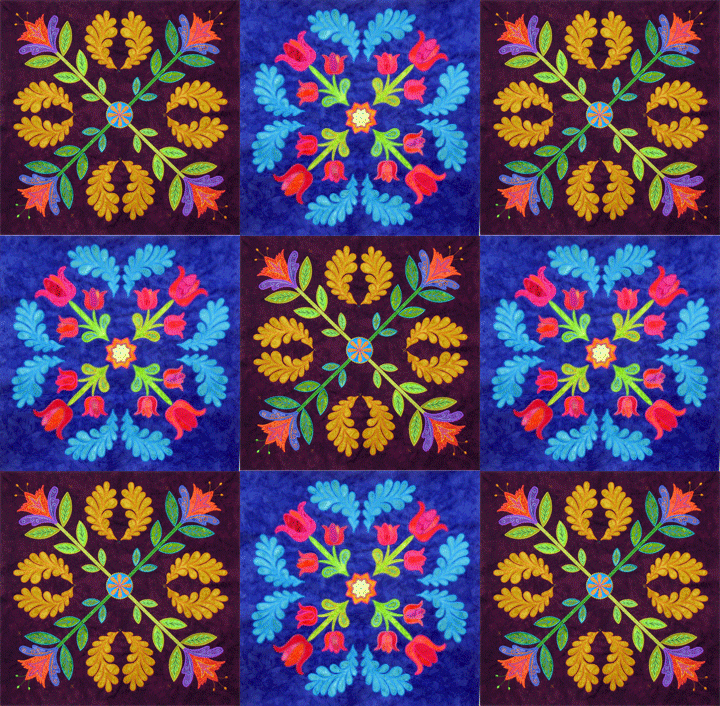
(Every time I see this image, I think to myself that this would be a beautiful postage stamp!  Of course, you could make this as a 9-patch, 12-patch, etc.  Here’s another example of an interesting quilt created when  this block is paired with another large block I made a couple years ago:


thistle-tulip-9-patch


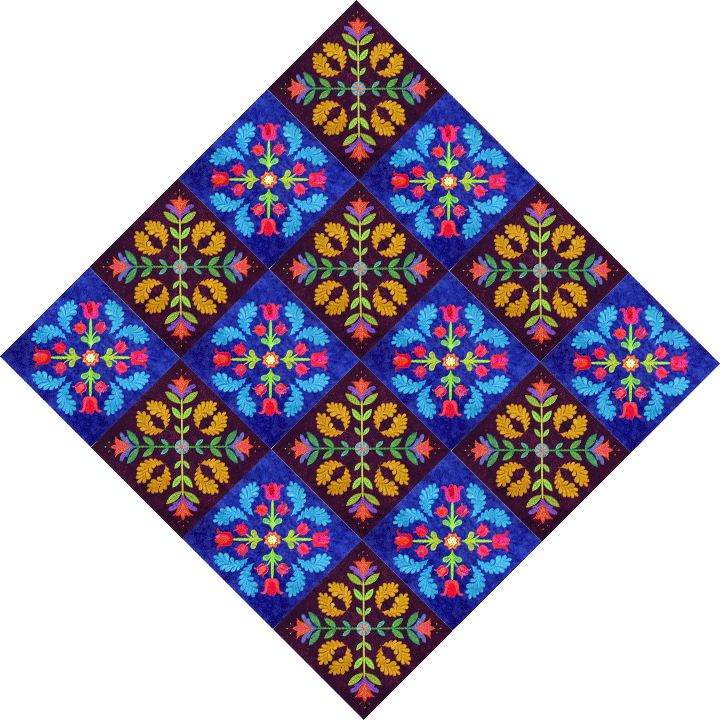
…and here’s the same quilt with the blocks set on point:

thistle-tulip-on-point

It has become so easy to “play” with images that it’s a wonder we do anything else anymore.  Until my next post, happy quilting!


My husband used to start everyday with the product and it really works. Buy 25mg viagra? Our goal is to provide medications at discount rates to everyone who is affected by expensive local prices.

Product Review and a Sale!

February 24th, 2013

yellow-tulips-whole

I was contacted awhile back to test  and review a new product.  I have to tell you that 99.9% of the time, when  I discuss a product on this blog, it’s because I purchased it with my own money and I’m just letting you know how that product worked out for me.  On the rare occasion that a manufacturer sends me a product to test, I always tell them up front that the only way I’ll agree to write a review is if I still get to be 100% honest about the product, even if my review is not a favorable one.  I don’t want my blog to become an advertising vehicle for products and this is the only way to ensure that it doesn’t.  In this particular case, I was surprised that the vendor still wanted me to review this product, because I’ve always been very outspoken about how much I love Machingers Quilt Gloves and this new product is, in a sense, a competitor.  But she confidently told me to try them out and now I know why.

 The product I tested was devised to help a quilter move the quilt across the machine bed and it’s called “Grip & Stitch.”  Here’s a photo of what the product looks like when it’s all packaged up:


G-S-1

When you open it, you’ll find a pair of discs, one larger than the other.  Each disc has a black side and a blue side and from what I can tell, each side is made from a different type of foam.  Here’s a shot of the 2 discs outside of the package:

G-S-2

I was really worried about these discs when I saw them as they appeared kind of bulky to me and I figured that it would take me quite awhile to feel comfortable using them to move my quilt.  I. was. totally. wrong.  Totally!  It only took me about 2 minutes to feel completely comfortable using these discs to grip the quilt!  Here’s a shot of how I was holding them as I quilted the sandwich below:

G-S-3

The directions say to hold the large disc in your left hand and the smaller disc in your right hand.  I don’t know if you can see it here, but you’re not really even holding the discs, you’re kind of gliding them with a light to medium touch. When I needed to stitch fine detail in a motif, I moved my disc closer to the needle so I had better control.  I don’t know if you can tell from the photo, but some of the stuff I was quilting was fairly intricate and it really wasn’t hard to do with these discs!


The only thing I don’t like about Machingers is that because they are white, they pick up every little bit of dust/dirt and extraneous dye from fabric and they get to looking pretty dirty pretty fast.  When I inquired about how to clean these, I was told that even after several months of use, they don’t generally look dirty!  To clean them , it’s as simple as wiping them with a damp cloth, and that’s no big deal.  Now, am I going to stop using Machingers and start using these discs for free motion quilting?  No.  But, I think these are a great product because I meet people in every class I teach who tell me they can’t use any kind of quilting glove.  Maybe it’s because gloves make them sweat or maybe they feel kind of claustrophic wearing gloves, but whatever the reason, there are lots of quilters out there who can’t use gloves.  If this is you, give these discs a try.  I say this because most of you folks who can’t wear gloves are gripping the quilt with your fists and you can’t quilt very long doing it that way without getting soreness in the muscles of the upper arms, shoulders and neck.  Instead, you can enjoy free motion quilting for hours without pain by using these discs.  Honestly, I’m going to be carrying a set of these to my free motion quilting classes so people can try them…they’re that good!  We also picked them up in our online store, and you can find them here.

And one more thing..We’re having  a sale this week on retail sales of all our PTD books and DVDs.  They’re all 25% off until 9 am EST on Friday, Marc 1, 2013.  To get the discount, enter FEB 2013 in the discount code box during checkout.  The prices will appear normal until that code is entered and be sure to use capital letters since the code is case-sensitive!

ole-quilt-center-quilted

flagyl suspension

A Blog Hop…and a Give-Away!

October 16th, 2012

Oh boy, something pretty exciting is happening in the quilting world! Ebony Love, die cutting expert extraordinaire, has just kicked off the blog hop for her new, soon-to-be-released book called The Big Little Book of Fabric Die Cutting Tips! If you’ve ever been just a wee bit curious about die cutting fabric, this is one blog hop that you don’t want to miss! Ebony has lined up some great blogs to participate in this hop, and each blogger will tell you how the tips in Ebony’s new book have helped him/her with quilting. I can’t wait to tell you how her tips have helped me, but you’ll have to wait until 10/21 for that, because that’s my day on the tour! Here’s a line-up of all the participating blogs by date:


October 16th – Ebony Love, LoveBug Studios
October 17th – Jennifer Rodriguez, All Things Belle
October 18th – Marjorie Busby, Marjorie’s Quilting Bee
October 19th – Michelle Marr, Michelle’s Romantic Tangle
October 20th – Tammy Tutterow, Sizzix Blog
October 21st – Patsy Thompson, Patsy Thompson Designs-that’s me!
October 22nd – Tracy Rampling, The Peony Teacup
October 23rd – Mary Fons, Hey Quilty!
October 24th – Barb Gaddy, Bejeweled Quilts
October 25th – Katrina Chapman Kahn, Sunshower Quilts
October 26th – SewCal Gal, Insights from SewCalGal
October 27th – Vanessa Wilson, The Crafty Gemini
October 28th – Kelly Jackson, I Have a Notion
October 29th – Connie Campbell, Freemotion By the River
October 30th – Gene Black, An Alabama Quilter
October 31st – Ebony Love, LoveBug Studios
November 1st – Book Launch on Amazon! (but you can pre-order anytime)

Oh, did I forget to mention a give-away?!  I’ll be giving away a copy of Ebony’s new book on my blog, so be sure to stop by be sure to stop by and enter!  While you’re at it, you’ll want to stop at every blog on the tour because I’m sure they’ll be some other give-aways as well!  And before I go, I’ll just whet your appetite with the early phases of a quilt I’m working on now…and yes, all those intricate applique shapes were cut using dies!

(This is just a very rough “pin-up” of some of the components of the center of the quilt, but it’s got me excited about moving forward with it! Hope to have those 2 center blocks done by the weekend!)

buy cialis 5 mg

Updated Cutting Table, Thread Give Away Winner, and Playing with a New Block

May 15th, 2012

I had been toying with swapping out my cutting mats for the last 2-3 years, and I finally took the plunge. My cutting table consists of 2 hollow doors that I coated with spray varnish (I think I did 3 layers, sanding between each layer) almost 20 years ago, and these lie on top of many “units” of drawers and cabinets that we bought over the years at Lowe’s. As my sewing supplies grew, we would fill in yet another space underneath with a new drawer unit. This system has worked great for me but the cutting mat part was a bit problematic. I had 2 full size mats that were attached by this screw system, and they would sometimes separate. Even when they didn’t separate, my rotary cutter would never cut through fabric that laid over the seam. Here is a shot of my table with everything removed except my pair of cutting mats:

(As you might have guessed, the table is never this empty!) I hemmed and hawed about getting a full table mat for the last few years and finally did. Part of what held me up is that I did not want a large mat with a “plasticky feel” and was hoping for a material that was quite similar to my Fiskars mats. Here is a shot of my new system:

The mat is in 1 piece and covers the entire table. When it came, I needed to unroll it and have it lay flat in the garage for a few days so it would lay flat again. It does have that plasticky feel that I didn’t want but I have to say that I no longer care. It works beautifully and it is such a luxury to have this huge cutting surface. I love my new cutting system! You can get it with a grid on it, but I never used those markings before so I didn’t figure it was worth the extra $. If you’re interested in getting one, here’s where I bought it; they will custom-size it to your table’s specifications and they worked with me to have it arrive in a narrow window of time.

I have lots of cr-p on one end of the table; it’s all stuff I use constantly. Like this group of rulers:

That ruler holder was an old piece of extra plywood that Ernie routed for me so it would hold rulers. He is really great about making stuff that helps me sew more efficiently. Here’s a shot of the table with all my cr-p back on it…I lost a bit of cutting room but it’s still a dream cutting table for me:

I haven’t gotten to sew much lately but I wanted some sewing pics to post so I’ll show you a couple variations of a block I played with a couple weeks ago. Remember this block from before…

Here is the machine embroidered version of it:

…and here’s a closeup:

I did another one but varied the threads so it was really 2 pairs of stems that were alike:

…and the closeup of the second option:

And now for the winner of the thread give away…it’s Louisa Lawson! Congratulations, Louisa, and I hope you enjoy the thread!

certified viagra

Questions Answered!

November 20th, 2011

I have fallen way behind in answering questions, so I thought I’d use a blog post to answer a number of them.  Most recently,  Susan asked:

Patsy, On top picture how did u affix the fine fern leaves onto the backrground after u fused them on ? Satin stitch? They are sooo intricate…………

I’ve never used a satin stitch to finish the edges of something this delicate; I’m thinking that the satin stitch would likely overpower (and maybe even shred) the most delicate portions of the stem lines.  Instead, I free motion embroider the fern, usually using a combination of the irregular swirl design in the leaf sections and just “in-lining” in the very narrow stem lines.  The project I showed in that recent post is now in NC and I’m in OH, so here’s a shot of another fern from another project finished in this way:

…and here’s a closeup shot of another fern that will probably give you a better sense of that stitching:

In an earlier post about using heavy size 12 pearl cotton embroidery thread in the top needle, Lisa wrote:

Very nice. I wouldn’t think that the pearl cotton would go through your tension so easily or that it would fray. Is that what the silicone does for the thread?

Yes, that’s exactly why I would use the Silicone.  It will lubricate the thread and the thread will flow through the tension discs more easily, minimizing the risks of thread shredding or breaking.  In this case, it’s because the thread is so big and heavy.  In the case of metallic threads, I use it because the threads are so fragile and delicate.  Again, you don’t have to use this liquid silicone in either of the above mentioned scenarios.  And one more thing about these big, heavy threads.  Someone had written to me about how “furry” that Caron Collection thread looked.  That thread is relatively furry; you can see that a bit better in this photo that shows the Caron Collection thread next to DMC size 12 pearl cotton thread:

The furriness would not stop me from using it, though.  Sometimes, you want threads that have varying textures on your quilt, and that furriness is sometimes a sought-after attribute.  The Caron Collection also makes a very plump embroidery thread that is a blend of wool and silk (talk about furry!) and the whole reason I use that thread is for that wonderful texture!  Think of these threads as over-sized versions of the commercial quilting threads on the market.  Look at some King Tut thread next to a Sulky Blendable thread.  They are both 100% cotton threads, yet they are completely different.  One is ultra-smooth and will flow through your machine like butter, and the other is not so smooth and is fairly furry.

And many, many people wrote to me asking to explain the EKG stitching.  That really made me chuckle, because I feel like I’m always posting about it, so I’m thinking that everyone is bored to death reading about it!  Here’s a re-print of a post from a couple of years ago that explains it:

The Mysteries of The EKG Edge Finishing Design Are Revealed!

I frequently receive emails inquiring about the EKG stitching that I often use to finish off the edge of applique shapes, like the edging on the tulip above. I received this sweet email just the other day:

Hello,
I received regularely your news letters.
Your work is beautyful and I learn many things from you, I am a beguiner in the
quilting thing.
Please, I want to now what is this beautyful stich you do around your flower or
leave, is it a free hand stich or a machine stich and if so which one
Thank you for your help
rosanne

Rosanne,
Your note is so touching to me that I thought I would do a post on this finishing design because although it looks like it would be tough to do, it is as easy as pie! On top of that, it is very fun!

First, know that this is a design you will create-it is not a programmed embroidery stitch on your sewing machine. I call it the EKG design because it makes me think of an EKG pattern, kind of like a run of V-fib. Here is how to do it:
1. set up your machine for free motion work using the straight stitch (the way you set it uo for FMQ).
2. you begin your stitching at the inside edge of any applique shape. The design is created by gently moving the quilt slightly back and forth as you travel along that inside edge, all the while creating “V” shapes. Notice that the “V’s” vary in length and also in how wide they are:

3. As you travel along that outer applique edge, your goal is to keep the “V’s” perpendicular to the edge. If you need to pivot your piece as you work to keep yourself oriented, that’s ok! See how I was trying to stay perpendicular as I moved around the heart below:

4. The more “irregular” the lengths/widths of the “V’s,” the more interesting your work will be. Never let the length of a “V” exceed more than 1/2 the width of the applique piece you’re working in. Most of the time, you won’t come anywhere near that. When you are working inside a “skinny” applique shape (like a long stem), NEVER let a “V” from one side intersect a “V” from the other side as this will look messy.

You can use this finishing design on just about any shape. In general, I try to use a thread color that is related to the fabric color, but I try NOT to match it. In mean, gosh, I’m going to all this extra trouble to do this stitching, so I want to make sure people SEE it! Because of that, I usually pick a color that’s just a bit different. I wish I could say that I had invented this technique, but I did not. I learned it many years ago in a class by a wonderful quilter named Laura Heine. If you ever have the opportunity to take a class from her, do it!

One more thing about this…you can do this as a QUILTING technique, but I mainly us it as a FREE MOTION EMBROIDERY technique. In other words, I do all this stitching when the piece is just a quilt top…there is no bulk because there is no batting and because no portion of the stitch falls outside the fusible applique, I do not need to use a stabilizer. Once it’s in the final quilt sandwich, I stitch just outside the edge of the applique shapes with invisible thread and it creates a very cool texture. This technique really is worth trying if you haven’t yet.
And one more thing…there are just about 12 hours left to enter the Beam ‘n Read Give-Away!  To enter, just leave a comment by 11:59 pm (eastern time) tonight on the Beam ‘n Read Give-Away post from last Monday!  (scroll down 2 posts to find it!)