Wow…when it rains, it pours! I got a nice email today from Debbie Wassenaar of thequiltjournal.com blog and she has been using yet another ruler foot on her Babylock Ellisimo! She is using an open toe ruler foot but the opening is on the left side. I’m going to assume that this foot was designed for use on a frame system (hence the odd positioning of the opening on the foot) but it will still work for the sit-down quilter. Again, we are all out there in the same boat, searching for ruler foot options until our sewing machine manufacturers catch up with us, so this is another option if you are still in search of a foot. You can find her blog post about the foot (with a photo so you can see it) by clicking here and you can purchase the same foot on ebay. Thanks for passing along this info, Debbie! (You should probably bookmark her blog url since she’s posting some great info about free motion quilting!)
Filed under
Site Updates.
Comments Off on Another Ruler Foot Option for the Babylock Ellisimo and the Brother Quattro
One of the most important things about ruler work is having access to a reliable and safe ruler foot. Unfortunately, most home sewing machine manufacturers are behind on this, so most home sewers don’t have access yet to a ruler foot. Thanks to Amy Johnson of Amy’s Free Motion Quilting Adventures Blog, we’re learning about some ruler foot options that would not have otherwise occurred to us. I’ve now experimented with the Janome Convertible Foot and the ruler toe attachment on 5 models of Pfaff sewing machines as well as the Babylock Ellisimo and the Brother Quattro and had fabulous results! These 2 Janome parts may also work on your machine so we made a video that will show you each step I performed to use these parts on the aforementioned machines.
All of the aforementioned machines are low shank machines and I ordered the following 2 parts from Allbrands.com:
1. Janome Convertible Foot for Low Shank machines:
(Remember, determine if your machine is low shank vs high shank before you order anything!) Now here’s the video that shows every single thing I did for all these machines:
I thought of this border design about 8 months ago and have been intending to stitch it out but everything else kept taking priority. I finally made the time to stitch it out 1 week ago and I love how it came out:This is basically a series of short straight feathers on a tiny swag stalk. I think it looks like I traced this from a stencil but I didn’t. Instead, I made a series of markings that would give me clear boundaries for each “plume unit” and that’s why they appear fairly symmetric. I started by drawing this onto a piece of scrap paper that would allow me to work on a border of this width:If you look at the far left side of the drawing, you can see that I also used this to test whether they’d look more symmetric if I stitched them as free-form feathers w/a short straight spine vs stitched them as bump back feathers. No question about it…they look far more symmetric using the bump back method. (Google “how to stitch bump back feathers” if you don’t know how. It will help you to learn as many ways to stitch feathers as you can.) At the bottom right corner I placed notes about the boundaries I penciled in so I could do this again on another quilt if I liked the look. These kinds of notes/drawings are worth keeping for the future. Anyways, what I’m trying to show you is that the easiest way to design a new border design is to work it out on paper first, and this will let you figure out what proportions will work within the confines of the particular border space you are filling. So, here’s how I marked my border:It’s not super easy to see, but I drew a light soap line every 2 3/8 inches across the border; this marked the boundary line between each plume unit. I also marked a soap line 3/8 inch above the bottom edge of the border; this told me how high to stitch my plume “stalks.” Next, I marked a soap line across the upper part of the border that was 2 1/2 inches above the bottom edge of the border; this was the highest part of the center plume. (This is an outside border so I needed to keep my stitching out of the area that would ultimately become my binding zone. Lastly, I drew a tiny mark at the base of the midpoint of each plume “space” as this would assure me of centering each plume unit within its space. I did the stitching in 2 waves. In the fist wave, I simply stitched a wave of stalks:In the second wave, I stitched a second line of stalk and then stitched the center plume and added the remaining plumes. Once done with a plume unit, I stitched another stalk line to get me to the next area:Because I had all those boundaries marked, it was very fast to actually stitch out. I needed to get in the car for a 10 hr drive (which turned into nearly a 12 hr drive because of ending up in an unexpected ice storm), and I wanted this DONE before I left. Because of that, I kind of wimped out on my 4 cornerstone blocks and just did a simple straight feather in each of those:…but I’m still ok with how the corners came out. I did it in 2 waves because my original plan was to hyperquilt the border but I decided this wasn’t the right quit for that. I’ll probably give that a go the next time I use this border design. I really like how this wall hanging came out. It’s one block of the Floral Serenade machine embroidery applique design (you can find that by clicking right here) that just has 2 simple borders surrounding it. Here are some other shots of it as I was quilting it:I’m taking my time finishing the binding…I guess I’m not ready to “say good bye” to this quilt!
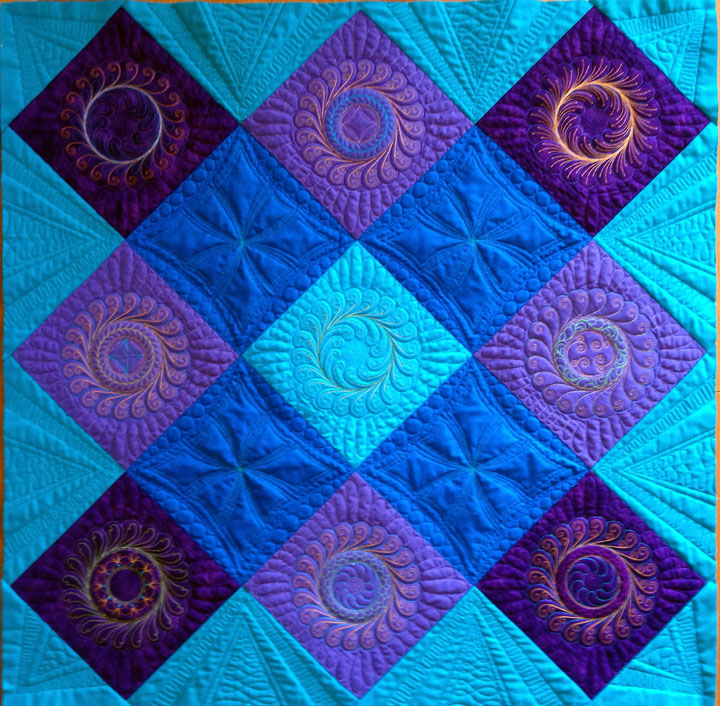
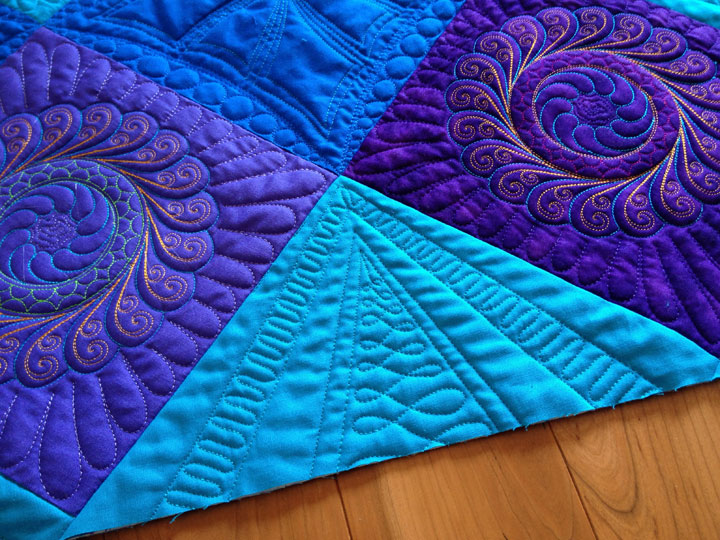
I decided I was getting too carried away with curves so I decided to play around with designs that were more focused on straight lines and angles. Unfortunately, when I updated my phone, I lost a lot of my recent photos, so I’m without any photos for the earlier parts of this design. I started again with a feathered wreath in the center of the block, then added markings for a temporary circle around it. I used one template to create the more “plunging” scallops and then went back in with another template to stitch the scallops with a very subtle plunge. I wish I could tell you which templates I used but the only documentation I had was in my photos!Next, I created a series of triangles that sprang from the circle where each scallop began/ended. I had to make the triangles in 2 sizes because it wasn’t possible to fit them all inside the block if they were all the same size. Once that was done, I added an inside line to each of the triangles. I can’t stress how important it is to have 2 lines of stitching. I say that because creating a channel between them adds a new level of interest/complexity to the design. Here’s a photo of what things looked like at this point:Now all the basic “framework” or skeleton of the design was complete. I think of this as “the bones” of the design and nothing can really happen until this framework has been laid out. What’s left at this point is lots of fun fill-in work! First up, I stitched turquoise feathers inside the larger triangles. This was easy because I used my center lines as my spine guidelines:Then I stitched feathers inside the smaller triangles using a slightly different color of thread but it’s hard to tell that:…and then I added a row of pearls inside the scallops and hyperquilted the feathers. That little bit of stitching made the whole block a lot more interesting:Here’s a side view:I stitched the “inchworm” design just outside the wreath and inside the scallops. This added a new zone of color and also made the trapunto stand out more:And then I finally got to stitch some fill in quilting all around the outside. I kind of melded a few different FMQ designs into a background fill design that came out like this:I added some Swarovski crystals to it (very sparingly) and then whipped it up into a tote bag:In real life, the crystals are very sparkly and show up well but they are hardly seen in my still photos. If you’ve never added crystals to a quilt, it’s very easy, fast, and fun and we made a quickie video to show how to do it: