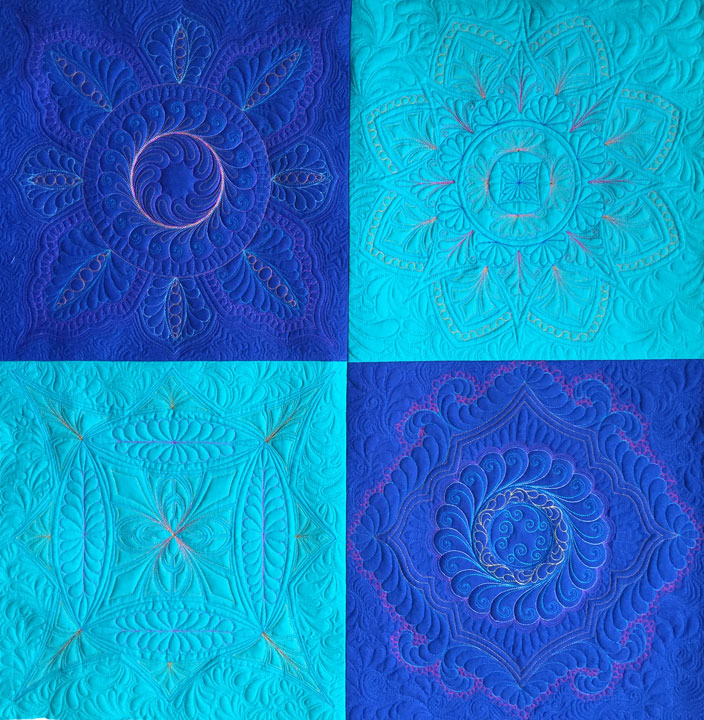
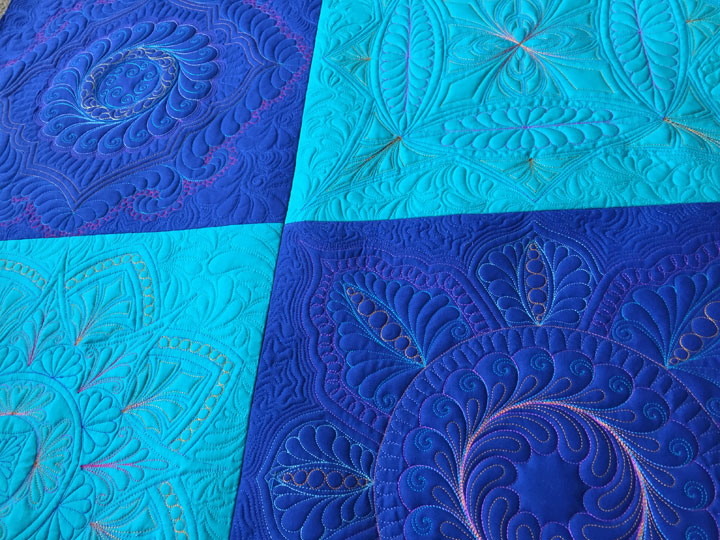
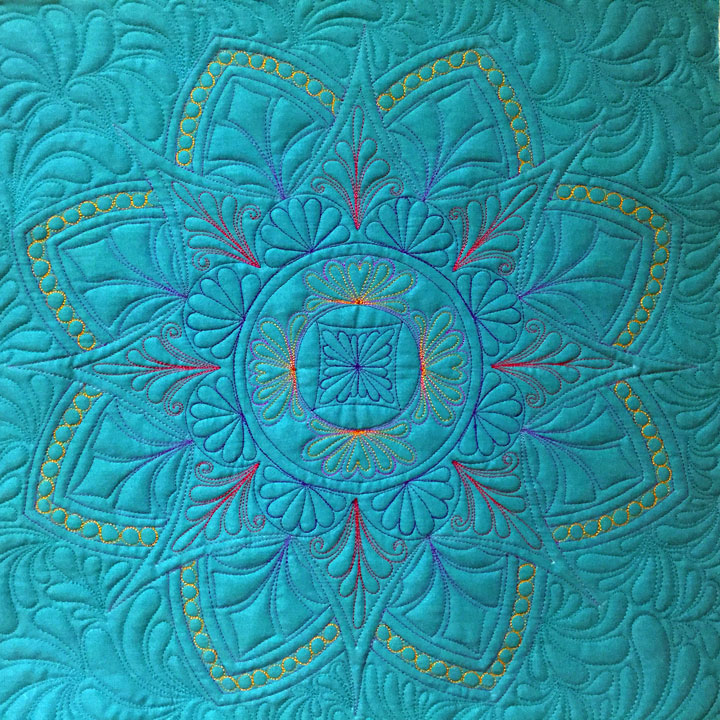
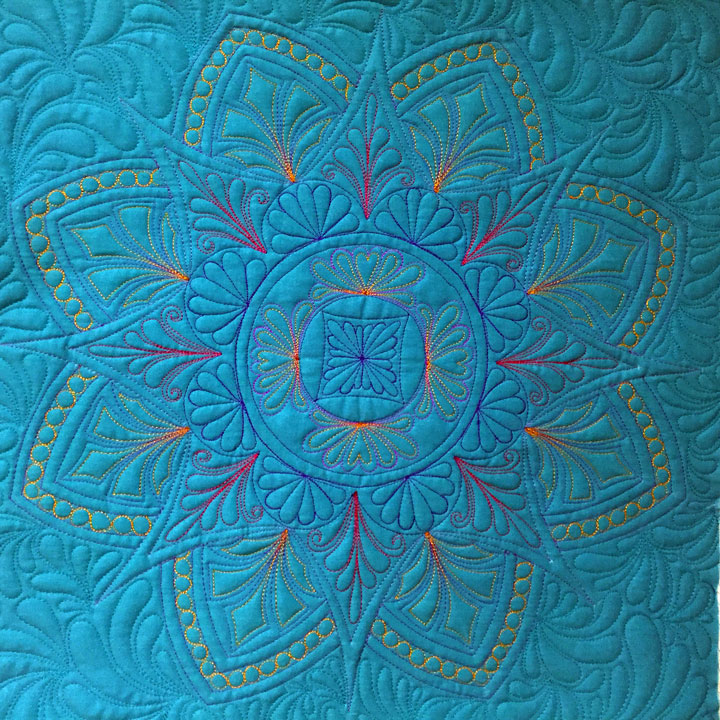
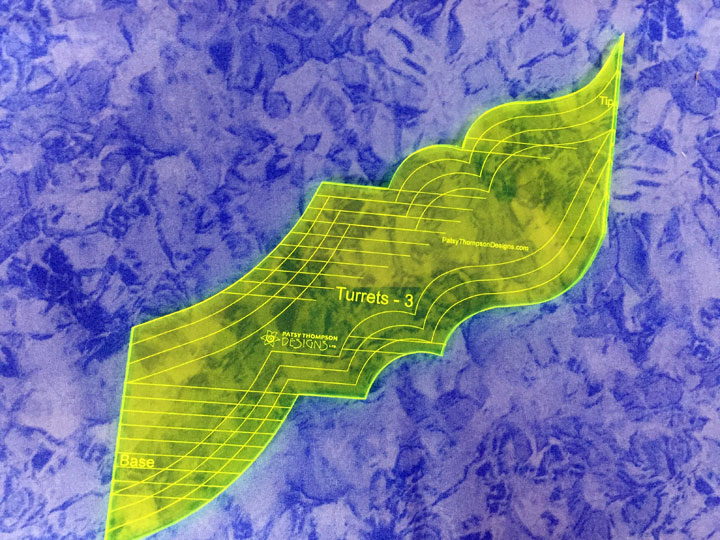
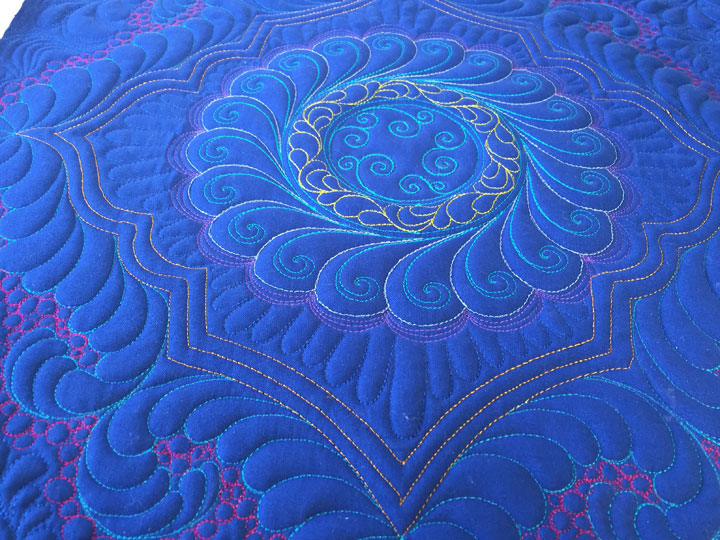
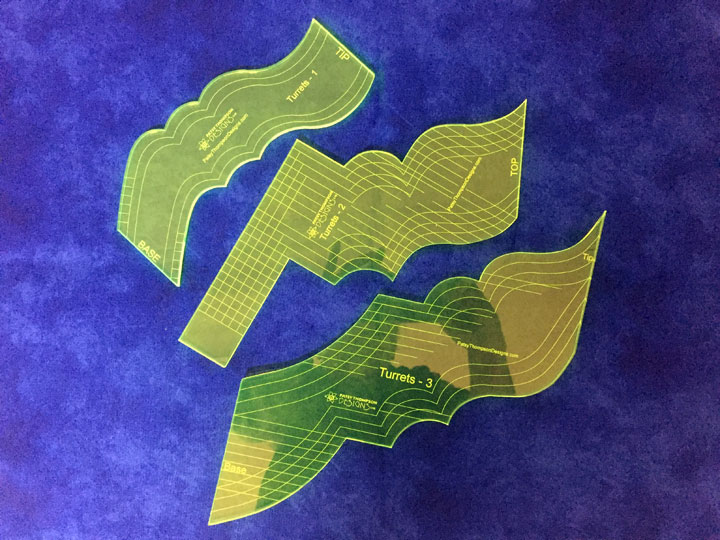
Our 3 Turret Rulers are now in stock and available for purchase! As you look at those 3 rulers above, aren’t you kind of wondering what the heck they’re used for?! They were inspired by the architectural lines of turrets, Turkish mosques, and Russian onion towers. They can be used to create beautiful turret swag designs for borders and for fancy frame designs. Swags can be simple types of designs or complex types of swags and you can fill them in with all kinds of free motion designs. Here’s an example of just 1 of the turret swag designs you can make with the Turrets 1 ruler:You might just recognize this filled turret swag border from a quilt I blogged about a few months ago. These turret swags were filled with mirror image feathers:…and here’s another example of how you might want to fill that swag design:…and if you really wanted to take that swag design over the top, here’s another idea:Whoa!! Here’s just one example of a Turrets 2 swag border design in the bottom row with an empty Turrets 1 swag design on top:…and here’s the same border design once the upper swags have also been filled:Here’s an empty Turrets 3 swag:…and here’s an example of a Turrets 3 swag filled in:You could just as easily fill in any turret swag with a background fill design instead:Don’t misunderstand, you can also create very simple swag designs with these Turret rulers as well. Here’s an empty one that’s very simple:…and here’s a simple one filled with a featherette:Honestly, there is no end to all the fun things you can create with these Turret rulers! Each ruler has both a positive and a negative side of the same contour, so you can work from both sides of the ruler. They are available in both the traditional 1/4 inch thickness as well as in a 3mm thickness if you are using a Westalee low or medium shank ruler foot. (And notice that the thinner rulers are markedly discounted!) You can purchase them individually or as a bundle (by clicking here) to save some $$! And if you’d like to see how easy they are to use, here’s a video tutorial that explains them all: And don’t forget, you can also use them to create fancy frame designs as well! Here’s an empty frame created with the Turrets 3 ruler: …and here it is filledIf you haven’t tried playing with rulers yet, now’s the time to get in on the fun!
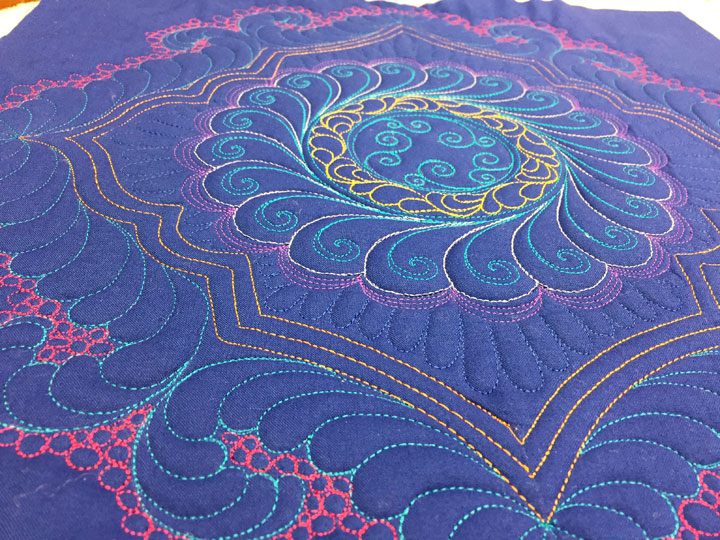
Playing around on quilt sandwiches has always been my best way to learn new designs and new free motion skills, so when I set out to learn some new ruler work skills, I put together many sandwiches that ranged in size from 18 inches square to 24 inches square. I have now amassed a fair number of them and one can only have so many tote bags and pillows, so I figured I’d make a couple small quilts with them. I did not set out to make a quilt-as-you-go quilt and I have to say that this is not how I would choose to work, but I’ve got to do something with all these darn squares!From another perspective:This most recent block I finished last weekend was the one I played around with a couple weeks ago but didn’t have time to finish. This next shot is the full block once it was completed except for the hyperquilting in that final section:Here’s a shot of the totally completed design after that final hyperquilting was added:I described how I made the center section earlier and you can see the first post where I described how I made it by clicking here. This is a shot of where we left off last time: I used one of my Quilters Groove Arc rulers to create another layer of framework outside the “star” above:…and here you can see that I’m starting to fill in the arcs as the pearls are in:This last shot is a tangential one and I love how it shows of the texture of the quilting:All I can say is Thank God someone invented thread! Can you imagine how drab life could be without it?!
No time to write much of anything today, but thought I’d share a few pics from playtime. This is pretty early on:…a bit farther:and done: A combination of ruler work using regular arc rulers and some freehand free motion quilting. Working 30-60 minutes of this into my day always makes me smile! What’s bringing a smile to your face these days?
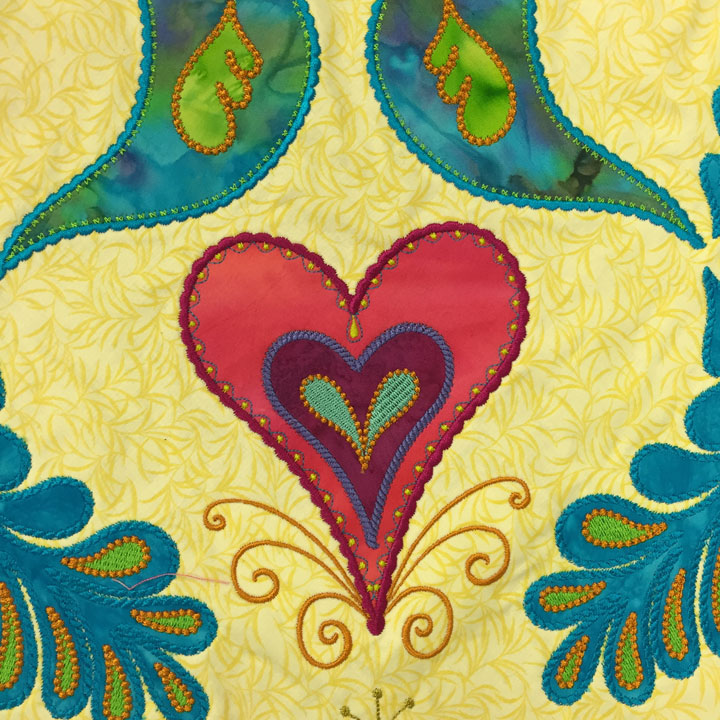
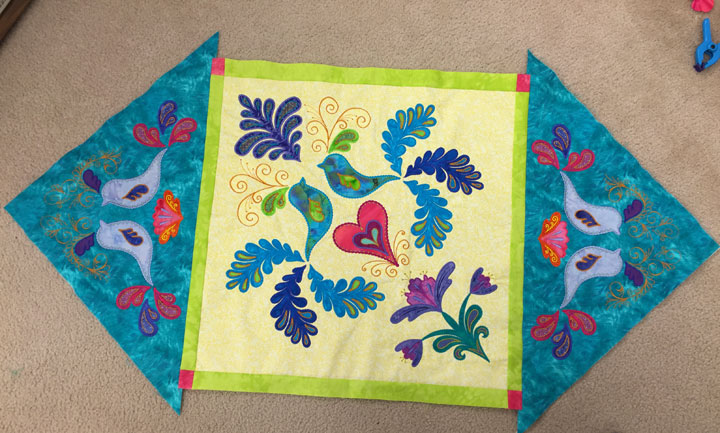
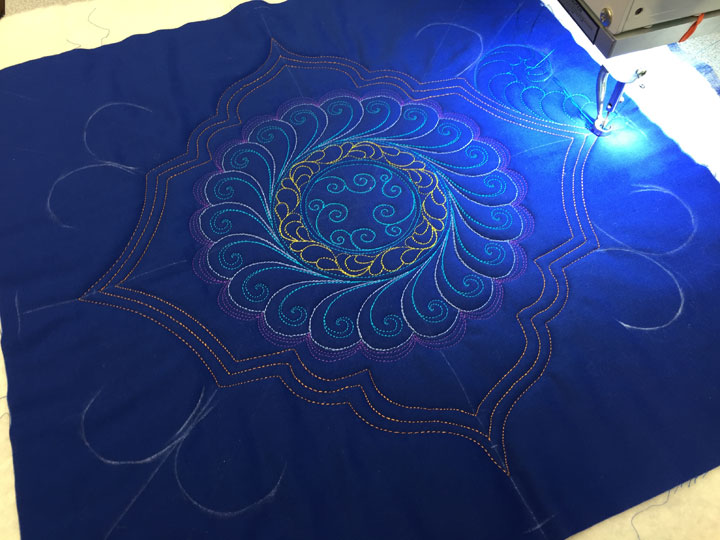
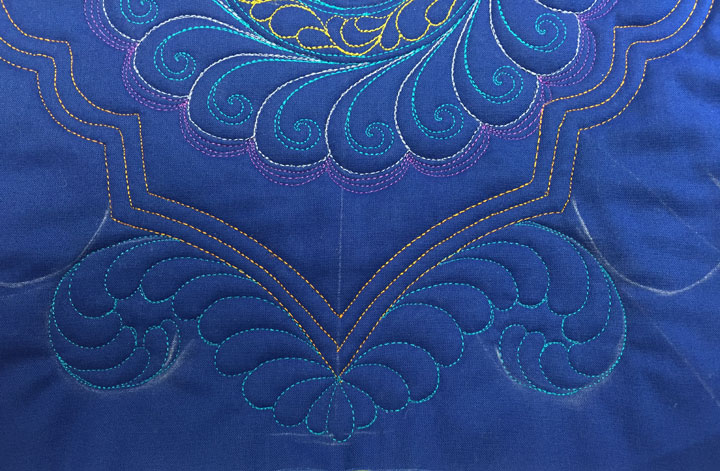
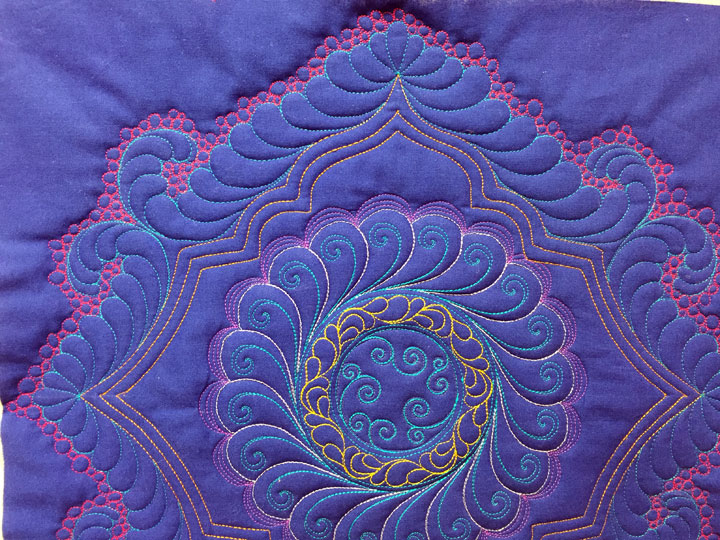
Remember this block? It’s been sitting around for several months now. It is one of my test stitch-out blocks when I was developing the center block for my Birds of Paradise quilt below:Here is a closeup of that heart area:
(Oops! I just noticed there is an errant thread in there…oh well!)
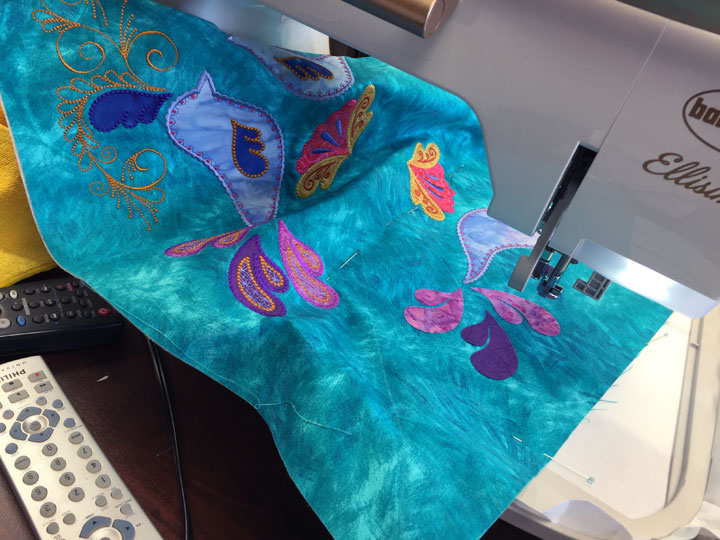
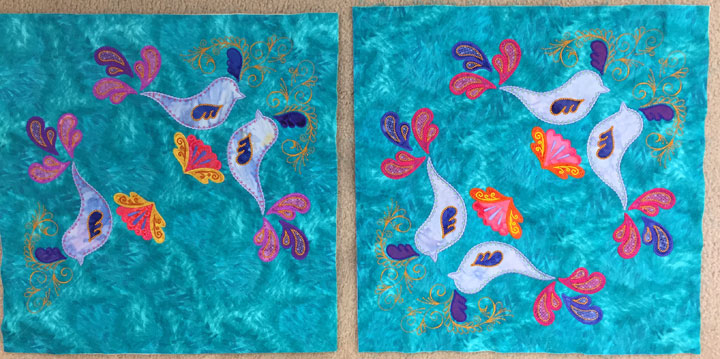
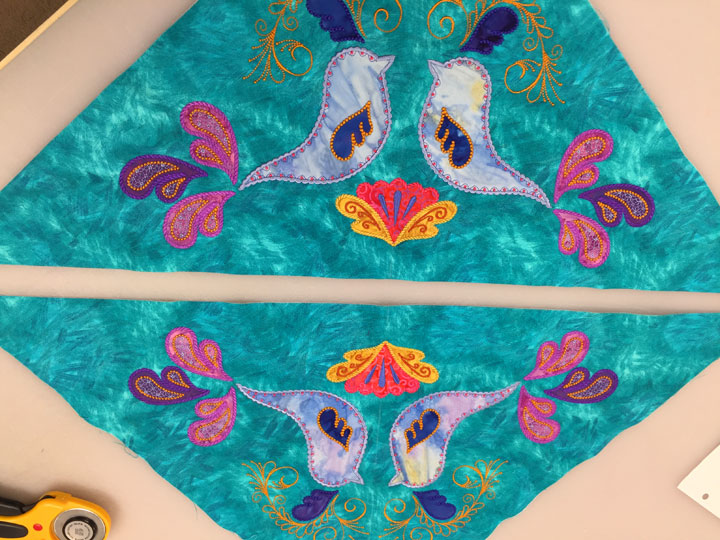
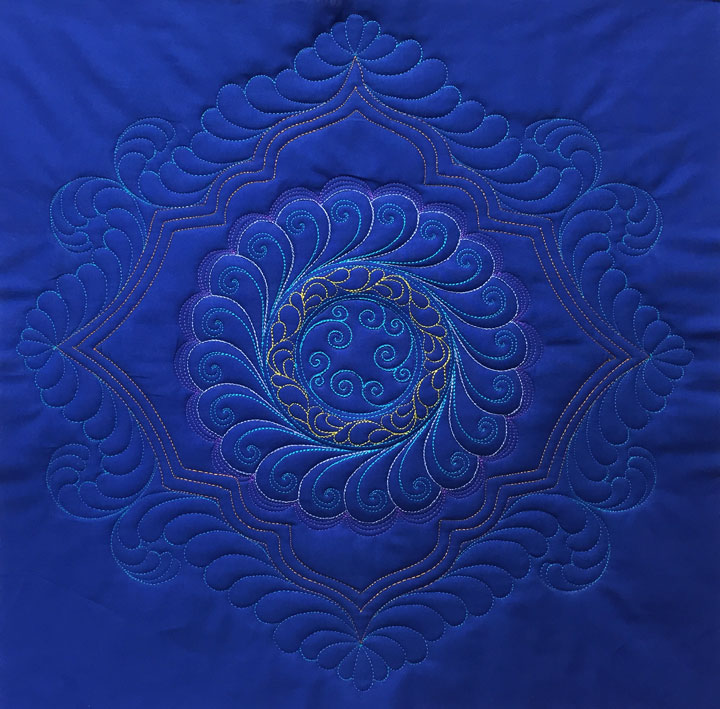
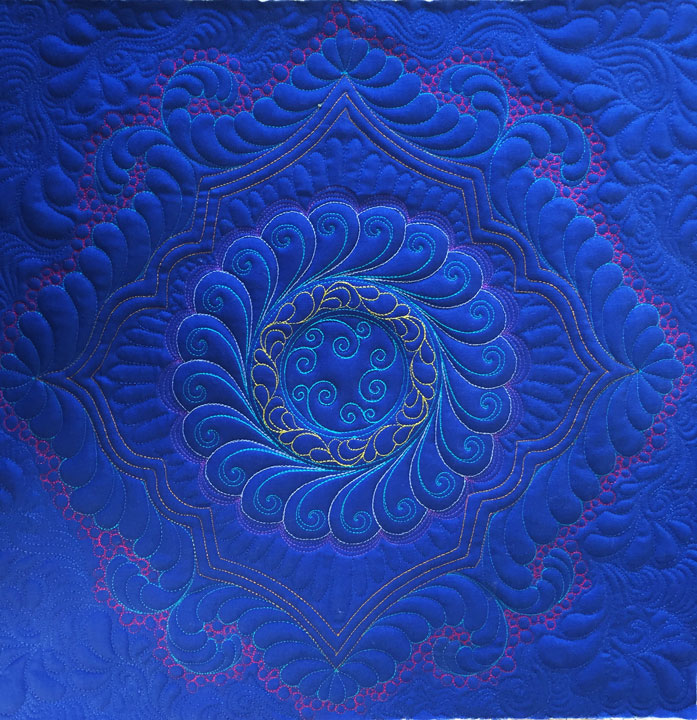
This center block measures 22 inches square and it takes a good 2 1/2 days of focused work to get through all of the hoopings required to make it. Because of that, I had to make something out of this test block! I actually had begun working on one of the corner setting triangle blocks for this many months ago, so I set to finish that one up,and then I had to make a 2nd one since each of these square blocks makes only 2 corner setting triangles. Here’s a shot of the 2nd block as it’s still being created on my embroidery machine. It is on the 4th hooping of 5 hoopings and if you compare the bird’s tail feathers by the needle to the other ones, you can really appreciate how much interest the embroidery adds to the applique scene:Here’s where I was at the end of this hooping: Once completed, each of these blocks is sliced in half on the diagonal:I sewed one set of triangles to opposite sides of the center block:And here’s the state of this small quilt at this point:I believe I’m going to be adding 2 more borders to this quilt, but it will sit untouched for the next couple of weeks. That will give me some time to think through whether my next plan makes sense or not. In the meantime, I have about 6 other projects that are actively being attacked…
I’ve done previous blog posts about creating fancy frame designs but this one is a bit different. In this case, I created a curvy/wurvy frame using ruler work, and then I embellished it heavily with plumes. My photos did not come out so great, but they are all that I have to illustrate the process, so we’re going to need to make do. This is the final piece:To make a fancy frame for the feathered wreath, I started with the Turrets 3 ruler. I’ll be blogging more about turret rulers, but they are basically a family of rulers that were designed primarily to create really beautiful swag border types of designs, but they also work great for creating fancy frames. Here is a shot of what the Turrets 3 ruler that I used for this design looks like:(I’m hoping to have these available in the store in the next week or so, but we’ve gotten kind of distracted by some family emergencies, so we’ll see.) The left and right sides of the ruler are essentially “positive” and “negative” cutouts of the same shape. The ruler has etched lines so you can create a series of channels and there are other series of lines that allow you to accurately “keep your place” when you move the ruler to stitch the opposite side of the swag or frame. Anyway, this next photo shows the most basic “bones” of the frame stitched around the wreath:Not really much to write home about yet, is there? (Notice also that I have my famous soap lines dividing up the block. I pretty much always have all of them there, even though I may not use all of them. It just helps me keep my options option.) Next up is the frame once I’ve stitched an echo line to create the first channel:Now she’s starting to look a bit more interesting, and THAT is the power of channels! Remember my mantra, more channels=more intricacy=more interesting! Anyway, in this next shot, I’ve stitched another channel and begun to add some plumes around it. This is where my challenge came. This frame is symmetric from top to bottom as well as from 1 side to the other, but it is not 100% symmetric in all 4 quadrants. I needed to find a way to add my plumes in a flowing design that would maintain my “half-symmetry” state! As you look at the next shot, notice the new curved soap lines that flow in mirror image pairs from the frame. Creating curves like this, that can be followed as the plumes are added, is the secret here:…and here is a closeup shot of the base frame once the plumes have been added to each side:(You can see that I didn’t do a very good job of stitching those plumes as mirror images of one another from one side to the other, yet this will still come out looking pretty cool by the end!) And here is the frame once all plumes have been added:I felt like I needed to accentuate the edges of the frame so I added pebbles around the edge in a highly contrasting color: …and in the end, I added the fingertips design to fill the center zone by the wreath, and then added some doodly-quilting for the very outside:I’m linking up to Amy Johnson’s “Ruler Work Rocks Link-Up,” so get over there and link up your own post as well!!


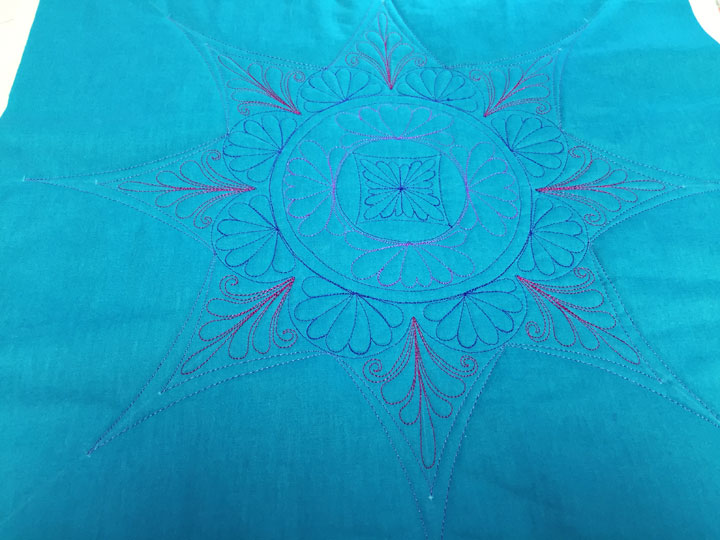
 Our 3 Turret Rulers are now in stock and available for purchase! As you look at those 3 rulers above, aren’t you kind of wondering what the heck they’re used for?! They were inspired by the architectural lines of turrets, Turkish mosques, and Russian onion towers. They can be used to create beautiful turret swag designs for borders and for fancy frame designs. Swags can be simple types of designs or complex types of swags and you can fill them in with all kinds of free motion designs. Here’s an example of just 1 of the turret swag designs you can make with the Turrets 1 ruler:
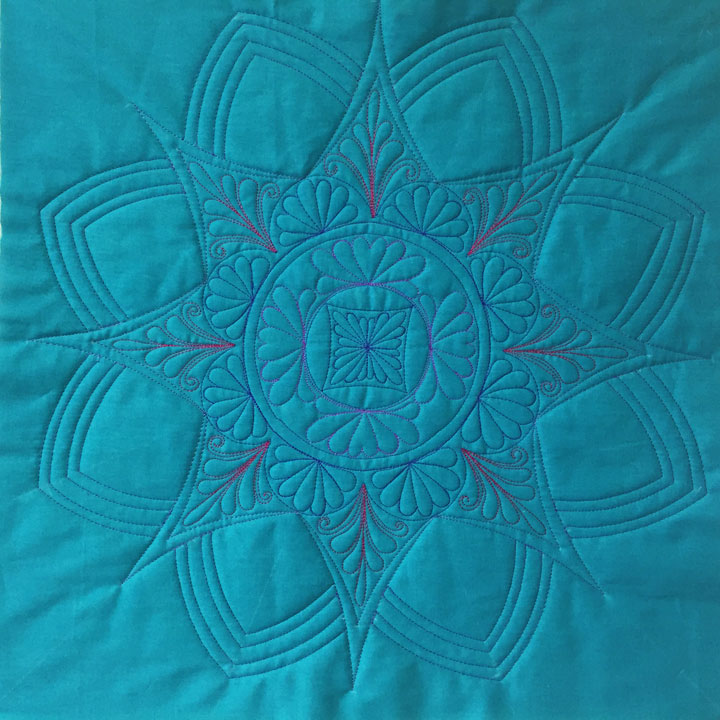
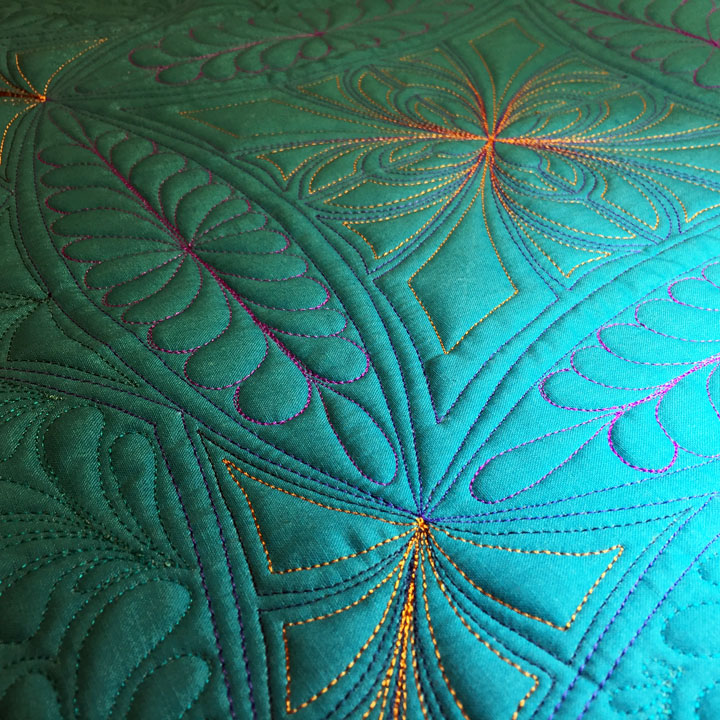
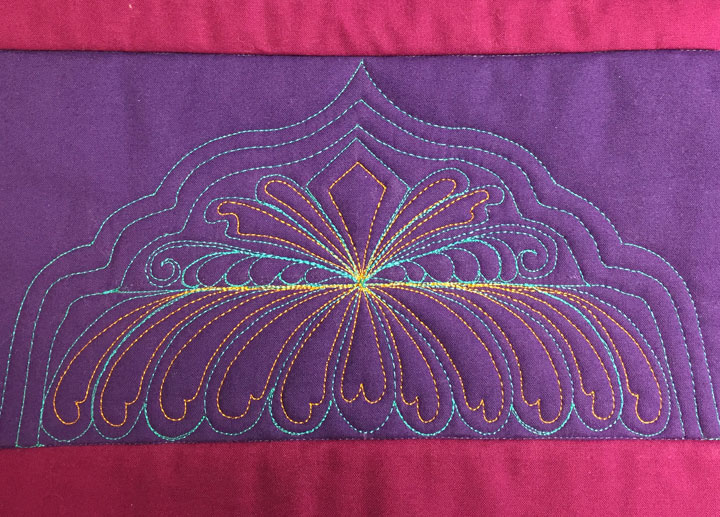
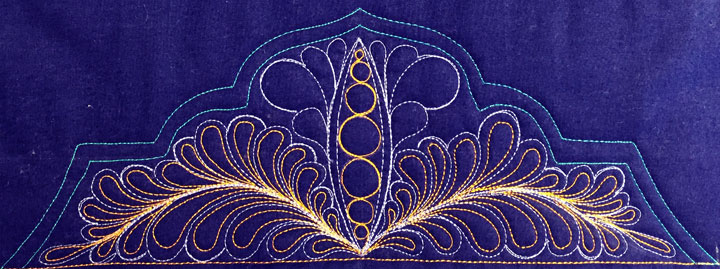
 You might just recognize this filled turret swag border from a quilt I blogged about a few months ago. These turret swags were filled with mirror image feathers:
 …and here’s another example of how you might want to fill that swag design:
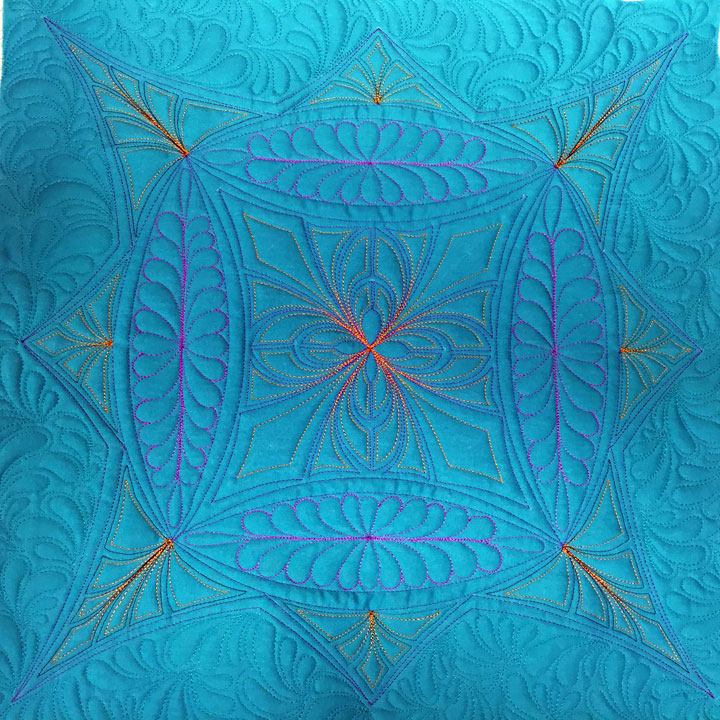
 …and if you really wanted to take that swag design over the top, here’s another idea:
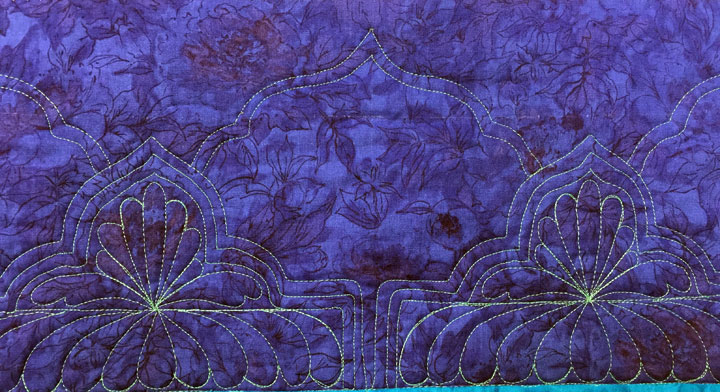
 Whoa!! Here’s just one example of a Turrets 2 swag border design in the bottom row with an empty Turrets 1 swag design on top:
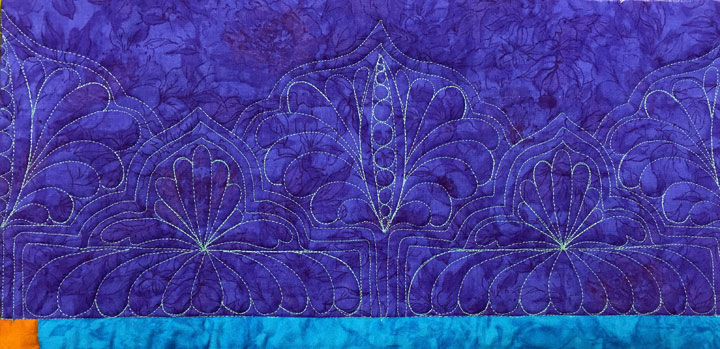
 …and here’s the same border design once the upper swags have also been filled:
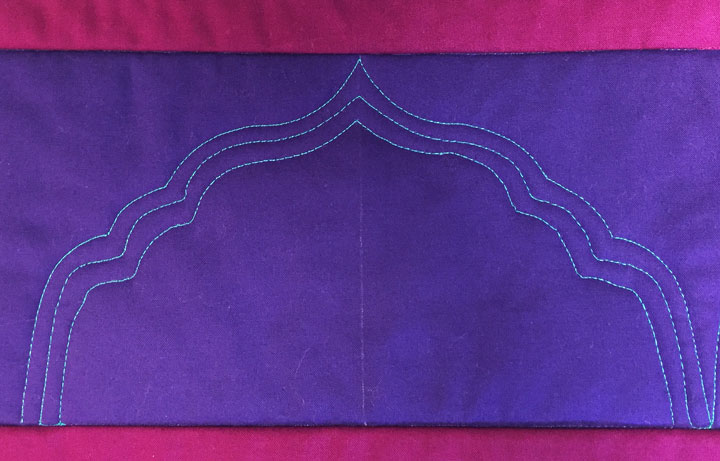
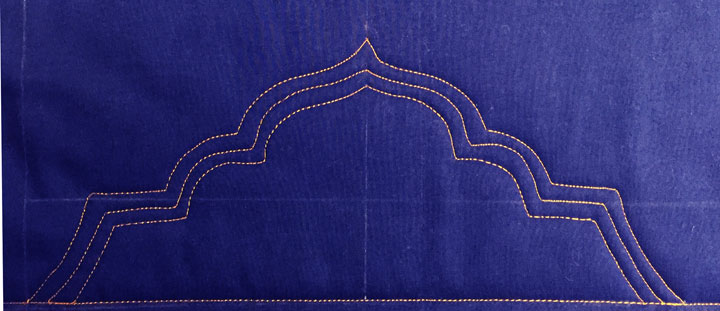
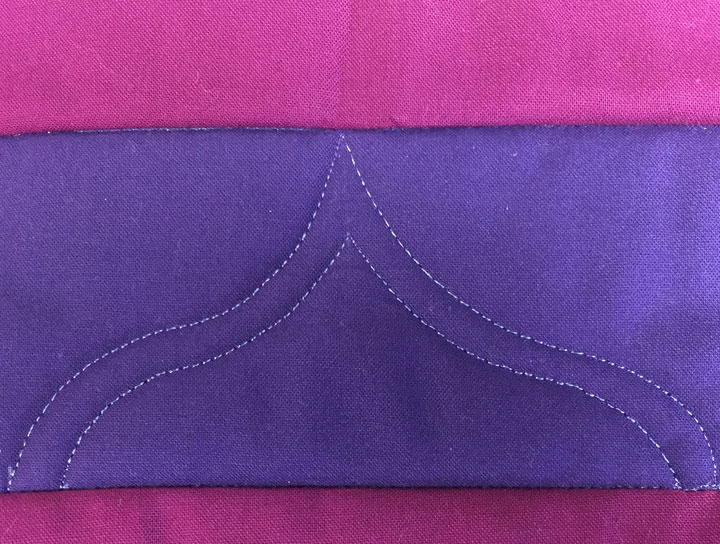
 Here’s an empty Turrets 3 swag:
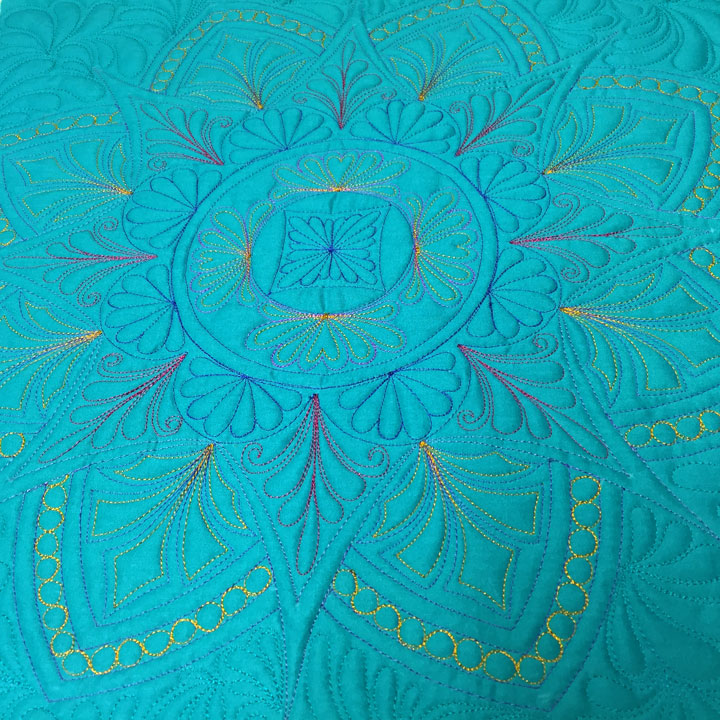
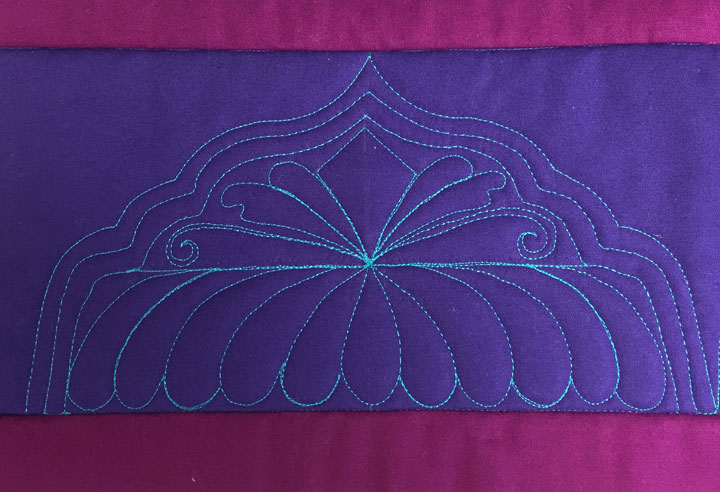
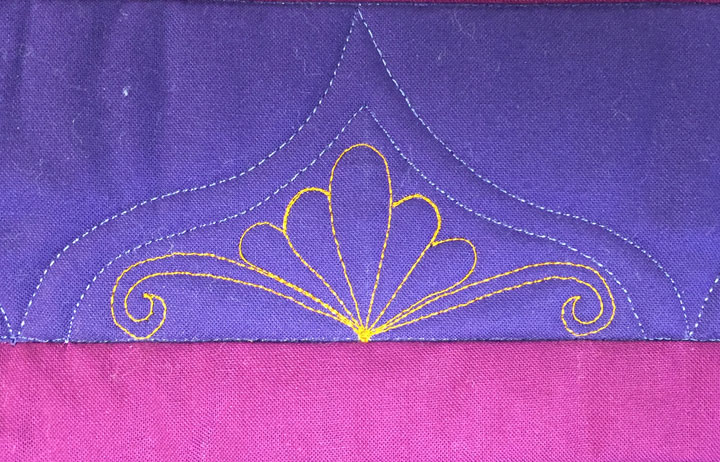
 …and here’s an example of a Turrets 3 swag filled in:
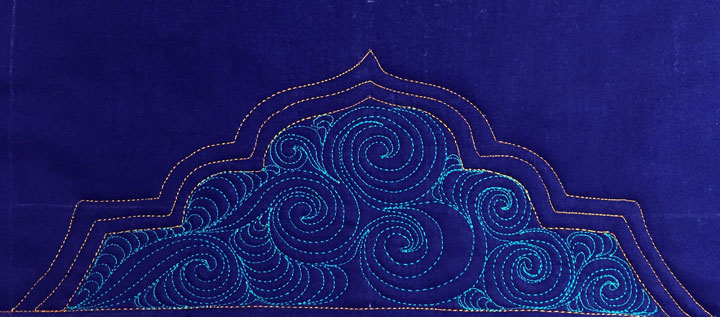
 You could just as easily fill in any turret swag with a background fill design instead:
 Don’t misunderstand, you can also create very simple swag designs with these Turret rulers as well. Here’s an empty one that’s very simple:
 …and here’s a simple one filled with a featherette:
 Honestly, there is no end to all the fun things you can create with these Turret rulers! Each ruler has both a positive and a negative side of the same contour, so you can work from both sides of the ruler. They are available in both the traditional 1/4 inch thickness as well as in a 3mm thickness if you are using a Westalee low or medium shank ruler foot. (And notice that the thinner rulers are markedly discounted!) You can purchase them individually or as a bundle (by clicking here) to save some $$! And if you’d like to see how easy they are to use, here’s a video tutorial that explains them all:
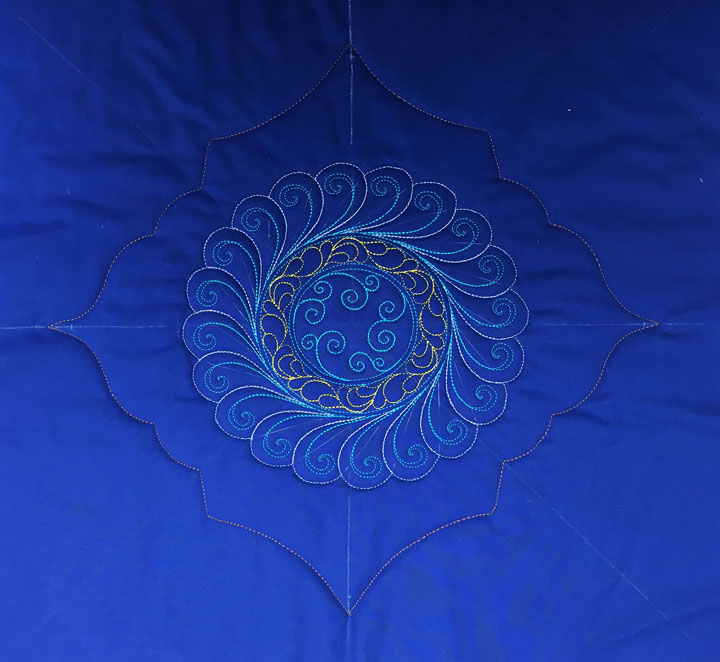
And don’t forget, you can also use them to create fancy frame designs as well! Here’s an empty frame created with the Turrets 3 ruler:
Honestly, there is no end to all the fun things you can create with these Turret rulers! Each ruler has both a positive and a negative side of the same contour, so you can work from both sides of the ruler. They are available in both the traditional 1/4 inch thickness as well as in a 3mm thickness if you are using a Westalee low or medium shank ruler foot. (And notice that the thinner rulers are markedly discounted!) You can purchase them individually or as a bundle (by clicking here) to save some $$! And if you’d like to see how easy they are to use, here’s a video tutorial that explains them all:
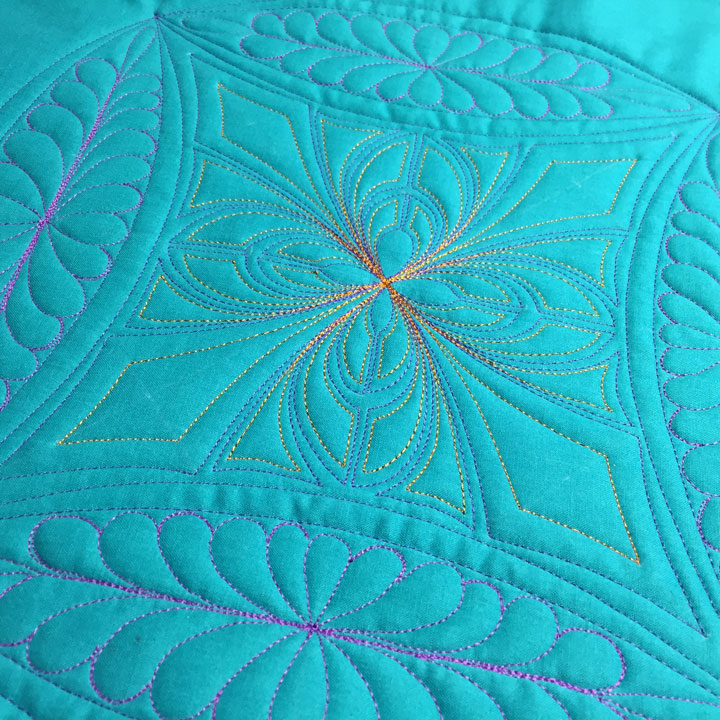
And don’t forget, you can also use them to create fancy frame designs as well! Here’s an empty frame created with the Turrets 3 ruler: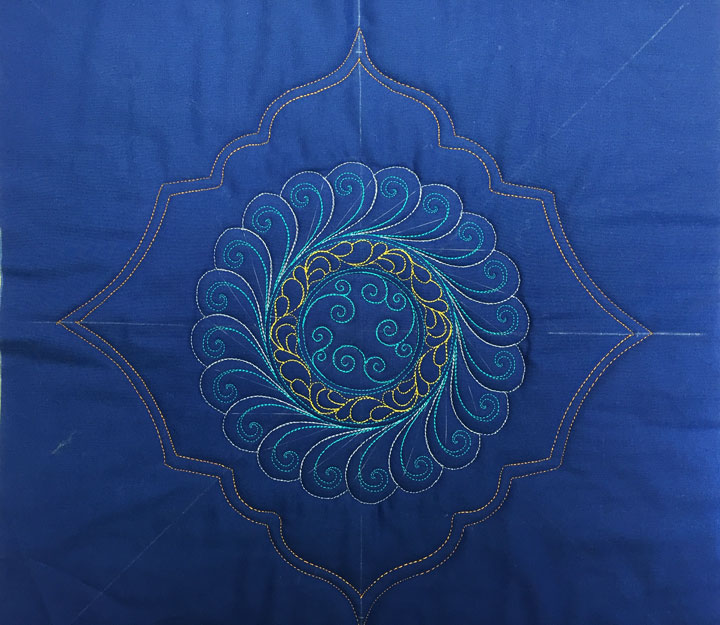 …and here it is filled
 If you haven’t tried playing with rulers yet, now’s the time to get in on the fun!