You can trapunto ruler work quilting just as you can trapunto any quilting or applique, so I used trapunto to highlight the various “zones” within my recent ruler work feathered wreath. You can see in the shot above that this allowed me to dramatize the wreath as a whole, but it also allows me to have the viewer appreciate the multitude of “design zones” that comprise the wreath. This is pretty easy to do and I’ll outline my steps below. By laying it out in this way, I’m hoping you will see the power of trapunto evolve literally before your eyes.Step #1: Pin a piece of scrap batting behind your block, then quilt whatever design you want to trapunto. In my case, I pinned a piece of scrap Hobbs Tuscany Silk/Cotton Blend batting, mainly because I have a ton of this stuff and I’m trying to use it up. I quilted my ruler work frame work (as described in the last post), then did all my fill-in FMQing and hyperquilting. Once done, I trimmed away all the excess batting that felloutside the ruler work design. Here is what the back of my project looked like at this point:I wanted to crank things up another notch, so I added a second layer of extra batting underneath the center circle, aka everything except the outermost plumes. I used the thinnest loft of Quilters Dream Polyester batting for this additional zone, and here’s what the back side looked like at this point:(That extra circle of batting was easily added by a few strokes of a glue stick.) Step 2: I basted the 3 layers of my quilt sandwich together, and here’s how that purple center block appeared before I started quilting. You can see that there’s a little fullness behind the center circle, but that’s about it. You can’t even tell there’s a trapunto layer behind those outer plumes:Step 3: I put invisible thread in my top needle and outlined all the various “zones” of the wreath, then outlined each plume. Know that I did not enter any plume or zone that had been hyperquilted, and this is important as it would have flattened those plumes or zones. I outlined the outermost plumes with 3 rows of echo quilting and did some dense stippling in the dead center of the wreath. This adds more relief to the design and accentuates the trapunto. The shot below is what the center block looked like at this point. All that puckering around the edge shows you how much contraction the trapunto and dense quilting causes: Hopefully, your heart is starting to race a bit now! I am usually starting to get excited at this stage because there is so much texture, but also having a bit of internal panic about all the puckering from contraction. Because the center block did not leave me much room outside the wreath, there was a limit as to what I could do to frame the wreath. This, coupled with the fact that there was so much thread detail in the wreath and I wanted it to be the “star of the show,” led me to frame the wreath in more subtle ways. I began by using my Quilted Pineapple arc ruler to create some arc channels in the 4 corners. Here’s what it looked like before any fill in work had occurred: In these next shots, all the fill in work has happened. I added some “Aztec featherettes” in the 4 corners and used the igloos design for my background fill around the wreath. Adding all that dense quilting surrounding the wreath again accentuates the trapunto:and more:I’ll post more once my outer border has been quilted… It might be awhile.
I hope I’m not boring you with border designs created from arch/swag border “frameworks.” These are endlessly fascinating to me and they stitch up pretty quickly, so I just keep cranking them out. The design above features the crosshatching in the upper section and I really like the “sparseness” of it. There’s enough cross hatching to create interest but not enough that it becomes a dominant part of the design. Another “plus” is that there’s so little of the cross hatching that the stitching goes very fast.The design begins by creating a basic arc border framework using an arc ruler. I used the PTD 12 arc ruler, but again, you can create these types of designs with any arc ruler. I then added a scant 1/4 inch channel to make the arch more defined. This next step is where the curved crosshatching begins. Sticking to just one side of the arc framework, I used the etched lines on my PTD 12 arc ruler to stitch (3) 1/2 inch wide channels, then repeated the same thing on the opposite side of the arch framework. This left the small triangle at the center base. To make it more intricate, I then added a scant 1/4 inch wide channel inside it. Now the real “bones of the design were complete.To “decorate” this skeleton, I first added a row of pearls in gold polyester thread inside the center-most 1/2 inch wide channel:I loved how that came out! Next up, I added a small featherette inside the small triangles at the base. I used a bluish-purple polyester thread for that:Of course, it would have been fine to stop there, but I have this dreaded disease where I am compelled to always add one more round of thread work to just about everything, and that’s how the design ended up as:I am about to fill the outer border of a small quilt and I’m debating whether I should use this design or the one below:I think I like that latter one more, but I need to sleep on this…
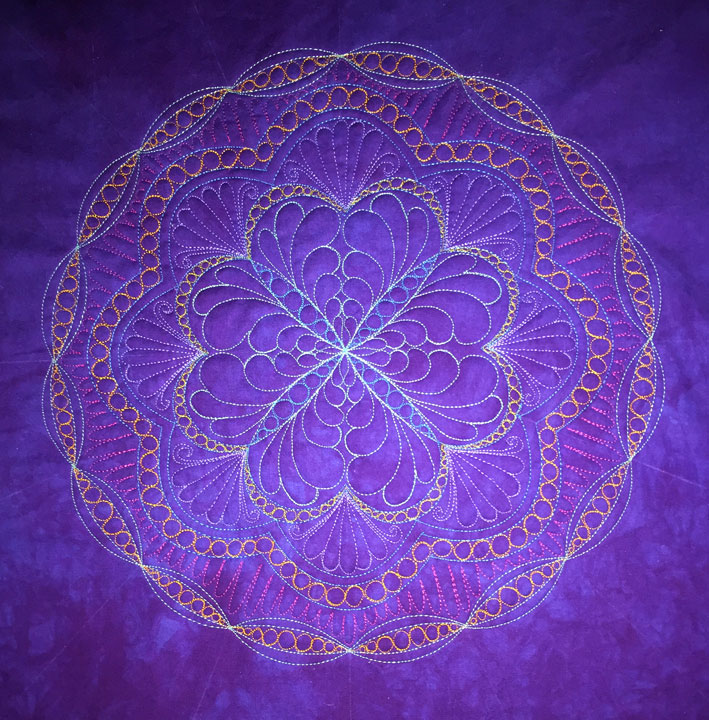
I heard from several people who wanted to know how I made this ruler work feathered wreath, so the tutorial that follows outlines the steps. When I set out to do something like this, I don’t have the full thing composed in my head, so I’m making up the wreath as I go. Sometimes I learn difficult lessons by working like this and other times the universe is smiling on me and everything works out great. The difficult lesson I learned on this one was that I should have started with a much larger fabric block! I started with a 20 in square block but wish I’d started with a 24-26 in square block. If you make this wreath, start larger and you can always trim it if you don’t want to do something with the surrounding zone.Step 1: I used the PTD flower templates to create the center. I used all 3 templates, set in concentric flower format. You can see a short video of me doing that on my previous post by clicking here.Step 2: At the end of step 1, here’s what I had:I knew I was making a feathered wreath that would be large and I wanted to have plumes on the inner portion as well as the outer portion. I also knew going in that my wreath would be large so I was “pushing it” as far as proportions go in having tiny plumes in the center and large plumes on the outside. This meant I needed to preserve the largest size of “inside circle” as possible, and when I say “inside circle,” I am referring to the circle from which the inside plumes would flow. I measured the maximal diameter from inside flower cleavage to the inside flower cleavage on the opposite side and it fell between 3 1/2 in-4 inches. This meant I would “waste” some space if I used my templates to draw a 3 1/2 in circle, so I instead used my Quilter’s Groove Pro Echo 4 arc ruler to stitch short arcs from each inside cleavage point to the next cleavage point. By working this way instead of using some form of a circle template, I could create the largest circle possible within that space. (I realize this might be confusing, but this is an important tip if you’re trying to use your rulers to “customize” a given design, so I’m putting it out there.) Here is what the wreath looked like at the end of this step:Step 3: Next up, I wanted to stitch the remaining circles that would be in this wreath. By working in this way, I am establishing the boundaries of the “negative space” within the wreath that I would be able to play in for the fill-in work. I used my Westalee Circles on Quilts Template set and stitched the 10 1/2 and 11 1/2 in circles. How did I choose those sizes of circles? I was “locked into” a maximal wreath size because of what I had chosen as my starting fabric block size, so I worked backwards. I figured that after allowing for enough space to throw plumes around the outside circle, that fabric block could not tolerate a large circle more than 11 1/2 inches, so that was my maximal circle size. I also knew I wanted to throw a ring of pearls around the outermost border of the circle, so I knew I needed a 10 1/2 inner circle as this would give me a 1/2 in diameter channel. Here’s what the wreath looked like at this point in the process:Step 4: This is the beginning of creating fill-in designs in that “negative space” area. I changed thread colors and used my PTD 8 arc ruler to create small inward curving arcs all along the outermost flower petals. There are markings etched on the flower petals that delineate the middle of each petal, so that’s where those small tick marks shown below came from. The original soap lines that I drew on the fabric block are the other intersections that I used as my starting and stopping points to do this ruler work. If this is confusing, check out the in-process photo below:I used the same PTD ruler to add a tapered channel to my diamonds, then added small featherettes inside the smallest flower petals and also added the innermost plumes, and here is what it looked like at the end of this section:Before we move on to the next section, a couple of things:1. Anytime I am filling a space with a featherette, I start by stitching that center-most plume, then I keep reflecting off what has been stitched to fill each side. I usually have a soap line that runs down the center of the space to help me keep things centered.2. I know of 2 ways to create the plumes on a feathered wreath. You can take a stencil that flows from roughly the same size circle and trace the plumes to follow, or you can stitch the plumes freehand. I will show you how to stitch the plumes freehand when we do the outermost plumes in step 8. I took the easy way out on the inner plumes and traced them from a stencil.Step 5: I swapped thread colors again, then I added Aztec featherettes inside the small diamonds. Here’s how the wreath looked at the end of this step:Step 6: I swapped thread colors again and added featherettes into the largest size petal areas. Notice that each time I have filled a zone with featherettes, I have changed some or all of the plume shapes that comprise the featherettes. This is deliberate as it will make the wreath more interesting. Here is what the wreath looked like at this stage:Step 7: I swapped thread colors again and filled the remaining negative space that bordered the external circles with the figur-of-8’s fill design. This design always works well if you need to fill a dynamic space, or one whose height is changing. The only trick to it is that you want to keep the design perpendicular to the base of the space you are filling. Here’s what the wreath looked like at this point:Step8: I wanted to add the plumes to my wreath before I went any farther in the inside. Here is how I add freehand plumes to a feathered wreath:-using soap or other temporary marker, draw a temporary circle around your outermost circle that will be your “boundary line,” or the target for the outermost plunge of each plume. If you deliberately stretch each plume to hit that boundary line, your plume size will be symmetric across the wreath. I used my compass to make this and literally spread its span to the widest diameter possible.-To stitch your plumes, you will begin with a “hook,” then add each plume using the bump-back feather technique. By using that specific technique, your plume shapes have the best chance of being as uniform as possible. This next shot is early in the process of adding my plumes to that outer-most circle. If you look to the far right, you can see my beginning “hook shape,” and if you look along the outer edge of the plumes, you can see my soap line circle that I’m using for my boundary mark:For me, this next part of the process is the most gut-wrenching! I keep adding my plumes until I have enough space left for the last 4-5 plumes. I then remove the quilt from the machine and lay it out to look at what space is left. I go ahead and draw the remaining plumes, taking care that the final plume will have a reasonable “meet up” with the original hook. I don’t have to follow my drawing exactly as I stitch, but it gives me an assurance that things will all work out in the end. Here’s a shot of what this looked like before i took it back to the machine for the final plumes:This next shot is what the wreath looks like once all plumes have been added. I want you to look carefully at the plumes so you will see that they are not all uniform. They really aren’t, but they are close enough that the wreath registers as “believable” and the wreath is beautiful. I’m telling you this because we are all way too tough on ourselves as quilting critics and we need to get over it!!!Step 9: I swapped to a gold polyester thread and hyperquilted those Aztec featherettes, then used the same thread to quilt a row of pearls inside the outermost circle. Here’s what it looked like at this point:Final step 10: I hyperquilted the outermost plumes with the same gold thread, using a compound hyperquilting design that merged a swirl with splay lines. The innermost plumes were hyperquilted with simple in-lining. And here is the end result:…and a closeup:This was a very fun way spend a day and I’m glad I did it! This was actually stitched as a trapunto layer, so it’s not done. I will hopefully be able to return to it soon and whenever that happens, I’ll post with some in process photos again. In the meantime, if you are wanting to learn more about featherettes and feathers, check out my Craftsy class called Ultimate Free Motion Feathers!
If you look closely at the center sections of these mandalas, you will see that one or more flower shapes form the framework for the elaborate thread work design that follows:For each of the above mandalas, a single flower shape (in each case, the large flower template), was used to begin the design. In this next mandala, all 3 flower template shapes were used to anchor the design that followed:(This one is my favorite ruler work design I’ve ever made!) Can you see all 3 flowers in the center section? When I mention our PTD flower template sets, I’m referring to our set of 3 flower templates, shown below:If you’re looking for these templates in our online store, you can find them by clicking here. One more mandala, and this one used only 1 of the 3 flower templates:I’m hoping this will show you that a flower template can be used for flower designs but also for designs that don’t resemble flowers! These templates are pretty easy to use and we made a short video that shows how they work:
One last thing! If you think they’re only good for making elaborate mandalas, how about using them for many cool feathered wreaths like these:If you look at this closeup shot, you can see that only one flower was used in this wreath. I love, love, LOVE the detailed thread work in the spine zone: …and all 3 flower templates were used for the over-the-top wreath below:The feathered wreath above was actually made from the block I used to demonstrate how to use the templates in the video. It will actually have 2 trapunto layers in it by the time it finally is finished, but I’ll post how it got to this stage in the next few days. For now, just remember that it began by stitching 3 concentric flowers in the center of the block, and I’ll walk you through the rest of it as well!


 You can trapunto ruler work quilting just as you can trapunto any quilting or applique, so I used trapunto to highlight the various “zones” within my recent ruler work feathered wreath. You can see in the shot above that this allowed me to dramatize the wreath as a whole, but it also allows me to have the viewer appreciate the multitude of “design zones” that comprise the wreath. This is pretty easy to do and I’ll outline my steps below. By laying it out in this way, I’m hoping you will see the power of trapunto evolve literally before your eyes.
Step #1: Pin a piece of scrap batting behind your block, then quilt whatever design you want to trapunto. In my case, I pinned a piece of scrap Hobbs Tuscany Silk/Cotton Blend batting, mainly because I have a ton of this stuff and I’m trying to use it up. I quilted my ruler work frame work (as described in the last post), then did all my fill-in FMQing and hyperquilting. Once done, I trimmed away all the excess batting that felloutside the ruler work design. Here is what the back of my project looked like at this point:
You can trapunto ruler work quilting just as you can trapunto any quilting or applique, so I used trapunto to highlight the various “zones” within my recent ruler work feathered wreath. You can see in the shot above that this allowed me to dramatize the wreath as a whole, but it also allows me to have the viewer appreciate the multitude of “design zones” that comprise the wreath. This is pretty easy to do and I’ll outline my steps below. By laying it out in this way, I’m hoping you will see the power of trapunto evolve literally before your eyes.
Step #1: Pin a piece of scrap batting behind your block, then quilt whatever design you want to trapunto. In my case, I pinned a piece of scrap Hobbs Tuscany Silk/Cotton Blend batting, mainly because I have a ton of this stuff and I’m trying to use it up. I quilted my ruler work frame work (as described in the last post), then did all my fill-in FMQing and hyperquilting. Once done, I trimmed away all the excess batting that felloutside the ruler work design. Here is what the back of my project looked like at this point:
 I wanted to crank things up another notch, so I added a second layer of extra batting underneath the center circle, aka everything except the outermost plumes. I used the thinnest loft of Quilters Dream Polyester batting for this additional zone, and here’s what the back side looked like at this point:
 (That extra circle of batting was easily added by a few strokes of a glue stick.)
Step 2: I basted the 3 layers of my quilt sandwich together, and here’s how that purple center block appeared before I started quilting. You can see that there’s a little fullness behind the center circle, but that’s about it. You can’t even tell there’s a trapunto layer behind those outer plumes:
(That extra circle of batting was easily added by a few strokes of a glue stick.)
Step 2: I basted the 3 layers of my quilt sandwich together, and here’s how that purple center block appeared before I started quilting. You can see that there’s a little fullness behind the center circle, but that’s about it. You can’t even tell there’s a trapunto layer behind those outer plumes:
 Step 3: I put invisible thread in my top needle and outlined all the various “zones” of the wreath, then outlined each plume. Know that I did not enter any plume or zone that had been hyperquilted, and this is important as it would have flattened those plumes or zones. I outlined the outermost plumes with 3 rows of echo quilting and did some dense stippling in the dead center of the wreath. This adds more relief to the design and accentuates the trapunto. The shot below is what the center block looked like at this point. All that puckering around the edge shows you how much contraction the trapunto and dense quilting causes:
 Hopefully, your heart is starting to race a bit now! I am usually starting to get excited at this stage because there is so much texture, but also having a bit of internal panic about all the puckering from contraction. Because the center block did not leave me much room outside the wreath, there was a limit as to what I could do to frame the wreath. This, coupled with the fact that there was so much thread detail in the wreath and I wanted it to be the “star of the show,” led me to frame the wreath in more subtle ways. I began by using my Quilted Pineapple arc ruler to create some arc channels in the 4 corners. Here’s what it looked like before any fill in work had occurred:
 In these next shots, all the fill in work has happened. I added some “Aztec featherettes” in the 4 corners and used the igloos design for my background fill around the wreath. Adding all that dense quilting surrounding the wreath again accentuates the trapunto:
 and more: