

Jan 01 18
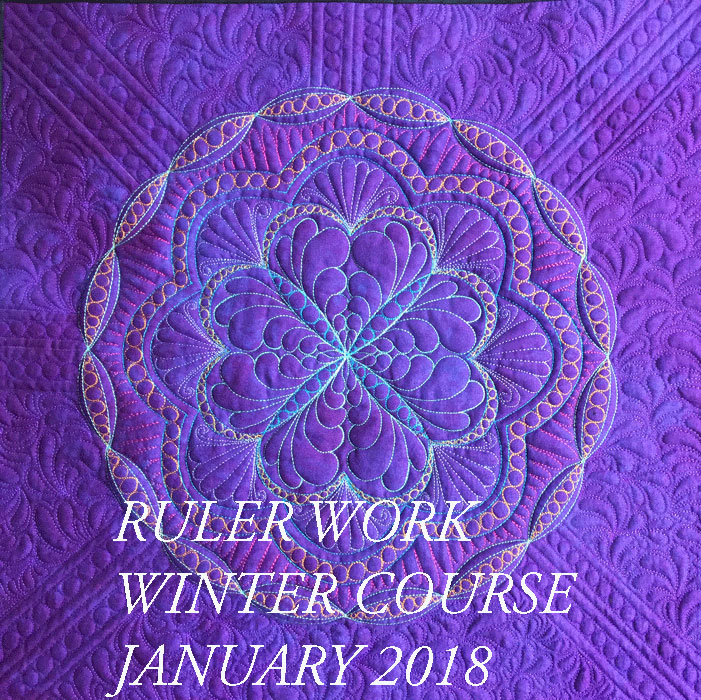
Ruler Work 2018 Winter Course – Part I
Welcome to the first installment of the 2018 Ruler Work Winter Course! Follow along with me each week as we tackle a topic in ruler guided free motion quilting each Monday and Friday in January 2018. I am teaching you from the standpoint of a sit-down quilter, but all of the information here will help you whether you are a sit-down quilter or a frame quilter, so there’s good information and inspiration for everyone.
In today’s lesson, we will explore the 2 basic ruler work skills that are the hallmark of more than 95% of ruler work designs. I am referring to parallel channels and tapered channels. These represent the 2 broad categories of channels that can be used to create ruler work designs and frameworks on your quilts. I suspect you may be yawning out of boredom right now, but trust me…understanding these very basic concepts can completely transform your free motion quilting design aesthetic! They are honesty the basis of everything you see me do.
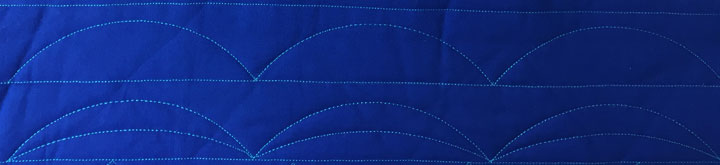
To understand these 2 types of channels, we must first define a channel. A channel is created when 2 lines are stitched near one another, and the channel is the “empty space” between them. This doesn’t sound like a very important thing, but turning a design created with a single line of quilting into a design that has a channel in it will change things up in a BIG way. Let’s start by looking at the quilted motif below:

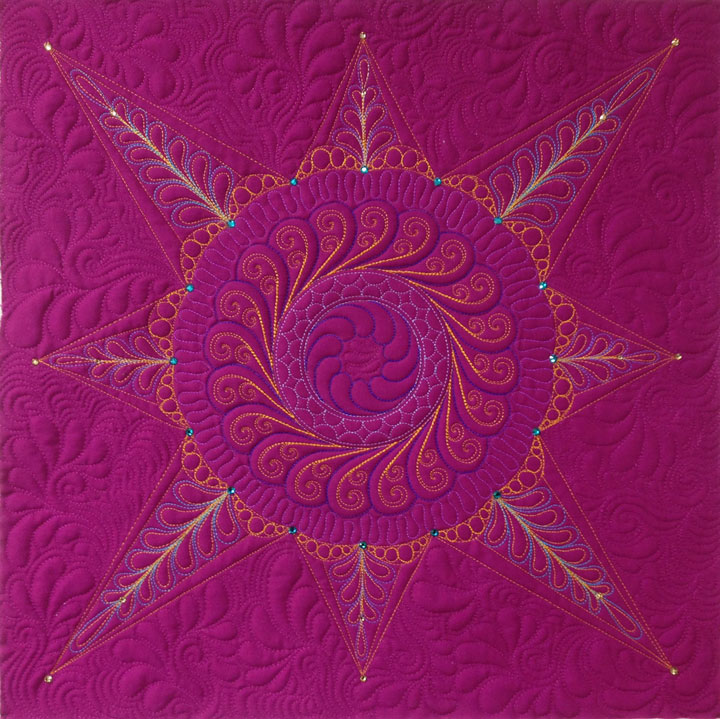
Can you see that this motif is a series of swags? That would be really pretty stitched across a border, wouldn’t it? But…a design like the one above has much more power and impact when it is stitched using channels. This is because it is very easy for a design to be “lost” when it’s stitched as just a single line. Let’s see what happens when we take this same design but stitch it using a channel:
The difference is pretty striking. Adding a channel has made the swag border design much more impactful.
It’s given the design strength and power. This design will not become “lost” as the earlier type of design did. Somehow, creating that simple channel has made the design more definitive.
Now, let’s talk a bit more about the channel above. Notice that the space within the channel is not consistent throughout its breadth, and that’s because this is what’s called a tapered channel. It’s called a tapered channel because the space occupied by the channel is narrowing toward the base of each swag. Now, let’s look at the second type of channel, which is called a parallel channel. To understand a parallel channel, let’s first look at the arched swag border design below:
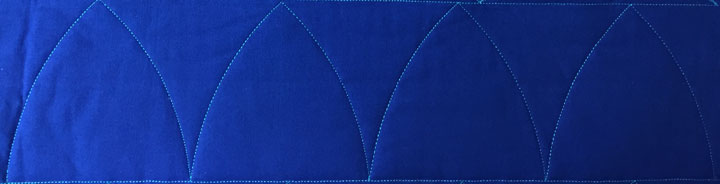
Again, it’s pretty and would make a nice border design, but it needs something, doesn’t it? Here is the same design after we’ve added a parallel channel:
This is far more striking, isn’t it? The difference between this type of channel and the earlier one is that the space inside a parallel channel is constant. This happens because they are parallel channels and there is no tapering of the space between the lines. Is a parallel channel “better” than a tapered channel, or visa-versa? No! They are just 2 types of channels that will become very useful to you as you do all kinds of ruler work because they are pretty much the basis of about 95% of ruler work designs. Sometimes, you will choose one channel type over another because that type of channel will fill the available space on your quilt better. Other times, both types of channel would work great and you may choose one over the other because of the design aesthetic. Other times, you may choose one over the other just because you “feel like it!” The point it, you want to learn the difference between the two types and you want to learn how to stitch both kinds of channels because they will enrich your ruler work more than anything else you do. If you learn nothing else in this ruler work winter course, please, please, please learn to appreciate the power of channels and how to create them! We’re about to start stitching our first design, but before we start, remember Patsy’s Golden Rule #1:
Channels will always enrich your design, and the more channels within a given design, the more intricate and powerful the design will be. This means that you always want to create at least 1 channel within a given design.
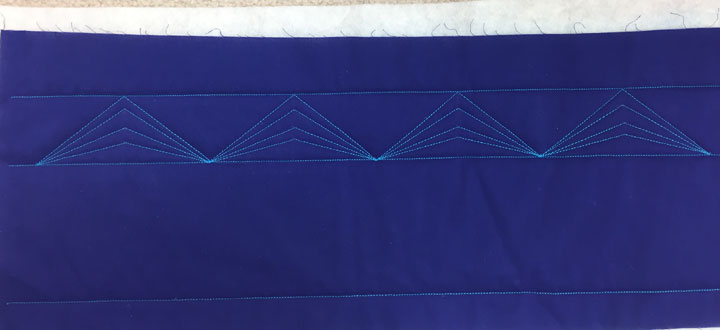
Ok, enough said, let’s put this new-found knowledge to work with some practical stitching! Today, we will be focusing on straight line channel work and you’ll need whatever straight line machine quilting ruler you have lying around to do this. To begin, whip up a 9 inch x 24 inch quilt sandwich, using a solid colored fabric or a gently mottled fabric that “reads” as a solid for the top fabric. We are going to create 2 “border zones” across the width of your fabric that we will fill with ruler work designs. Using a temporary marker, draw a horizontal line across the 24 inch length of the fabric that rests 1-1 1/2 inches from the base of the top fabric. Draw another horizontal line that falls 4 inches above the bottom line, and then a 3rd horizontal line that falls 2 inches above the middle line. Next, go to your sewing machine and stitch these 3 horizontal lines and once you’re done, your quilt sandwich should look like this sandwich below:
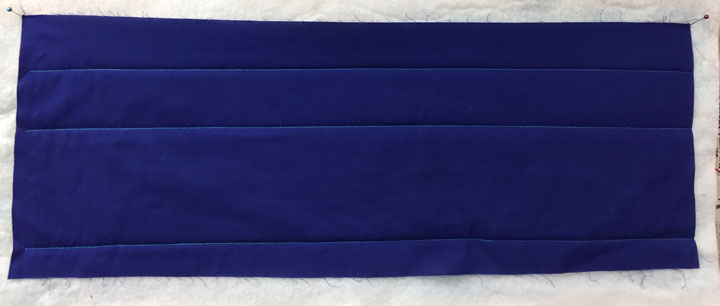
(**Note: the uppermost and lowermost zones will remain untouched. They exist only to make it easier to quilt these designs since working at the edge of a quilt is difficult.)
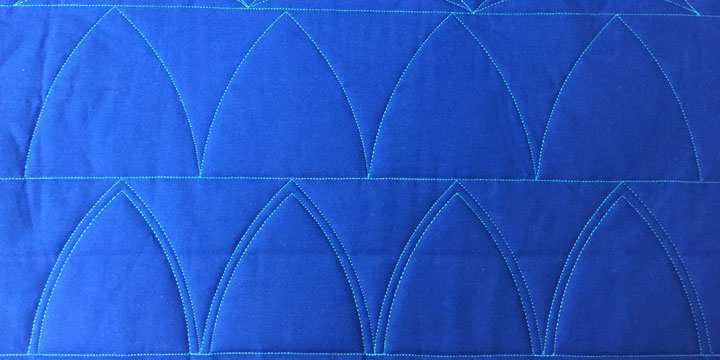
To start, we will be working ONLY inside the 2 inch wide border zone today, so focus solely on that zone for now. This is the ruler work border design we will be making:

Before we begin, know that this is a border design created by stitching a series of tapered channels inside the original parent shape, and the parent shape here is a triangle. Go back and look at the photo of the tapered swag border design I showed you earlier. Can you see that this is identical, except the design is different since we are using a straight ruler instead of an arc ruler? It will help you to take the time to “see” these similarities as you are learning ruler work, because you will realize that you can make a ton of unique designs if you can think about designs and channels in this way. Now, back to today’s exercise. Remember that we are working inside the 2 inch border zone for today. Each “triangular unit” is 5 inches wide and 2 inches tall. In ruler work, you must always have a plan. This means you must always know exactly where you want your line of stitching to begin and exactly where it should end, before you ever start stitching. We need to place a series of temporary tick marks that will guide us as we stitch. Beginning at least 1 1/2 inches from the left side of the border zone, make a small tick mark at the base of the border, then make a series of identical tick marks every 5 inches. Now, mark a vertical line that is perpendicular to the baseline at the 2.5 inch mark, then every 5 inches thereafter. In doing so, you have marked the starting and stopping points for each line you will stitch using your ruler. Before you begin stitching, your marked sandwich should appear as below:
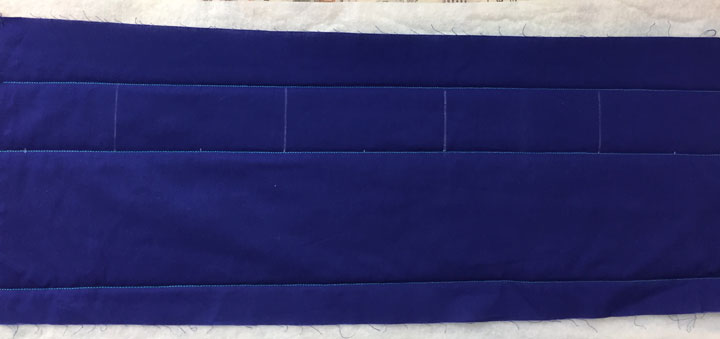
(Again, note that the tiny tick marks at the base of the border will be the bottom-most point of the triangle and the long vertical lines mark the center of the triangles. If you can’t see that clearly, enlarge this photo so you understand how the marking will work.)
As we move forward, know that every time I ask you to make a temporary mark on your sandwich, this mark is where you want the stitched line to fall; it is NOT where you place the ruler edge. Keep this straight in your mind and your actions or you won’t end up with the design you intended!
Mount your ruler foot onto your machine and center the needle if it’s not clearly centered. (you will determine this by eye-balling the needle’s position and if you don’t know how to center the needle on your machine, then you need to look this up in your sewing machine manual!) I recommend using a zigzag throatplate for ruler work in case you need to alter the needle position. Know that once the needle has been centered, the distance from the needle to the outside edge of your ruler foot is 1/4 inches. This means that regardless of where you place a ruler against your ruler foot, your stitched line will always fall 1/4 inches from the needle. You will come to rely heavily on this consistency. (Note-every time you turn your machine off, you will need to re-center your needle. It’s very easy to forget to do this!)
Ruler work is ruler-guided free motion quilting, so set you machine up for FMQing, straight stitch, stitch length zero, and if your machine has a “needle down” option, make sure it’s in “needle down.” (If your machine doesn’t have a needle down option and you are serious about any form of FMQing, it’s time to think seriously about investing in a new machine!)
Pierce your needle in the base of the border at the very first tick mark toward the left of your sandwich. Since you will be using your straight line ruler to guide the stitching of all these straight lines, place the edge of the ruler up against the ruler foot, and place the other edge of the ruler 1/4 inch away from the intersection of the vertical soap line and the upper edge of the border, as shown in the photo below:
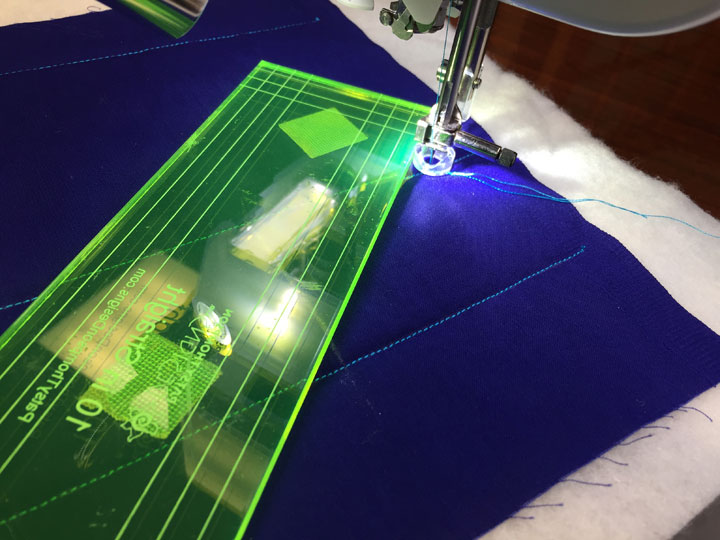
Why didn’t I place that ruler directly on the intersection where I want my line to end? Remember, the stitched line will always fall 1/4 inch away from the needle itself (since the ruler foot will “add” 1/4 inch, so you must account for this each time you place the ruler to begin a new round of stitching. If you are new at this, expect that it will take you time and practice to be able to “guesstimate” a 1/4 inch distance, but in the meantime, you can use a small ruler or one of those measurement gizmos by Westalee.)
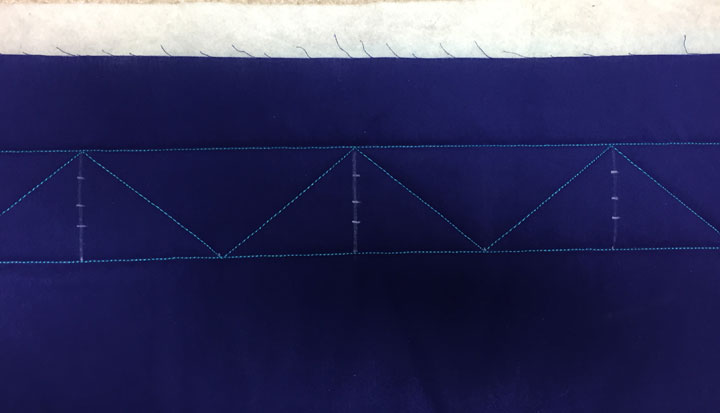
Just as you would with any FMQing, take 4-6 very short stitches as your “locking stitches,” then stitch the straight line that takes you to the intersection of the vertical line and the top of the border. Once you arrive there, stop stitching with your needle down. Move the ruler (and feel free to pivot your quilt sandwich if you’d like), and place your ruler so that it will guide you in stitching to the next tick mark at the base of the border. (Remember, this means you’ll want to place one edge of the ruler against the ruler foot and the other edge of the ruler 1/4 inch in front of the desired tick mark.) Go ahead and stitch this line, and then continue this process from bottom of the border to top of the border again and again. You will stitch 4 of these “triangular units” and then stop with your needle in the down position. Your quilt sandwich should look like the photo below:

Look closely at the vertical soap lines and ensure that your stitching is hitting the top of the line at the apex. If you are a teeny bit off, erase the soap line and create a new vertical line that’s perpendicular to the base. (Remember, these temporary lines will all be gone at the end, so no one will ever know if you were a teeny bit off. Once you’ve stitched your “parent design,” you honor what has been stitched, not the original marks!) If you are more than a teeny bit off, sorry, but you’re kind of hosed and you need to rip out your work and start over. (Sometimes life is hard!)
Now you are ready to add the final tick marks that will allow you to complete the tapered channels. These tick marks will all fall on that vertical center line, and the measurements I am giving you are measured from the very tip of your stitched line at the apex of the triangle and measured downward. Make a tiny tick mark 1/2 inches, 1 inch, and 1 3/8 inch from the very top of each apex. Once done, your sandwich should look like this:
These tick marks are the new “stopping” and “starting” points for the midpoint of each tapered channel inside the parent triangle. You should be asking yourself “Why didn’t she have us mark this right from the start?” The reason is that you will sometimes need to “correct” your center vertical line as discussed above, so I always wait and do this kind of marking once the parent shape has been stitched.
Your needle should still be piercing the fabric in needle down. (If it’s not because you pulled it out to mark, it’s no biggie. Just know that you can stitch this entire design in one continuous thread line.) On a “real” quilt border, you would stitch all 4 border sides with this parent triangle and you would have ended up exactly back where you began. Since we’re only doing 1 short border zone, you are now at the “end of the border,” so you will now be working backwards. You will now stitch the next size triangle inside each already existing triangle and you will easily travel from one triangle into the next, ultimately ending up at the beginning of the short border. Here is what my “set-up” looks like as I prepare to begin stitching the second series of triangles:

Remember, one edge of the ruler is against the ruler foot and the other is 1/4 inch away from the desired endpoint for stitching. Once you stitch the next set of triangles across this border, your sandwich should look like this:

Before you reverse direction and stitch the next round of tapered channels, I want you to notice that my left-most inner triangle’s apex isn’t quite where it needs to be. It’s close enough that I know I can “get away” with it, so I’m not ripping it out. I didn’t do this on purpose, I did it because I’m not perfect. By the end, you’ll see that you can get away with tiny errors! Now, stitch the next row of tapered triangles and when you get to the end, reverse direction and stitch that final row of internal traingles. At the end, your sandwich should look like this:
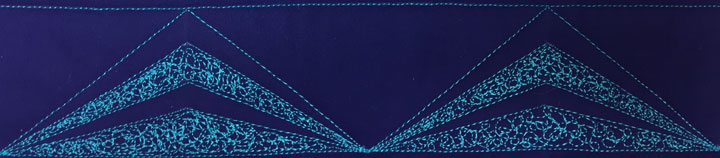
Once those temporary marks are removed, you should realize that you can get away with some small errors, can’t you?!! This design looks great as is and it certainly stands alone. However, I want to use this exercise to teach you one more thing. When you have a design with multiple channels within it, you can add a little more “punch” by filling in some of the channels. In a situation like this, you could fill in every other channel and this would cause the unfilled channels to “pop” a bit. These are fairly narrow tapered channels, so the only fill I would add would be something like a scribble or micro stipple. The goal here would only be to lay down color. If you do this, leave the left 2 triangles just as they are (so you’ll have a record of what this design looks like “empty), and fill every other channel in the remaining to 2 triangles. Here is what my filled version looks like and honestly, I like my empty ones better in this case:
OK, so this ends our first lesson. You’ve learned about the 2 types of channels and you’ve learned how to create tapered channels using a straight line ruler. Again, this may seem drab, but channel work is really, really important. We will keep building on both skills and concepts and if you are patient, this will pay off for you in your ruler work adventure. Happy New Year!
Do you see the straight line tapered channels in the design above?
Thanks, Patsy, I’m looking forward to this whole series.
Happy New Year to you (from sunny and warm Arizona)
I have been following your work for many years. Have your DVD and have watched them many times. Looking forward to this class. Last night it was -34c in southern Alberta, Canada.
Oh thank you for taking time to share your talent with newbies. I have learned so much in this lesson. I look forward to Friday!
WOW I love your easy to follow directions–and your wonderful sense of humor!! This will be an amazing course!! Thank you so much for educating and inspiring us!
Thanks for sharing. Happy New Year! 2018 is my year to focus on quilting many UFO’s. I have several of your DVDs and learned so much from them. Very cold here in Blackstock, ON. -24c
Your directions,as always, are clear and easy to follow. I am looking forward to this whole series. Thanks for putting this together in bite size chunks!
Awesome tutorial. Can’t wait to try!You’ve made this very easy to understand.
Awesome tutorial. Can’t wait to try! You’ve made this very easy to understand.
Love how you explained it and put in to comprehensive words!
I have been looking forward to this class and it is going to be fun. I have your Craftsy class on feathers and have enjoyed your method of teaching. Happy New Year.
Wonderful lesson! I am a newbie so I will follow along faithfully!!
Happy creating eveyone!!!
I am a newbie also. I have admired your work and am absolutely thrilled that you are sharing and teaching all that you know. Thank you!
Thank you. Your courses and books have given me confidence. I am finally enjoying myself.
You are anything but boring Patsy! Like a sponge, I soaked in every word of this excellent tutorial. You are a terrific teacher and I do appreciate your time and talents. I began to play with ruler work last year, but casually and without structure. This ruler work series of yours is just what I need. Many thanks for all you do!
LuAnn in Oregon
luannkessi.blogspot.com
Long have I admired your artistic quilting and your eye for colour. I have bought many rulers along the way but have never used them in any cohesive way so I thank you for breaking your method down and sharing it. Happy new year to you and your Ernie from Scotland, uk.
Anna
Patsy, I watch your tutorial and then gave it a try. I couldn’t believe the stunning results so quickly and easily. Thank you for sharing your skills with all of us. I can’t wait for the next video!!
So happy I ran across this. Look forward to trying it tomorrow. Thank you for sharing
Thanks Patsy…your lessons are practical and lovely…
Love the way you teach.
Thank you! I have free motioned quilting for years but just got into the ruler work. Your ruler work is beautiful!
Have a great day!
Love the 1st lesson and look forward to the next on. Thanks Patsy for doing this for us.
Happy New Year!
Dear Patsy, happy New Year to you and your family! Thank you so much for sharing this wealth of information and experience with us! I am currently studying your Craftsy courses, too.
This will be an amazing time with you – this Ruler Course – and I plan to note also everything I will buy from your shop to be sure I am buying exactly what I need ( as a newbie)so thank you for highlighting supply choices, too!
(St-Petersburg, Russia)
So glad to learn about these lessons….love your work. I am looking forward to learning a lot.
Patsy,
Thank you so much for a great lesson. Mine even looks better after a day or two rest.
Can’t wait for tomorrow.
Thank you for 2x a week
[…] go back and read that lesson and also complete the ruler work exercises that go with lesson #1. You can find lesson #1 by clicking here. Know that each lesson builds on the preceding lessons, so it’s to your benefit to complete […]
Patsy — so excited to find this course! Your instructions are amazing because I actually understand them without any of the illustrations. The only pictures I can see are the title picture at the top and the last three pictures in your blog post but I understand what you are describing to a T. Tomorrow I will be creating my own sample sandwich to start following along on this adventure. Thanks for sharing your amazing talent.
Thank you so much for these lessons. I am looking forward to learning to quilt using rulers. Lesson 1 was great.
This will all come out in due time and we will be making a circular design in the class, so you’ll see how easy it is. For this early part, I have to know everyone knows how to do these basic ruler work “maneuvers.” Once this basic stuff is covered, we’ll get into how to put these maneuvers into practical action and how you can “customize them” for the quilt you are working on. You are asking all the right stuff, it will just take a little longer to get there.
Thank you Patsy. It is great and simple.
Did your 2 lessons and enjoyed them.
Lesson one completed. I feel so smart. Your instructions are perfect. Thank you. On to more lessons. 🙂
Thank you Patsy for offering this course! Loved the first lesson & agree with your opinion on the micro-stippled channels. They look better the further away you get – LOL! Looking forward to moving on to Lesson 2 now.
Drab? Not at all. I have twin quilts that were waiting for me to decide how I was going to quilt the first borders. Thank you!
[…] Lesson #1 […]
I just read your first lesson, WOW!! So well written
Excited to work though them, we are traveling and won’t get back home till April
I hope they will be on your site for awhile.
Thank you for sharing your talent.
Sincerely Louise
Patsy, Thanks for posting this lesson. It was very well written and the photos were very helpful. I just finished doing lesson 1 and am happy with the end result. I micro/scribble stitched in the same channels that you did on two of the triangles. On one of the other triangles, I scribbled in the opposite areas. The 4th triangle was left blank, as you suggested. This piece will be great to refer back to in the future.
I am looking forward to lesson 2 and beyond!
Thanks!
June in AZ
[…] Lesson #1 Lesson #2 […]
I’ve finished lesson 1 and I must say these are the best ruler work that I have done! I’m not a fan of doing the prep work but I can see with this what a difference it makes. Lesson 2 tomorrow! I have 3 and 4 prepped also so they may be tomorrow too.
Thanks so much Patsy. I have been following you for some time now. Love your work. I am just getting started on these lessons so I am playing catch-up.
I just finished stitching Part I and I enjoyed. Thank you for your clear and concise directions. I can’t wait to do Part II tomorrow:)
[…] Lesson #1 […]
Hi Patsy,
I’m new to ruler work. What rulers do I need for your course? Thank you for sharing your knowledge and experience with us!
[…] Lesson #1 […]
Your instructions are very clear, I made a practice sandwich and went for it! I’ve been using the line tamer ruler for a quilt I’m working on now, but did the lesson with the regular straight ruler. Oh my! It’s hard for me to remember to keep the ruler lined up with the ruler foot, can you say wobble? The suggestion to use a ruler to find the quarter inch placement for the ruler is genius! This sample actually looks much better than the quilting on my real quilt, I’ve learned a lot just from lesson 1! Thank you for putting these lessons together. On to lesson 2!
Thank you very much for sharing your expertise. Just found out about this site and looking forward to learning a lot. Will have to get more rulers though. Do not have the big ones, only 61/2″.
Hi I just found you online. Looks like some wonderful information. By any chance is this lesson in PDF form somewhere?
Thanks!!
I’ve gotten here late, but looking forward to working through these lessons. The only suggestion I have is for better pictures next time you put together a class. The instructions are well written but I have trouble trying to see the stitches when the background is dark and the thread matches. I have lightened my screen and enlarged the pictures so that I can zoom in to finally see the stitches.
I’m a little late to the party as I just discovered these lessons today. I hope they stay up for a while so we latecomers can catch up! Thank you so much for sharing this with us!!
I’ve come very late, but wanted to give this a try. Where do I find the fabric requirements and information to make the practice quilt sandwiches?
Hi there! I am so thankful that someone showed there ruler work project from January! I have wanted to learn this for a long time but, could never afford the expensive classes after I bought some westalee rulers. The blog is so well written! I actually think I can do this. I have my first quilt sandwich ready to measure!