

Jan 08 18
January 2018 Ruler Work Winter Course Part III
Welcome back! This is the 3rd ruler work lesson and if you missed lesson #1, or lesson #2, you’ll want to go back and read those lessons and also complete the ruler work exercises that go with each lesson. Know that each lesson builds on the preceding lessons, so it’s to your benefit to complete them in order. Your time and my time are valuable, so I won’t keep repeating the same information in each post. You can find the earlier lessons by clicking on the links below:
Before we get to today’s lesson, know that there really is a logical order to what I’m presenting here. I’m actually spending several hours preparing for each of these lessons, and I’m not counting the time I’m spending thinking about the info and the best way to present it to an audience filled with quilters with wide-ranging skill levels. I’m telling you this because I’m receiving some questions about how to take these designs and use them in a customized fashion on your quilt. That info is coming, but I need to lay a solid foundation before we get there. So, I’m asking you to trust me for a little while longer. If you read what I wrote at the end of the last lesson, then you know that my goal is to give you the wings to create all kinds of designs once this is over, so know that your desire to use this info in a “customized way” is very much my goal as well!
You’ve learned how to create tapered channels and parallel channels using straight line rulers, and now we will embark on creating these same types of channels using curved rulers. For the next 3 lessons, we will be using arc rulers and I should tell you up front that arc rulers are by far my favorite and most used rulers. I would recommend building your ruler arsenal by investing in and gathering as many different arc or curve rulers as you can afford, because your quilting life becomes very easy (and very fun!) when you have a nice stash of curves available to you. I say this because we are using these rulers to create designs to fill-in all kinds of “empty spaces” on our quilts, and the more different curves you can create, the easier and faster you’ll be able to do that.
The picture below shows you some different arc rulers:
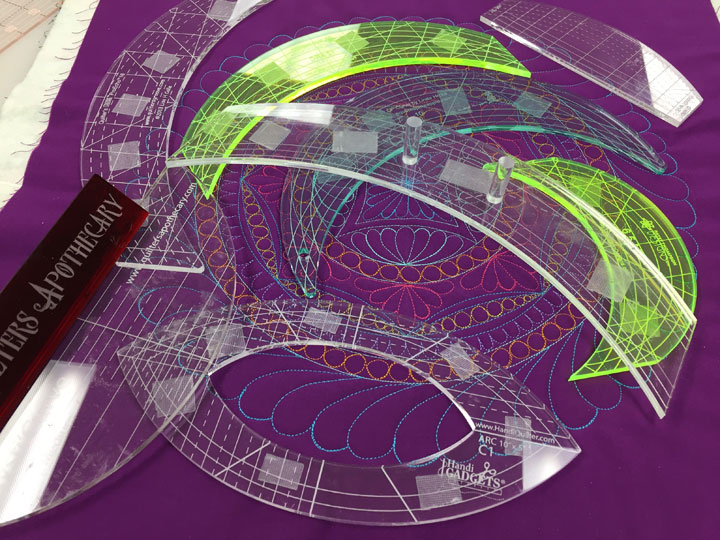
These are all similar to one another, yet all different from one another. Remember that arcs are formed by either “cutting away” the outside edge of part of a circle or the outside edge of part of an ellipse. (Don’t freak out and tell yourself that you can’t understand this stuff because you sucked at math or hated math. This is an easy concept and you need to know it, and frankly, math matters, so if you’ve managed to get through life trying to avoid math, you really do need to buck up and get over it! I remember once watching something on PBS and one of the presenters said “Let’s just face it, MATH=POWER.” That was one of the most profound comments I’ve ever heard and like it or not, it’s true! Ok, I’m getting off my soapbox now…) Just to remind you, an ellipse and a circle are both curved “structures,” but they are very different:


Imagine that we cut out a section of the perimeter of that circle to create an arc ruler…wouldn’t the curve on any part of that arc be the same as the curve on any other part of that arc? Yes, it would. Now, imagine that we cut out a portion of the perimeter of that ellipse. The same would not be true since the curve on the edge of an ellipse is not constant. When you pick up a given arc ruler, you don’t know whether it’s “parent” was an ellipse or a circle, so in general, assume it’s an ellipse and you will always be “safe.” This means that if you make it a habit to try and roughly “center” the center of the arc ruler over the area you want to stitch, you should come out w/a symmetric curve. I don’t want to belabor this point, so just know that this is a good habit to develop, and it won’t be hard to develop if you’re just starting out.
One more thing before we get started…you can ride along the convex or the concave side of an arc ruler (meaning you can ride along the inside or the outside curve.) Most people develop a preference over time and when you have the ability to choose, always choose to stitch in the way that is easiest for you. Sometimes you won’t have a choice, though, so learn to stitch on both the concave and convex sides of arc rulers. Some rulers have the exact same curve on each side of the arc but others do not. You need to know if the 2 sides are identical or you may end up with a design that was not what you intended! (This is easy to determine: trace along the concave part of your arc on paper, then move your arc and try to align the convex side along your traced curve. If they line up, then both sides of your arc have the same curve. If not, they are 2 different curves)
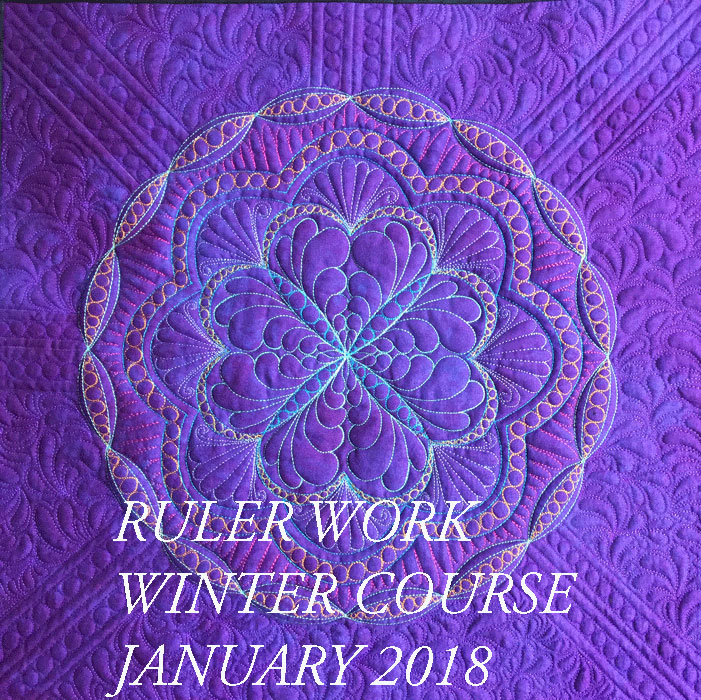
The photo below shows you the ruler work design we will make today; this is a series of swags with tapered channels:

I will be using the PTD 12, 8, and 6.5 arc rulers for today’s exercise. These have the same curve on both sides, so feel free to ride along the inside or the outside curve. You do NOT need to have these same 3 arc rulers to do today’s lesson, but you DO need at least 2 arc rulers whose curves are different enough from one another to be aesthetically pleasing in order to complete today’s exercise. You will also need a 13 in x 24 inch quilt sandwich. We are going to create 3 “border zones” across the width of your quilt sandwich that we will later fill with ruler work designs. Using a temporary marker, draw a horizontal line across the 24 inch length of the fabric that rests 1-1 1/2 inches from the base of the top fabric. Draw another horizontal line that falls 4 inches above the bottom line, then a second line that falls 4 inches above the first line, and then a 3rd horizontal line that falls 1 3/4 inches above the last line. Next, go to your sewing machine and stitch these horizontal lines and once you’re done, your quilt sandwich should look like this sandwich below:
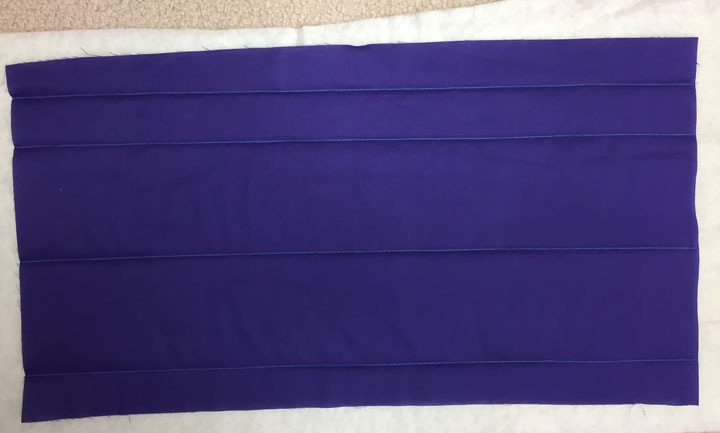
For today’s lesson, we will only be working inside the 1 3/4 inch wide border zone, so we need to mark that zone for stitching. (Note: just like before, the uppermost and lowermost fabric zones will remain empty as they exist only to save you from having to work right at the edge of your sandwich.)
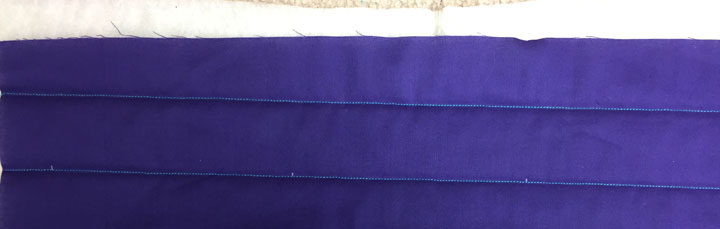
First, mark a small tick mark at the base of the border 1 inch inward from the left side, then mark a tick mark every 5 1/2 inches thereafter. This is all the marking we need to do for this design, so there is no need to mark a midpoint vertical line like before. We are ready to begin stitching! In case you are confused by how easy this is, the photo below is a closeup of some of the marking:
Mount your ruler foot, set your machine up for free motion mode, and see if you can find a re-run of an old “Law and Order” TV episode to play in the background. (Don’t you still messy Lenny the cop? I just never got over losing that actor…)
Pierce your needle in the first tick mark. I’m going to be stitching with my 6.5 arc first because this arc will give me the most protuberant curve in this design. Here is a shot of my set-up just before I begin stitching:
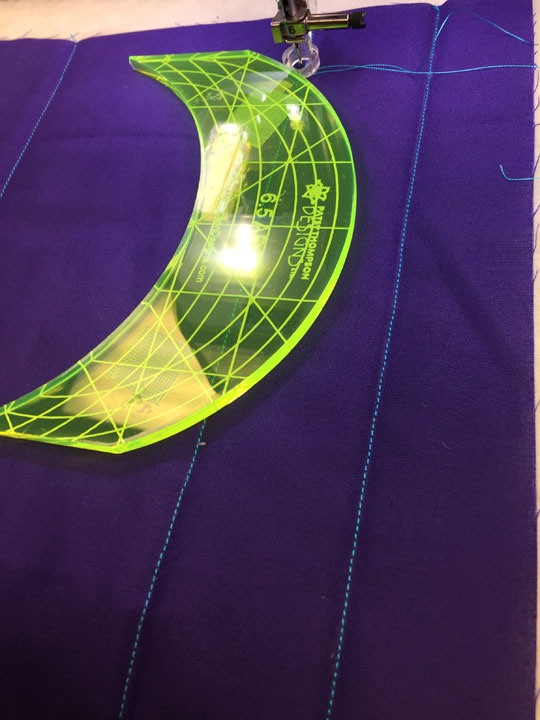
(Just like before, one edge of the ruler is against the ruler foot and the other is 1/4 inch away from my desired endpoint for the swag. The only NEW thing here is that I have roughly centered the arc ruler across this space.) Take a few short locking stitches, then follow the edge of the ruler until you arrive at the next tick mark, then stop with your needle down.
Sometimes when I teach “live,” I see some folks doing some twisting and turning with their shoulders/arms as they follow the curve of an arc ruler. Avoid doing that as you will end up with very sore shoulders after a session of ruler work and it’s not necessary. Just follow the edge of that ruler and the curve of the ruler will do all the work for you. This really is much easier than one might think! Your challenge here is to stitch that entire swag without allowing the ruler to move in the process, as this will cause a deflection of your stitched line. You can make this easier on yourself by stopping partway through the swag with your needle down and leaving your hand on the ruler. With your other hand, steady the ruler, then raise your “ruler hand” and place it in a new position where you’ll have better control to complete the swag’s stitching. This is the only sure-fire way I have found to alter my ruler hand’s position when I need to re-position my hand part-way through a line of stitching.
Go ahead and pick up your ruler and align it to stitch the next swag, then go ahead and stitch the remaining swags in this short border. Once done, your design should look like the photo below:

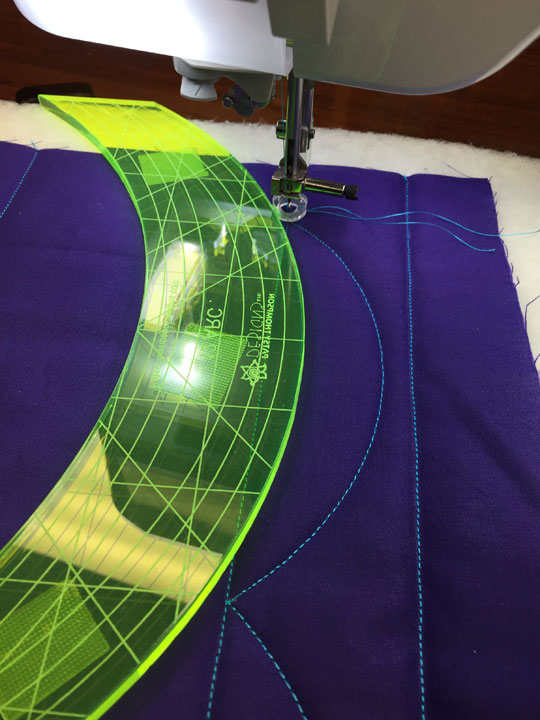
Starting with this lesson, I am going to illustrate this in a way that will mimic a “real quilt” situation. Remember that on a “real quilt,” you would have stitched this first round of parent swags on all 4 sides of the quilt and your needle would have ended up exactly where you had begun. In order to mimic that, end your thread line and pierce your needle where your first stitched line intersects the base of your border. Swap to a different arc ruler that has a curve that’s different enough to be aesthetically pleasing, (I am using my PTD 12 arc ruler) and align it to stitch the tapered channel. Here is my set up before I begin stitching:
Now go ahead and stitch each swag. Remember that your target “end points” are the place where the stitched line meets the baseline; ignore those tick marks as they will be gone at the end, so you want to “honor” your stitched points, not the soon-to-be absent tick marks. Once done, end your thread line and your sandwich should now appear as the photo below:

This is a 2-tiered tapered swag border design. It is lovely and you could stop stitching now and have a lovely design. If all you have available are the 2 arc rulers you used to stitch these 2 swag lines, you are done stitching for today. I am going to go ahead and add one more tapered channel using my PTD 8arc ruler, and if you have a 3rd arc ruler whose curve is different enough from the other 2 arcs, please go ahead and use it to add a 3rd tier. Once done, your border design should look something like the photo below:

There you have it-tapered channels using arc rulers to create tiered swag designs! Could you fill some of these tapered channels? Of course! Could you throw in some kind of design at each of the “cleavage points” where 2 swags join at the baseline? Yes! Tapered channel swag designs are easy, fast, and fun and they look great all by themselves as well as “all dressed up.” One word of caution about quilted swag designs in general though… pay attention to their orientation before you begin stitching. It is very easy to orient them in a way that will not “make sense” on your quilt, and it’s a hard lesson to learn after you’ve finished stitching!
We have used this technique to create tapered channels in a border design, but know that these same tiered swags work great in framing large blocks as well as small blocks. In fact, this basic skill you just learned will give you lots and lots of design mileage if you let yourself think about it:
More food for thought:

See you back here in another few days and we’ll take another step together.
Thank you for these lovely sequenced lessons. I have done each one as described, then went on a tear and added additional channels, addition loop-de-loops, etc. I have been looking for a book that teaches these skills this way. The most important thing I have learned is the importance of marking, and using soap- yes!
Have you written a book on ruler work, or recommend one that teaches this same way?
With all that going on, I appreciate even more the prep that has gone into these online videos. I made a stack of about a dozen sandwiches from solid fabric I bought that is lesser quality than I had expected, so I am so ready. Bring it on!
Thank you Patsy. Another excellent well planned lesson, with great content. In the photo you shared with a bunch of rulers there is a Handi Quilter ruler in that wonderful collection. I’ve had some recent discussions with others, some sharing that the Handi Quilter rulers are not appropriate for a domestic machine. Thus, I’m wondering if you might touch upon this topic in one of your upcoming lessons.
QuiltShopGal
http://www.quiltshopgal.com
Thanks for another great lesson Patsy! Your tip on checking both sides of an arc ruler to determine if they are identical is especially helpful. I’m planning to check all my arcs now & place a bright sticky “dot” on those that are not identical to prevent any miscalculations……hopefully, I’ll remember what that dot means when I next use the arc. 🙂
Really good AGAIN. Since I do not have as good of a ruler selection I used a Circle with a oval then a curve. Turned out good also a tip I picked from a long armer. I used a piece of masking tape on my ruler to help in lining up my start and stop points. Thanks again for a wonderful class.
Thank you Patsy. With just this lesson I am realizing that I cam see so much more in a design than I was seeing before. These lessons are great! Thank you for offering them to us!!!
Love these lessons. So glad you are stuck inside to help us all!
I don’t think your instructions are correct for checking whether a ruler has the same arc on both sides. If you trace right along the edge of the ruler they won’t match, but if you use a disc to draw your line a quarter of an inch away, they will. At least that’s been my experience. Thank you for doing these lessons. I expect to learn a lot.
I think I know what you’re saying, but you’re confusing two things. In trying to figure out if the convex curve on a ruler is the same as the concave curve on the same ruler, what I described really does work! You are describing how to emulate what a stitched curve will look like if one uses a fixed set of starting and stopping points. In that scenario, you would need to add a spacer into the mix to “add” the 1/4 inch that a ruler foot would add. That’s a different situation from what I’m describing.
Thank you for these lessons. You are so skilled with building skills based on each previous lesson.
Enjoyed your Craftsy classes so much. These classes are so explanatory they clarify anything I missed before. Your time and effort is greatly appreciated. Bring it on. Wendy, Australia.
Can you please explain your method of marking with soap. Thanks!
It’s very simple. I rescue small pieces of soap from the shower (I use Dove white soap) and use the thin edge of the soap to mark my quilts. I keep an old vegetable peeler in my sewing room and use that to keep the edge narrow.
Most of the time, the soap lines have worn off by the time I’ve finished the quilt. If not, they are easily removed by gently rubbing the area w/a batting scrap. I haven’t had them “not go away,” but if I had that issue, they always come off in the wash since it’s soap!
One more thing I really like about using soap for marking…I do a lot of machine embroidery applique on my embroidery machine and have to mark registration marks on my fabric block to place it correctly on my hoop. Once I start doing the embroidery/applique, it’s a given that I will inadvertently touch a soap line with my iron. Normally, when an iron touches a marked line like a chalk line or disappearing ink line, the heat makes the line permanent. The opposite is true w/sap as it causes the line to disappear.
You ROCK Patsy! Great instructions, great pictures! Thanks for sharing your time and talents.
LuAnn in Oregon
luannkessi.blogspot.com
Great lesson. Thanks for the reminder that all arcs are not equal. I really appreciate the time and effort you are putting into these lessons, and I know it will pay off for me as I develop more confidence and understanding in rulers and how to use them. Thank you.
Thanks for another great lesson . Little steps make it easy to follow and want to try out. Now to get a few more arc rulers.
In stitches
Patsy, Great tutorial, as always! You really are a great teacher and artist. I love seeing your creations and really appreciate you taking the time to teach us how to use our rulers on our sit down quilting machines.
June in AZ
I am learning so much! Thank you for giving us this gift of your time and knowledge!
Thanks a million for these great lessons, I will be repeating them until I feel like I have done them well.
Regarding the picture shown of the arch rulers (lesson 3) – there is an ARC C1 Handi Gadgets, that shows a hollow or empty centre. Are the centres removable in this set? I have gone to the store to see if there are more details, but can’t find any with the empty centres.
Love your classes.
Diane Bussiere
Thank you. That was interesting. Is it possible to make your own rulers?
Thank you so much for these tutorials!!! I have been using curved rulers for a couple of years with some success, but I have learned so much already from you!
I’m looking forward to the rest of the series! 💕
I’m a little behind but I love your lessons, they are so much fun! I¡m not certain why, in lesson 3, you have us use 3 different rulers instead of using the same one 3 times. Wouldn’t the same ruler work?
Hate to say it, but the big lesson in making tapered channels with a swag shape is that you MUST use arcs with different curves! The best way for you to learn this is to go ahead and follow the directions given, but use the same ruler for each swag. You will quickly learn that all this will do is have you stitch identical swags right on top of one another!
Patsy, I am so excited. These lessons are exactly what I need to complete a class project. I wanted to teach a lesson on trapunto and the skill I have is so primitive that I wanted our trapunto block to be as great as the other blocks in the quilt. I love the lessons and I can not believe I had not found you before. Thank you for filling a void in my education. LOve it Love it. Love it. Thank you.