Nov 04 10
The Power of the Thin Black Line
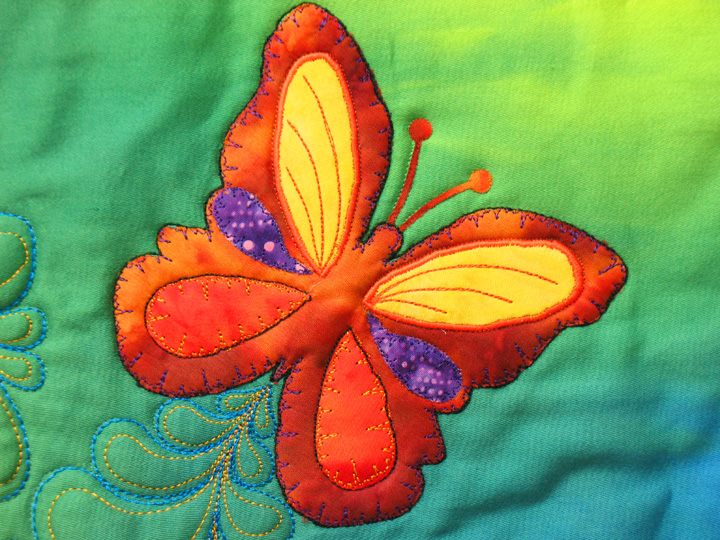
Remember our trapuntoed friend, Monsieur Butterfly? Here he is as I’ve begun to quilt my first Sizzix quilt. I’m re-visting a technique I have not used in about 7-8 years, and this involves outlining applique shapes with heavy black thread instead of invisible thread. This has the cool effect of adding a thin black line around everything, and I’m really liking the effect. As you can see in the butterfly above, you can make many different choices about where to use that thin black line. For example, I didn’t use it to outline all the shapes within the butterfly body, and I didn’t use it to outline this butterfly’s antennae. In the former case, I just didn’t feel like it and in the latter, I deliberately avoided it because those antennae are so fragile that a heavy thread might “un-do” their intricate nature. (Notice that they were outlined in invisible thread.)
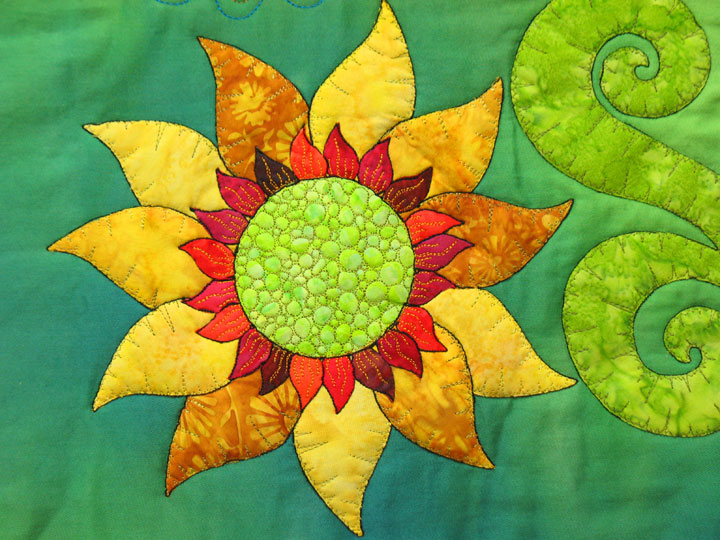
Now here’s what a yellow flower looks like with its various parts outlined:
I think it makes the flower look more “definitive.” Isn’t it interesting to see how that line is barely visible around the swirly stem next door? It’s really there, though! I used 3 different heavy black threads to outline shapes on this quilt. I began with YLI Jeanstitch Thread because that was the thread I originally learned to perform this technique with. Jeanstitch thread is VERY HEAVY!!! I ended up switching to Robison Anton 25 weight 100% cotton thread and that worked really well. But, I was rushing around the last time I left NC to drive to OH and forgot to bring my one spool of it to OH, so then I had to switch to Guterman Polyester Topstitch Thread. The flower above is outlined with Guterman and the swirly stem is outlined with Robison-Anton. Of the 3 options, I like the Robison Anton first, Guterman second, and YLI third.
Here’s a red flower with its shapes outlined:
Ooh-la-la! I really like how that one came out! And now I’m working on the flight paths of the butterflies. This is a good lesson on how you can easily change the “feeling” or message of a flight path. In this quilt, I’m using feathers to denote the flight paths. In this first butterfly, I started with a loose, gently curved spine guidline, and that creates a flight path that makes you think this butterfly is just kind of meandering around this garden, like he’s got all the time in the world to putter from flower to flower:
Contrast that butterfly with this next one, who’s moving really fast! He’s flying so fast that you’d better get out of his way! You can create that sense by tracing a highly curled spine guideline, as this intense curling gives the butterfly momentum:
I’ve got one more butterfly flight path to go, and then I can start quilting the background…can’t wait! It sure feels good to be quilting!


I love the effect!! Yippie for you on ‘dragging’ something from the past….obviously an oldie…but a goodie!
Very nice effect, Patsy. Question: are you using your free motion foot to accomplish the outline stitching? Joan
The black outline looks great. I’d love to see the whole quilt.
Hi Patsy,
The black outlining definitely adds interest! I like the feathering you did for each butterfly, it really adds movement to the flight of the butterfly.
I’m liking it!
-Alice
The outline is a great effect for that quilt. It really makes the sunflower pop.
I must say however…..I think you should trash the entire quilt….and I’d like to know what night is garbage night in your neighborhood? ROFL I could not resist…sorry…well…I’m only a little sorry!
Smiles,
Kelly
Gorgeous Patsy.