

Oct 16 17
Another Ruler Work Border Design
 I’m not wild about my fill-in choice for the lower section, but I can see a lot of variations on this that could be quite cool! Here is how to make an arched swag border like this:
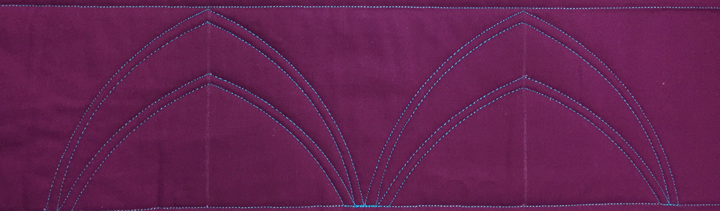
Step #1: The basic ruler work framework is an arched swag using the PTD 12 arc ruler, then I added a 1/4 inch parallel channel followed by a 1 1/4 inch tapered channel, and then another 1/4 in parallel channel:
I’m not wild about my fill-in choice for the lower section, but I can see a lot of variations on this that could be quite cool! Here is how to make an arched swag border like this:
Step #1: The basic ruler work framework is an arched swag using the PTD 12 arc ruler, then I added a 1/4 inch parallel channel followed by a 1 1/4 inch tapered channel, and then another 1/4 in parallel channel:
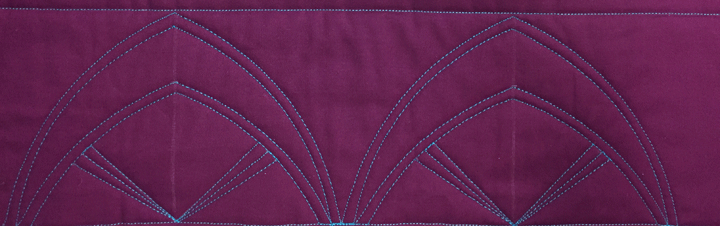
 Step #2: Using a straight line ruler, I added a right angle that intersects the bottom center base and straddled it equally, then added (2) 1/4 inch tapered channels on either side of the right angle:
 Step 3: Fill-in begins! First, I stitched a waterfall featherette in the top section:
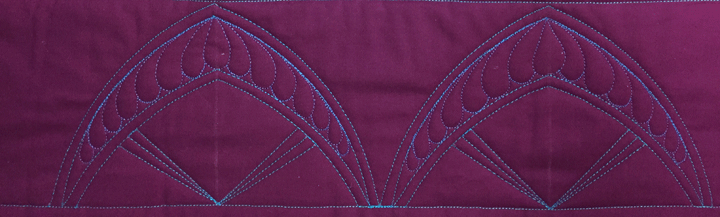 Step 4: I added a basic upright featherette in the center bottom section:
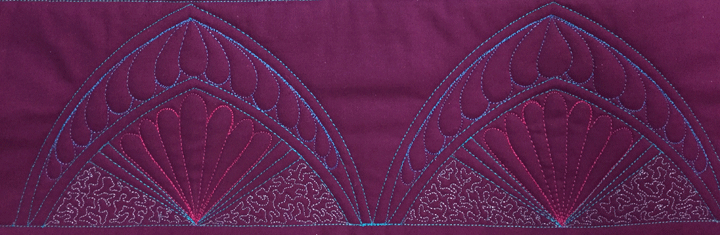
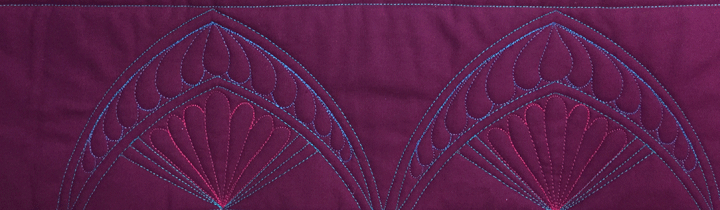 Step 5: I added a small stipple in the outer 2 bottom sections, just to add a new color. This is the portion I’m not wild about, but I have lots of other ideas I will play with later:
This blog has been sorely neglected over the past few months and that has not been my intention. I have been doing so much traveling that I haven’t had much time in my sewing room. To make up for this drought, I promise that today’s post is the first of 3 posts this week! I will do better!!!!
Step 5: I added a small stipple in the outer 2 bottom sections, just to add a new color. This is the portion I’m not wild about, but I have lots of other ideas I will play with later:
This blog has been sorely neglected over the past few months and that has not been my intention. I have been doing so much traveling that I haven’t had much time in my sewing room. To make up for this drought, I promise that today’s post is the first of 3 posts this week! I will do better!!!!
Absolutely beautiful. I appreciate the step by step photos. I want to give this a try. Love it.
BTW – I’ll be here whenever you can share. Don’t feel guilty for a business schedule. But know we all appreciate it when you do have time to share.
QuiltShopGal
http://www.quiltshopgal.com
I, too, look forward to your posts. I’ll take whatever you give us! You always have such good ideas.
Thanks for posting some new things, I always look forward to what you are working on. And I do like the stippling- I know that’s not your usual, but it works for me. Kathy