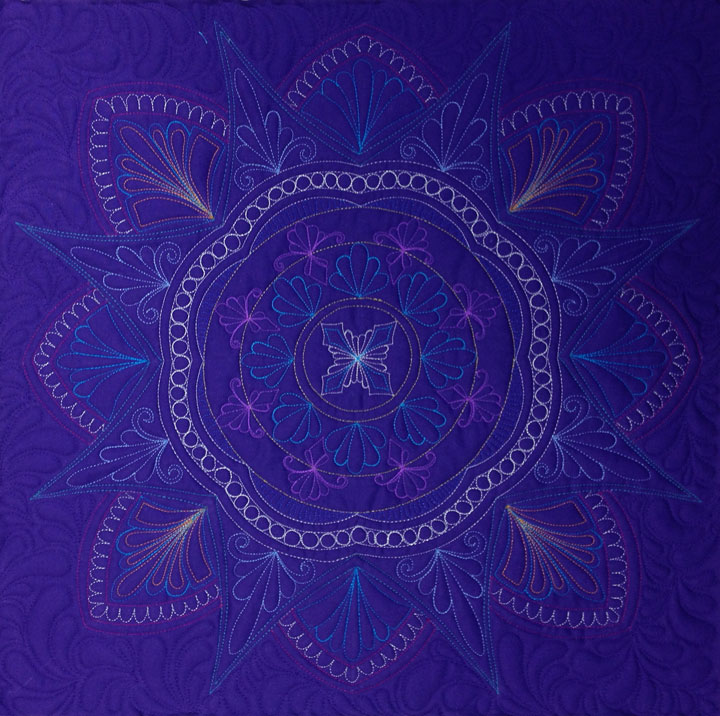
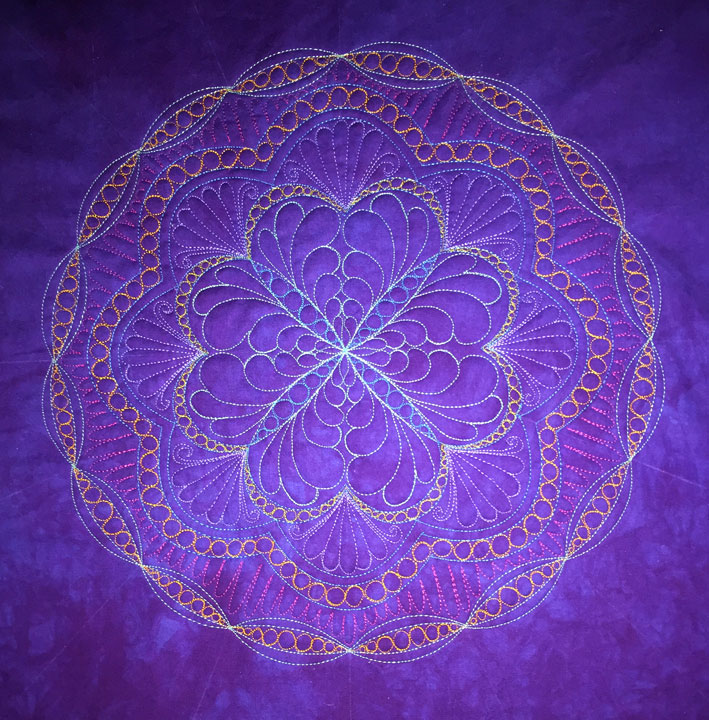
Upcoming Classes in 2017

February 17th, 2017


arc-ruler-play-3

I receive a fair number of emails asking me about when I am teaching classes.  I used to keep a list on my web site, but then I never updated it, so it wasn’t very valuable.  Below is a list of what has been set up thus far for 2017:


February 25, 2017 – “Ruler Work 101-Intro to Ruler Work for the Sit-Down Quilter”

The Quilt Patch, Tecumseh, MI


March 25, 2017 – “Ruler Work 101-Intro to Ruler Work for the Sit-Down Quilter”

Beginnings Quilt Shop, Hendersonville, NC


April 8, 2017 – “Ruler Work 101-Intro to Ruler Work for the Sit-Down Quilter”

Rutherfordton Quilt Guild, Rutherfordton, NC


April 21, 2017 – “Yes, There is Life After Stippling”

April 22, 2017 – Ruler Work 101-Intro to Ruler Work for the Sit-Down Quilter”

Sew It Fabulous Quilt Shop, Boerne, TX


May 2, 2017 – Lecture/Trunk Show

May 3, 2017 – “Ruler Work 101-Intro to Ruler Work for the Sit-Down Quilter”

Bloomington Indiana Quilt Guild, Bloomington, IN


May 6, 2017 – “Ruler Work 101-Intro to ruler Work for the Sit-Down Quilter”

Wyandotte, MI

Sew What Quilt Shop 724-281-7344


May 13, 2017 – “Ruler Work 102: Beautiful Ruler Work Borders”

Beginnings Quilt Shop, Hendersonville, NC


June 5, 2017 – Ruler Work 101 – “Intro to Ruler Work for the Sit-Down Quilter”

June 6, 2017 – 6-hour class TBD

Ann Arbor, MI

Leaubu Sewing Center

June 8, 2017 – Lecture/Trunk Show

June 9, 2017 –“Butterfly Wall Hanging”

June 10, 2017 – “Autumn Leaves Wall Hanging”

Indianapolis Quilt Guild, Indianapolis, IN


October 9, 2017 – Ruler Work 101 – “Intro to Ruler Work for the Sit-Down Quilter”

October 10, 2017 –Ruler Work 102 – “Creating Beautiful Arc Borders Using Ruler Work”

Sun Bonnet Sue Quilt Guild, Sequim, WA


 October 10, 2017 – Lecture/Trunk show: “ThreadPower!”

October 11, 2017 – Lecture/Trunk Show: “Ruler Work for Sit Down Quilters”

October 11, 2017 – “Ruler Work 102: Beautiful Ruler Work Borders”

October 12, 2017 – “Ruler Work 101-Intro to Ruler Work for the Sit-Down Quilter”

Quilters Anonymous, Shoreline, WA


November 9, 2017 – Lecture/Trunk Show – “Ruler Work for Sit-Down Quilters”

November 10, 2017 – TBD (at least 1 workshop will be Intro to Ruler Work)

November 11, 2018 – TBD

Great Lakes Heritage Quilt Guild, Bloomfield Hills, MI

 If you’d like to see a list of available classes and descriptions of what is covered in that class, you can find that list by clicking here.  If you’d like me to teach a class at your local quilt shop or quilt guild but don’t see one listed that you’d like, I’m happy to fashion one around your needs.  I really love to teach and get other quilters jazzed up about what they can do with their machines, so I’m hoping to hear from you!

 circles2a


Trapuntoed Ruler Work-Part I

February 11th, 2017


RWT10.5

This is the first block in a quilt I’m making that will feature trapuntoed ruler work.  Unfortunately, you won’t be able to appreciate the wonderful effect of the trapunto until I complete the other blocks and sew them together and then get them into that final quilt sandwich.  These early posts about this quilt will really focus on just the ruler work but if you can stick with me over several posts, this will all fall together and make sense.  For now, know that each block is 20 inches square and each block begins with a layer of batting pinned to the wrong side of the block.  There is no backing fabric.


For me, when I’m making mandala-like designs like this, I always mark 8 lines across my quilt block as shown below:


RWT1A

Those marked soap lines will serve as starting/stopping points for ruler work as we “build” this design.  I will be making up all these designs on the fly, and the lines really allow me to maintain symmetry in the final design.  Do you see that piece of green foam in the center?  There is a flat-headed straight pin in the dead center of the block (this is where all those lines intersect), and that foam pin anchor is securing it in place.  I used the large flower template from the PTD Flower Template set to form the base of my ruler work framework.  I’m guessing that you don’t even see a flower in the center part of the finished block, so this is  a good example of how easy it is to use templates for purposes other than the obvious.  Here’s a shot of the center flower as it was setup for stitching.  Notice that there’s a tiny hole in the dead center of the template.  That straight pin is coming up through it and the foam pin anchor holds it in place.  Also notice that I’ve aligned my template so the markings fall over the markings on my fabric block.  You don’t have to do that, but it makes life easier if you do:


RWT1B

Once the flower had been stitched, I switched to the corner marking oval templates by Westalee.  As you can see, I used one of them to create another round of “petal-like” ovoid scallops surrounding the original flower:


RWT1C

Here’s what things looked like once that entire first round was completed:


RWT1D

Next, I wanted to create a 1/4 inch channel , so I used the next size up of the Westalee corner marking ovals and aligned it so the edge fit right up against the stitched line:


RWT1E

I did this all the way around the design.  Next, I wanted a wider channel so I could fill it.  I swapped to the next size up of Westalee corner marking oval but this time I placed it so my stitched line aligned with the marked line inside the oval’s edge, as this would create a 1/2 inch wide channel:


RWT1F

…and here’s what the design looked like at the end of this round:


RWT1G

Starting to look more interesting, n’est pas?  I was itching to do some fill-in work, so I added small featherettes inside the outermost “petals.”  I used a polyester lavender thread for this zone:


RWT1H

…and here’s after the entire zone had been filled:


RWT1J

I moved to that 1/2 inch wide channel next and threw in a single row of pearls using a Floriani gold polyester thread:


RWT1K

This next step is hard to see.  I used a small circle template to create a channel inside the innermost flower shape; this channel tapers at the base of each petal.  This is the stitching being done in turquoise rayon thread below:


RWT1L

…and here’s how it looked after that channel was completed but before it was filled with tiny pearls.  I am still always struck by how much power adding a channel can add to a design:


RWT1M

I then began working on the “bones” of the center-most design.  I used the inside portion of the Handiquilter Arc C ruler to create 4 narrow mellon shapes:


RWT1N

(Notice that I’ve switched to another polyester thread; this time a very light turquoise.   Changing thread colors makes it more fun and interesting, but also helps to create visual “zones.”)  I then used the bump-back feather technique to stitch 4 featherettes, each of which springs from one of those melons.  Here’s a shot as I was still adding them:


RWT1O

…and here is the center-most section once it had been completely filled in:


RWT1P

(Sorry, the colors in that last photo and next photo are way off!)  I then added a circle of channeled crescent shapes around the whole thing:


RWT10.8

…and here it is once I’d filled in the “empty space” between the crescents with the fingertips design (magenta rayon thread), and added a row of small pearls inside that innermost channel by the smallest petal shapes (green Floriani polyester thread):


RWT1.88


This last photo shows what it looks like at the end, the only addition being the addition of pearls inside the double crescent circle with gold polyester thread:


RWT10.5

Once it was done, I cut away the excess batting that falls outside the mandala and here’s what the back looks like at this phase:


RWT10.7


We won’t see this block again for awhile, but it was a blast to stitch this out!  Three more to go, and I’ll post those along the way!


RWT10.6


My Blog Is Back!

September 10th, 2016
ada0.5
Phew!  It looked like we’d lost the blog forever when we moved to our new web site but she’s back!  If you have bookmarked the old blog, the new url for the blog is:  https://blog.patsythompsondesigns.com/
 
 
When I was re-organizing my NC sewing room after the paint had dried, I finally finished up this quilt that I started a few years ago:
 
ada1
 
The flower in the center of each of these blocks was trapuntoed.  I’m not sure that any shots show the texture very well:
 
ada2
The background quilting on this first block is the irregular swirl and it’s quilted in a gently variegated blue polyester thread:
 
ada3
This next flower has a similar swirl design in the largest leaf section:
 
ada5
 
…and the orange background is quilted with a “stacked swirl” design:
 
ada6
 
Next up is a flower that has hyperquilted “vein lines” inside the largest set of petals:
 
 
ada7


…and the background is quilted with another fun design in a dark blue solid rayon thread:
 
 
ada8
The 4th flower has a hyperquilted feather inside the largest flower petals:
 
ada9
 
…and the background is another swirl design:
 
ada10
 
This is for my great niece who just turned one years old.  I’m hoping she will get hooked on bold, saturated colors right from the start!


Loose Ends and a Give Away

September 17th, 2015

My life got so hectic in the last couple of months that I’m ashamed to say that I left many loose ends dangling in the wake of “hurricane Patsy’s summer.”  Do you remember when I posted a photo of Gary Harvey’s beautiful circle of featherettes that he quickly stitched up during a quickie 3-hour class?  The photo below will hopefully jog your memory-isn’t his work fantastic?!


  Gary-Harvey's-Block-with-Featherettes

What he did here was to create temporary markings of triangles that rotated around a circle and then he went in and filled them with a basic featherette.  At my request, he sent me 2 photos of his completed project.  (I think he sent them to me, like the very next day!  This guy not only quilts beautifully, but he quilts really fast!)  Anyway, this next shot is of his 18 inch quilted block before he’s sewn it into a pillow sham.  I lightened it up a little so you could see all the details of his thread work:


gary0.5

Isn’t it stunning?!  What he’s done in this 2nd round of stitching is to create a 2nd temporary circle that surrounds the original circle of featherettes.  He then filled in the “empty spaces” within the 2nd circle with another set of featherettes that are oriented in the opposite direction.  Look even more closely and you’ll see that he’s done 2 hyperquilting designs, one inside each circle of featherettes, and then he’s surrounded the entire design with the “plumify it” background fill design.  Here’s a shot of his final project, after it’s been sewn into a pillow sham:


Gary-2

What a great job he did!  Here’s a little tip for when you’re adding “layers” of featherettes onto a frame but you’re trying to create a cohesive design that “reads” as one design.  Even though the circle itself is never stitched, we “see” these designs as a unified whole because of simple outlining.  Here’s another example of what I’m talking about:

maroon-snowflake-wreath

Just like in Gary’s block, the featherettes actually just “float” because there is no stitched structure that actually supports them.  If you look closely, there are 2 lines of echo quilting that surround the entire “snowflake wreath.”  Who would have thought that some narrow lines of stitching could have such power to pull a complex design together?!


I can’t say anything yet, but I’m hoping to have some very exciting news in about a week…what could it be?! I’m happily offering up a free special gift to whoever guesses the right answer but you have to post a comment to this blog post to enter and your comment must be in before I make the announcement next week.  If you want to cover your bases, make multiple guesses of different announcements but make sure you do it as separate comments to be counted!  (I can’t tell you what the gift is or I’d give away the announcement, but know that it’s a nice gift and I’ll pay shipping, wherever you live in the world!)

***Note:  This give-away is officially closed as of 8:00 PM EDST on Sat 9/26/15***

A Wonderful Surprise!

July 25th, 2015
Woo-hoo!  Our local quilt show, Kaleidoscope of Quilts, was held this weekend and I am one lucky quilter!  The quilt I call “My Thistle Garden” won many awards…Best of Show, Best Wall Quilt, and Best Machine Quilting on a Non-Computerized Long Arm!  I feel so proud and so grateful!!
 
MTG-at-GCQC
What a great way to begin the weekend!  Well, it only got better from there!  I taught a class on trapunto in the afternoon and for the first time ever, everyone decided to frame their wreath with a circle of featherettes.  Check out this shot of Gary Harvey’s block where he’s stitched his first round of featherettes surrounding the wreath:
 
Gary-Harvey's-Block-with-Featherettes
Can you believe that this was the first time he’d tried using a chalk triangle to create boundaries to make a freehand featherette?  His work is so symmetric it almost looks like it was created from a digital file!  He’s working on another row of featherettes that will fall between these now and I can’t wait to see what his finished block looks like!  When I asked if anyone else would let me take a picture of their block for my blog, everyone was SILENT!  Sorry I don’t have more pictures but you’ll have to trust me, they did some really beautiful work and it made my day.   Hope everyone else is having a great weekend!