May 23rd, 2017
O.M.G!
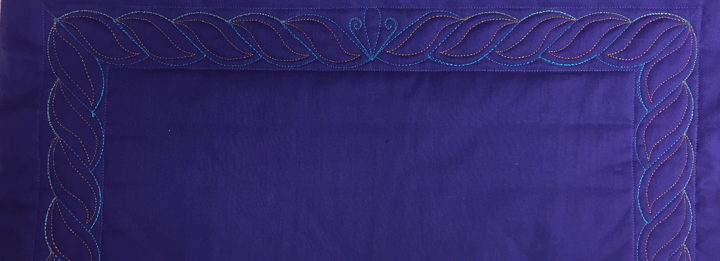
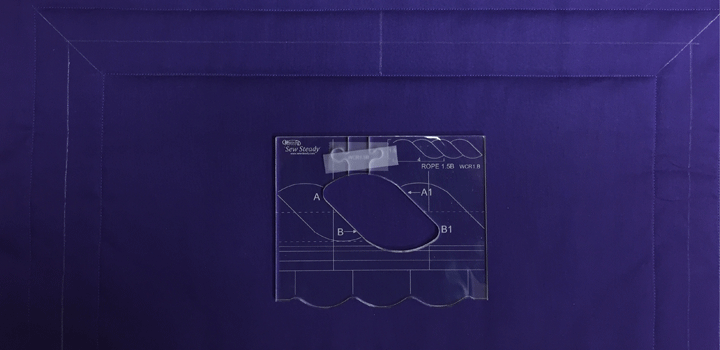
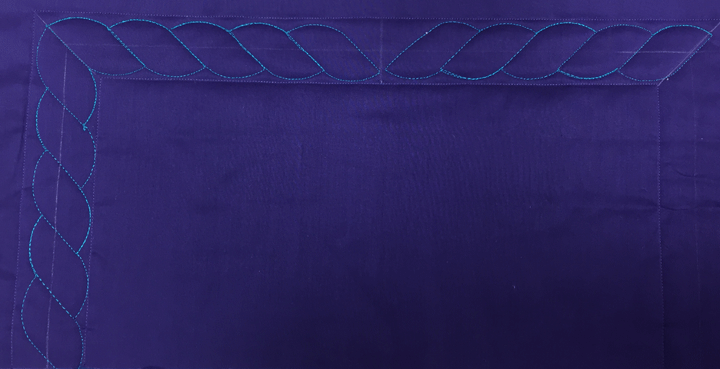
The photo above is my first experiment playing with the Westalee rope templates. I have drooled over these Westalee continuous rope border templates for many months, but I was totally stumped by 2 issues:
1. If I begin my rope at the miter line in a corner, how do I ensure that the design will arrive at “just the right place” (meaning the neighboring miter line)when I reach the opposite corner?
2. Even if I get right to the miter line in the 2nd corner, how in the world do I turn that corner?
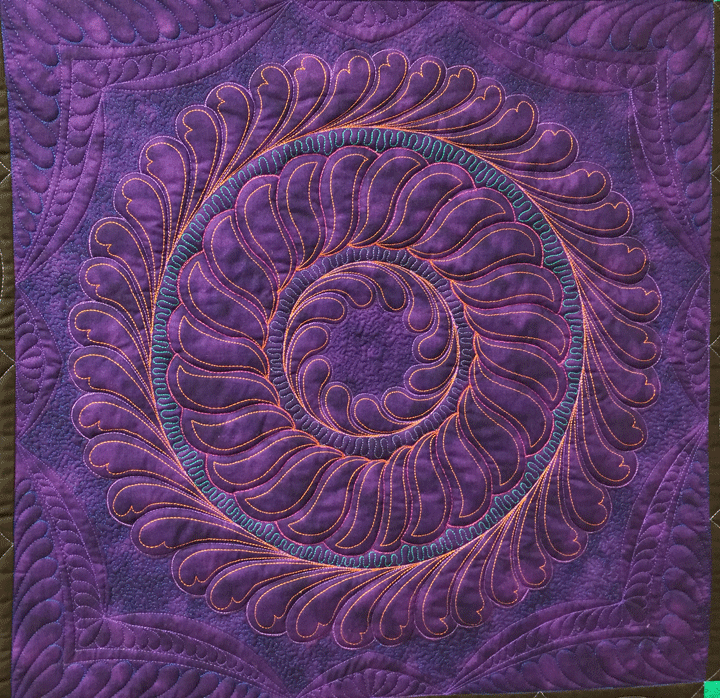
I wracked my brain, trying to figure these issues out for months, and I didn’t buy a set of templates because I just couldn’t “crack the code.” Enter quiltshopgal, whose blog is an endless resource for information on all things quilt-related. (If you don’t read her blog, you can find it by clicking here.) A couple months ago, she contacted me because she was writing a post about Westalee Rope Templates, and she wanted to add some info about designs I’ve made playing with their rope wreath, like the one shown below:
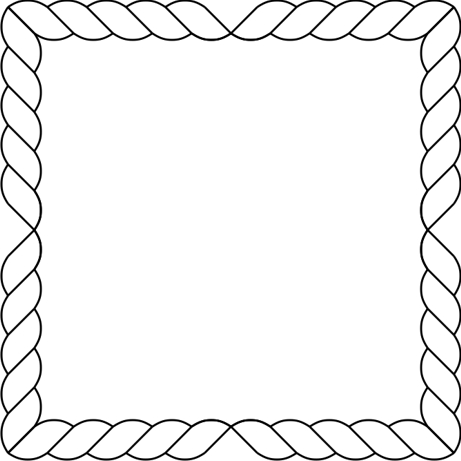
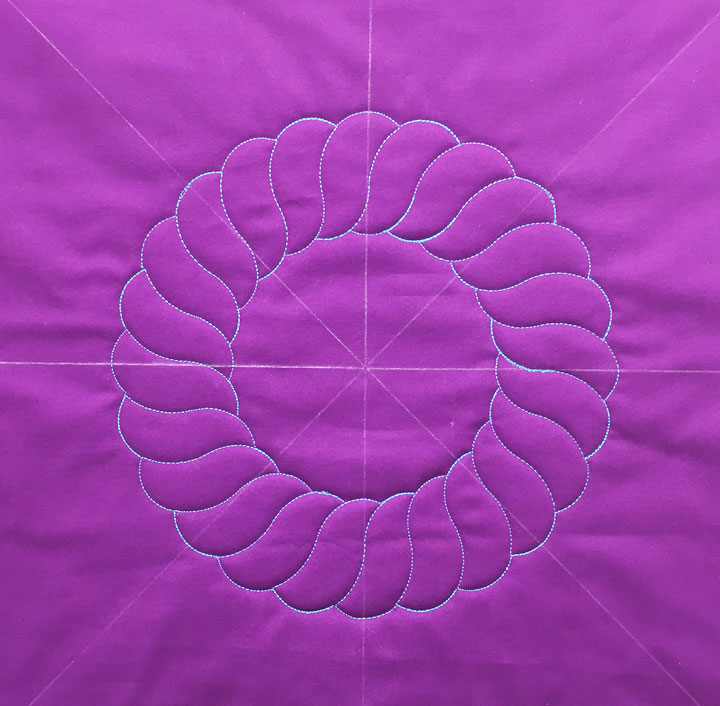 (The photo above is the wreath formed by using the Westalee Circles on Quilts Wreath #3 Template, which you can find in our store by clicking here.) When I read her entire post, (which you can find by clicking here), she also wrote about the continuous rope border templates, and she had a diagram that showed the perfect way to handle the those 4 corners and the center “meetup.” Here is the image from her blog post that blew open the world of continuous rope border designs for me:
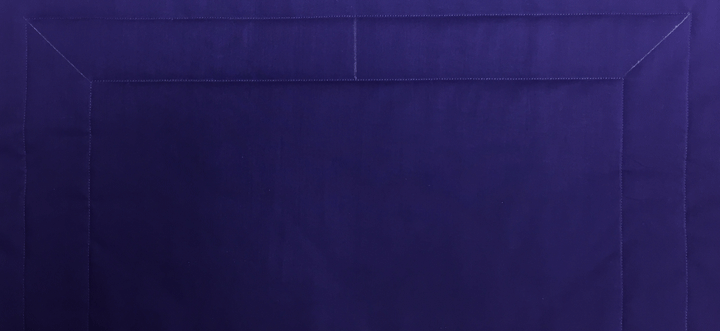
 Talk about a eureka moment! I’m going to outline the steps I took to handle the corners and “meet up” in the center. For this experiment, I am using the Westalee 1.5B Continuous Rope Template. (This template can be found in our online store by clicking here.) I created a “fake border” for my experiment that is 1 3/4 inches wide. (Note: This means I made my border 1/4 inch wider than the actual stitched design. I did this on purpose because it gives me roughly 1/8th of an inch of wiggle room on each edge of the border zone. This is my way of hedging since I know I’m human and likely to not stitch this out perfectly. As it turned out, this paid off well for me.)
Step 1A: Using a temporary marker, place a diagonal line in each corner at the miter line, as well as a perpendicular line in the dead center of each of the 4 borders:
Talk about a eureka moment! I’m going to outline the steps I took to handle the corners and “meet up” in the center. For this experiment, I am using the Westalee 1.5B Continuous Rope Template. (This template can be found in our online store by clicking here.) I created a “fake border” for my experiment that is 1 3/4 inches wide. (Note: This means I made my border 1/4 inch wider than the actual stitched design. I did this on purpose because it gives me roughly 1/8th of an inch of wiggle room on each edge of the border zone. This is my way of hedging since I know I’m human and likely to not stitch this out perfectly. As it turned out, this paid off well for me.)
Step 1A: Using a temporary marker, place a diagonal line in each corner at the miter line, as well as a perpendicular line in the dead center of each of the 4 borders:
 Step 1B: Using the same temporary marker, make a line across the mid-point of the border’s width, as shown below:
 The template in the photo is the one I’m using for this experiment. If you look closely, you’ll see a dotted line etched into the template. This dotted line is important, as you’ll be placing it directly over your midway line that moves all the way across your border.
Step 2: Begin in the corner of your choice, and place the template so the needle will pierce the miter line AND the dotted line on the template will be directly over the temporary mid-line on your border. The photo below shows my starting placement:
The template in the photo is the one I’m using for this experiment. If you look closely, you’ll see a dotted line etched into the template. This dotted line is important, as you’ll be placing it directly over your midway line that moves all the way across your border.
Step 2: Begin in the corner of your choice, and place the template so the needle will pierce the miter line AND the dotted line on the template will be directly over the temporary mid-line on your border. The photo below shows my starting placement:
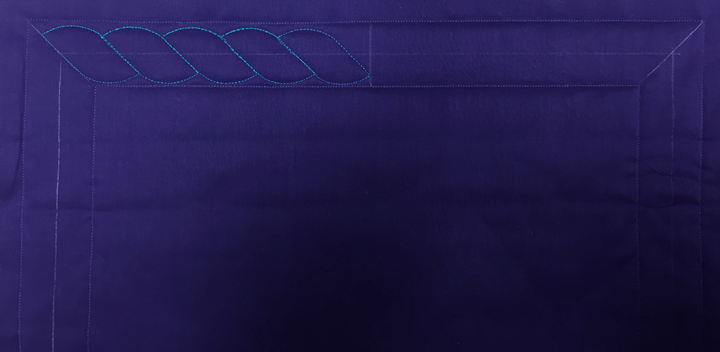
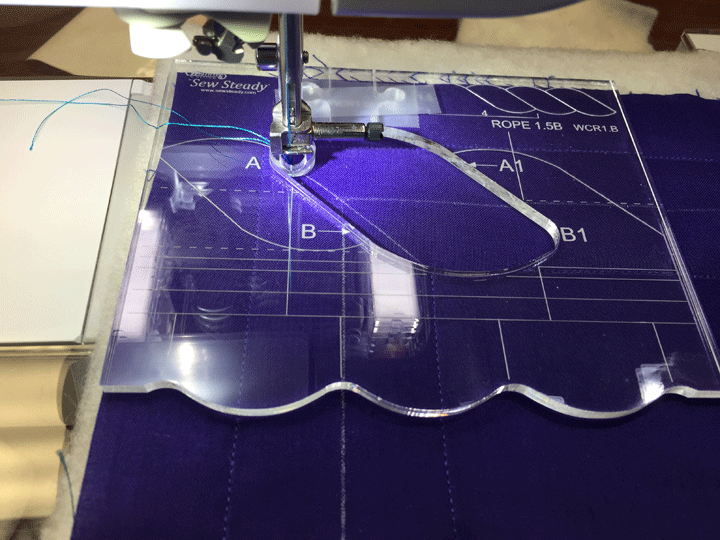 Step 3: Following the inside edge of the template, stitch out a sequence of ropes. When you reach the last rope you
can stitch before crossing the center line, stop stitching and end your thread line as below:
Step 3: Following the inside edge of the template, stitch out a sequence of ropes. When you reach the last rope you
can stitch before crossing the center line, stop stitching and end your thread line as below:
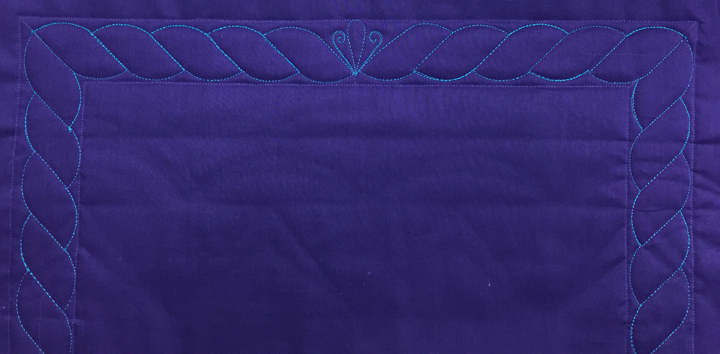
 Now, before I go any further, I need to point something out. It is a complete coincidence that the final rope cable terminates at the center point. This was not planned and you should be prepared to have to deal with a way to connect the 2 center rope cables that don’t actually meet at the center. You will just have to wait for another day when I encounter this for an example of how I will deal with this down the road! For now, know that the first side is done and now we move to the opposite corner and begin just as we did before. The only difference is that the cables are oriented in the opposite direction, so I had to flip the template over and use it in the opposite way.
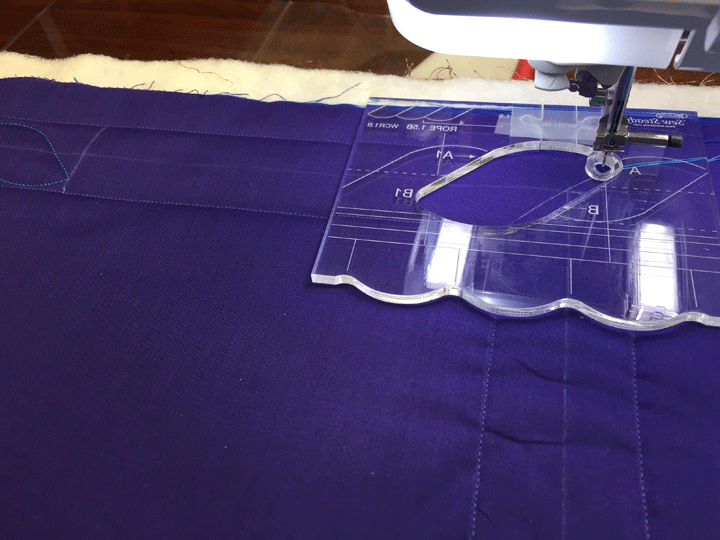 Step 4: From there, I went back to the corner and pierced my needle in the miter line, then aligned my fabric line with the dotted line on the template. Here is how things ended up with merging rope cables at the corner and in the center:
 Things weren’t quite as perfect at the center as I would like, but I disguised my error by throwing a small “fleur-de-lis” in between the center ropes:
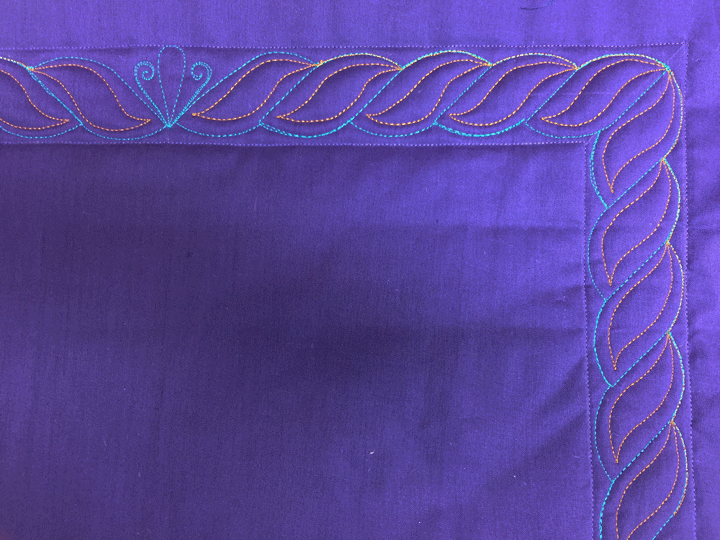
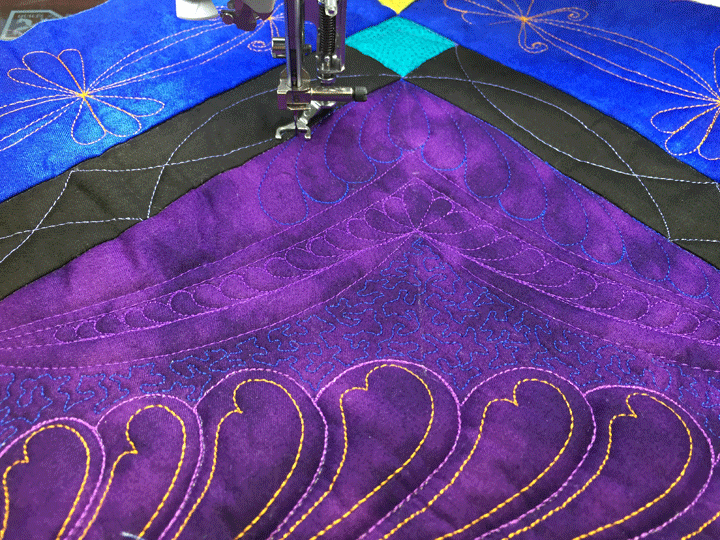
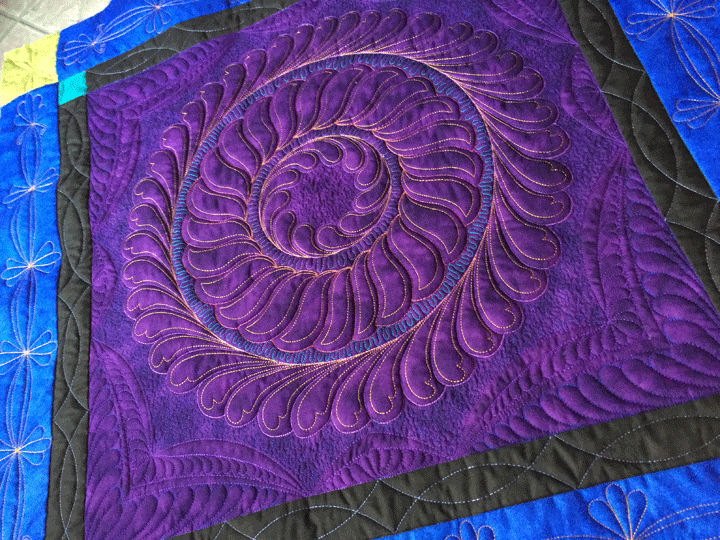
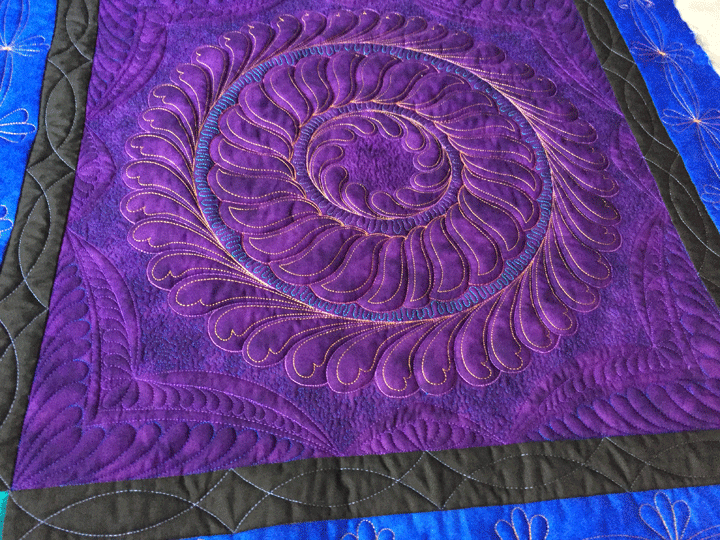
 I thought this came out great as my first experiment with the Westalee rope templates, but I had to carry it one step further. I swapped my thread to a Floriani gold polyester thread and hyperquilted the rope cables. I think it gives them more of a twisting movement:
…and here’s a closeup of the center and corner meetups:
I thought this came out great as my first experiment with the Westalee rope templates, but I had to carry it one step further. I swapped my thread to a Floriani gold polyester thread and hyperquilted the rope cables. I think it gives them more of a twisting movement:
…and here’s a closeup of the center and corner meetups:
 Totally fun! Can’t wait to try this on a real quilt! Thank you, quiltshopgal!
Filed under
Free Motion Quilting, ruler work on a HDSM.
May 17th, 2017
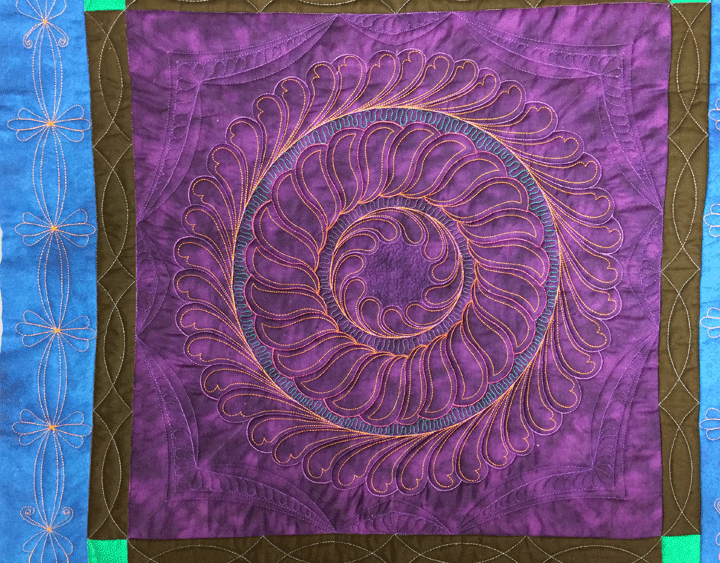
 When you have an important motif (and that motif could be a quilted, appliqued, or pieced motif), you can frame it with your quilting design. The trapuntoed feathered wreath in the center block is important, and it’s been highlighted further through framing. Unfortunately, the overall size of my block didn’t leave me much room for framing, but there was enough room for a small frame design.
I began by using my original temporary marks that I used to create the trapuntoed section. The only thing new here, (and it’s hard to see), was that I added small tick marks 2 inches from either side of the short center lines:
When you have an important motif (and that motif could be a quilted, appliqued, or pieced motif), you can frame it with your quilting design. The trapuntoed feathered wreath in the center block is important, and it’s been highlighted further through framing. Unfortunately, the overall size of my block didn’t leave me much room for framing, but there was enough room for a small frame design.
I began by using my original temporary marks that I used to create the trapuntoed section. The only thing new here, (and it’s hard to see), was that I added small tick marks 2 inches from either side of the short center lines:
 I used those marks as my starting/stopping points and then used my PTD 8 arc ruler and PTD 6.5 ruler to create the first round of framework:
 I then went back in with the PTD 12 arc to create tapered swags on the larger curves, and used the same PTD 6.5 arc on the small center arches to create a tapered swag:
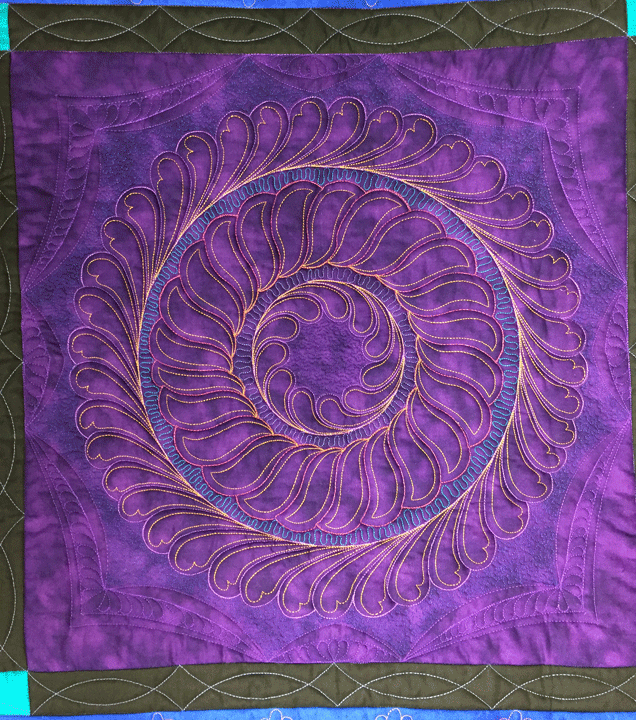
 If you look closely at the long diagonal soap lines in the corners, you’ll see a small tick mark about 1 inch from the swag cleavage points. I used those tick marks as may new starting/stopping points and then took my Quilted Pineapple 22 arc ruler to add in another arc. Once that arc was stitched, I added a new tick mark 1/2 inches down further and then used the same ruler to create a channel:
 Now that all the ruler work framing has been finished, the fill in work begins. I first added featherettes inside the widest channels:
 Next, I used a dark blue thread to stipple in the zone between the wreath and the frame. This will serve to highlight both the wreath and the frame:
 Lastly, I added another featherette, stitched in the same dark blue polyester thread, in the remaining space between the block’s edge and the ruler work framework. Here is a shot of one corner as it is being stitched:
 The goal in stitching these featherettes is to completely fill the empty space with the featherette. If you do that consistently, that will give the look of identical and mirror image featherettes. Of course, you are stitching everything freehand, so it is not identical at all, but it will give the illusion that it is. Here are some other shots:
 You can appreciate the texture better in tangential shots:
 Learning to create custom featherettes to fill spaces on a quilt is a very, very useful skill to develop. If you are interested in learning more, this is an old blog post that talks about them a bit and you can find it by clicking here.
 An even more in-depth instruction can be found in my Craftsy class called Ultimate Free Motion Feathers and you can find it by clicking here.
Filed under
Craftsy!, Free Motion Quilting, ruler work on a HDSM, Trapunto.
May 11th, 2017
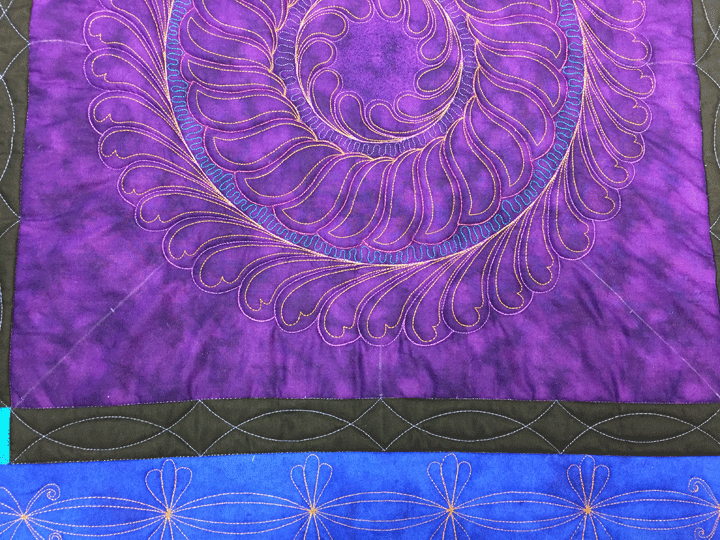
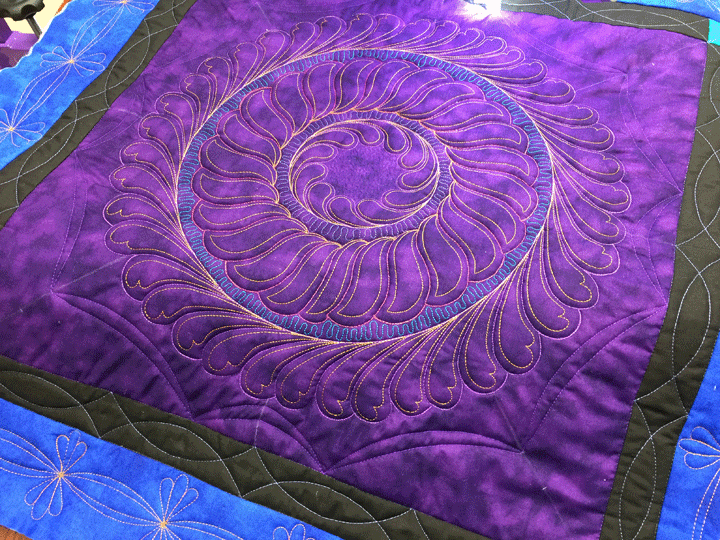
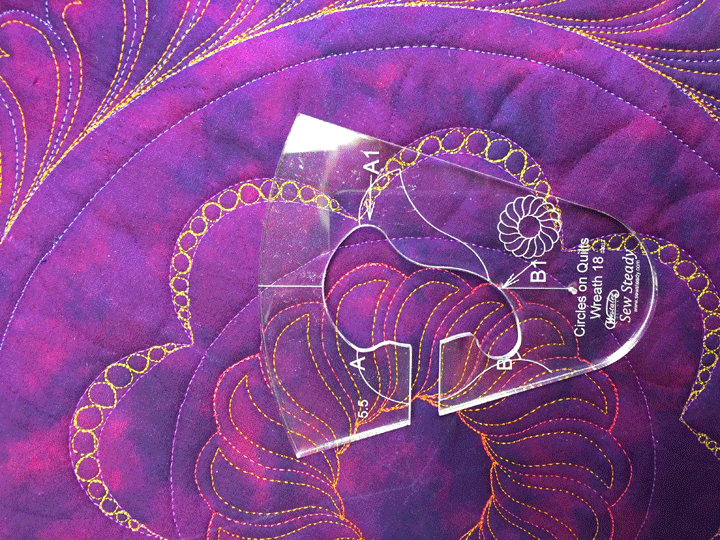
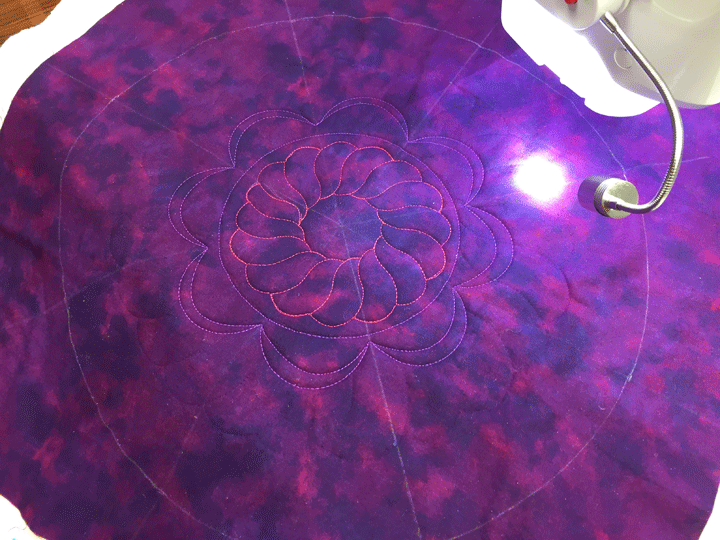
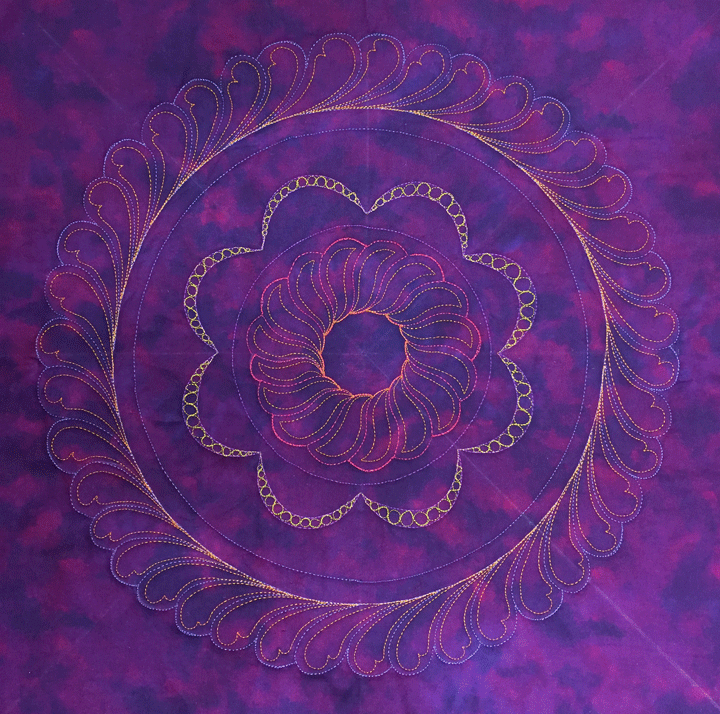
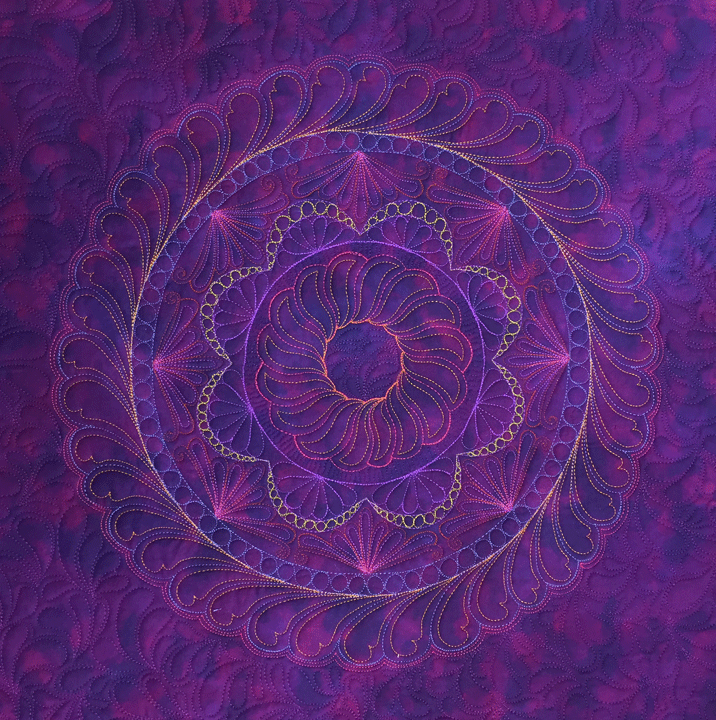 I finally tried out the Westalee small rope wreath template and I like it quite a bit. It is the centermost portion of the feathered wreath shown above. This is the Westalee Circles on Quilts Wreath #18 template and the shot below gives you an idea of the shape of it:
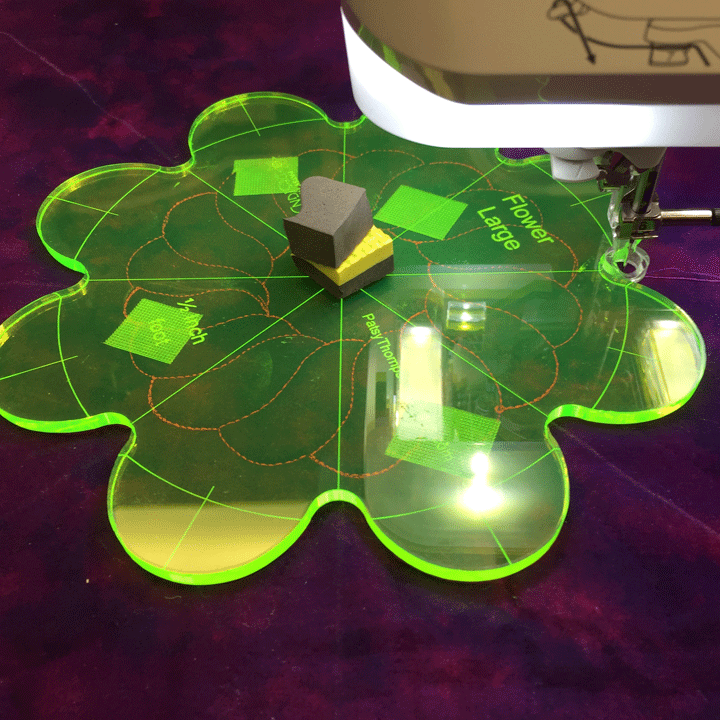
 Once I’d marked my lines to denote the center of the block, I used that template to create the small rope wreath in a geranium colored rayon thread. (This template is the same as the Westalee Circles on Quilts Wreath #3 template, except that it creates a smaller rope wreath with a diameter of 5 1/2 inches as compared to the larger 11 inch diameter rope wreath.) I then used the large PTD Flower Template to create another design surrounding the wreath. In the shot below, you can see the rope wreath underneath the flower template:
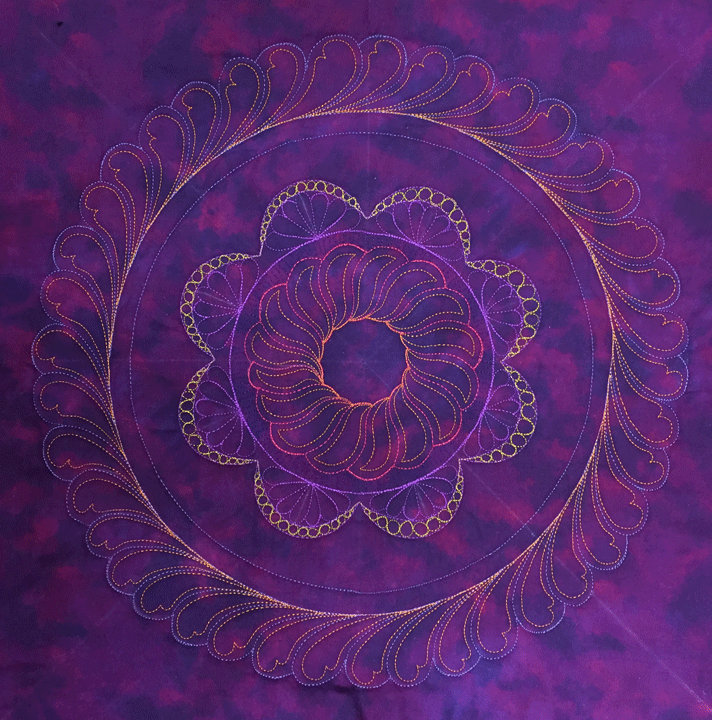
 I then used one of my Westalee Circles on quilts templates to create a circle just inside the based of the flower petals and I used Superor Threads Art Studio Colors Polyester thread #307 for that round of stitching:
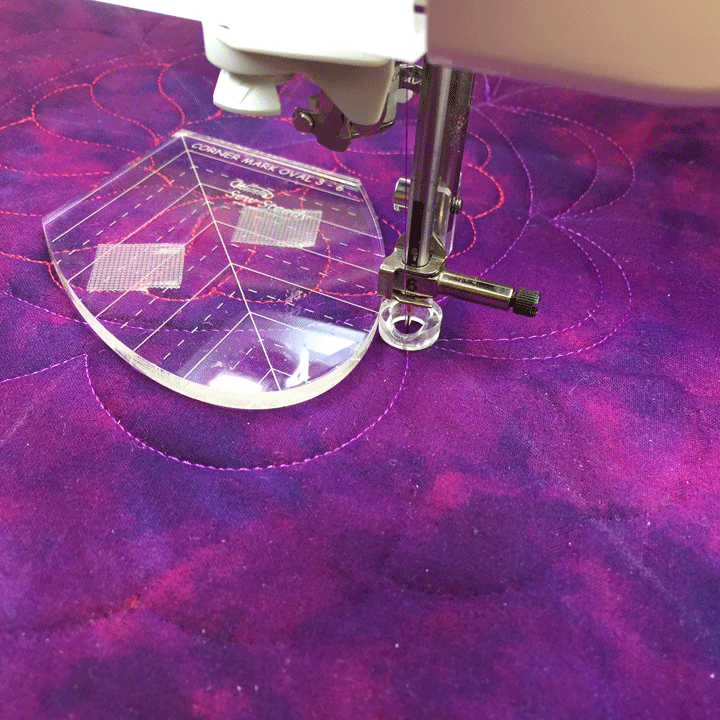
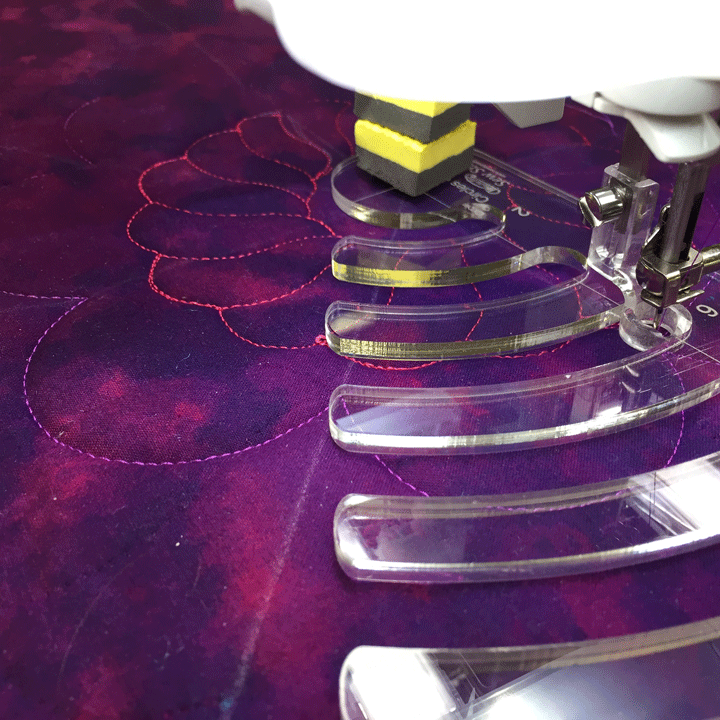 Next, I used one of the Westalee Corner Marking Oval Templates to create a tapered channel inside the flower petals. This cuts back on how much space I’ll have to fill inside the petal zone but it adds a nice level of intricacy to the framework, so it’s worth adding:
 In this next shot, the channel work is complete and I’ve drawn a temporary circle surrounding the whole enchilada. This soap circle marks the boundary line for all my plumes when I go to complete the feathered wreath.
 That boundary circle is the absolute largest size I can make my feathered wreath for a quilt sandwich of this size. Once I’ve established this boundary, I can determine the sizes for my remaining circles for my feathered wreath. I again used my Westalee Circles on Quilts templates to stitch those inside circles. Once stitched, I went in and added my plumes freehand:
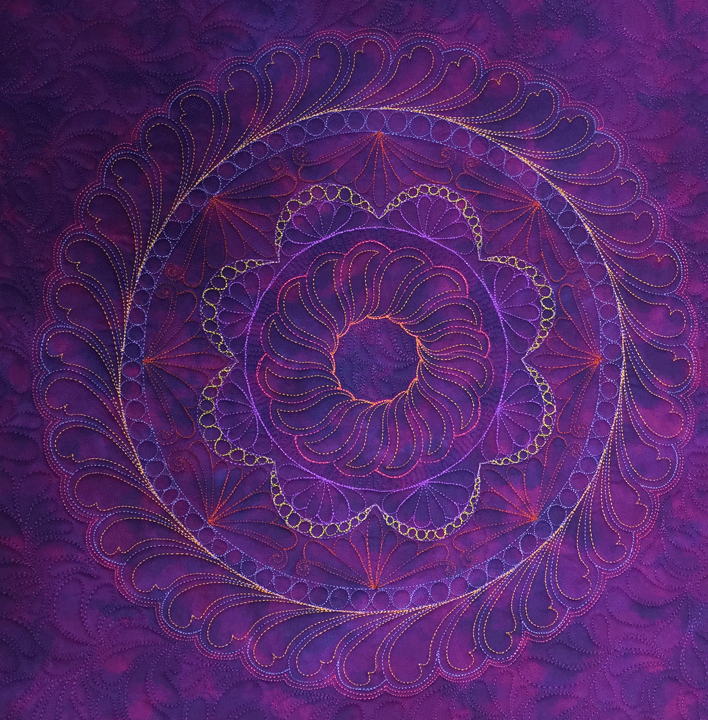
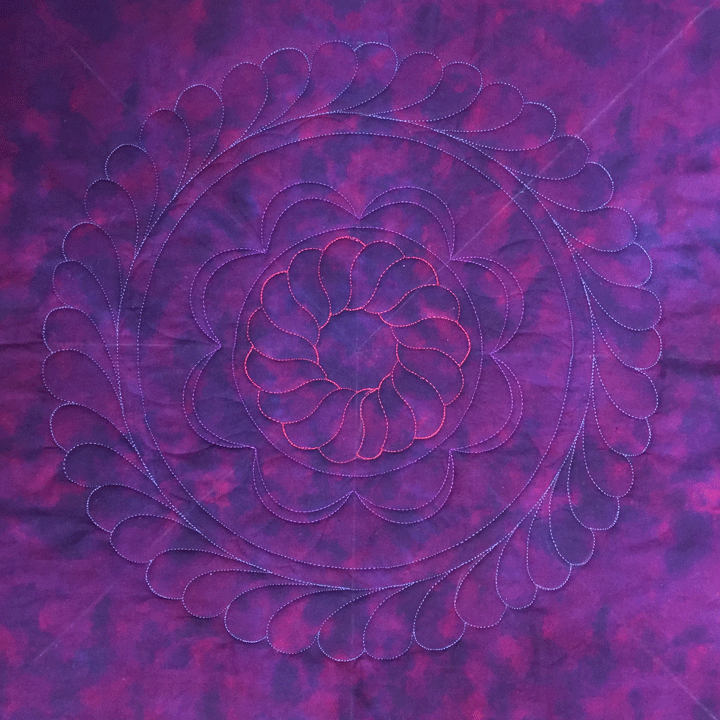 In the next shot, I’ve added hyperquilting inside the small rope wreath and also inside my outer wreath plumes. I used a gold Floriani polyester thread for both:
 In this next round of stitching, I added small pebbles inside the tapered channels of the petals. I used a green/gold polyester Floriani thread for this:
 I added small featherettes inside the petals (Superior Threads Art Studio Colors polyester thread) and also added a tiny inchworm design (dark purple Isacord thread) in the zone between the small rope wreath and the flower circle:
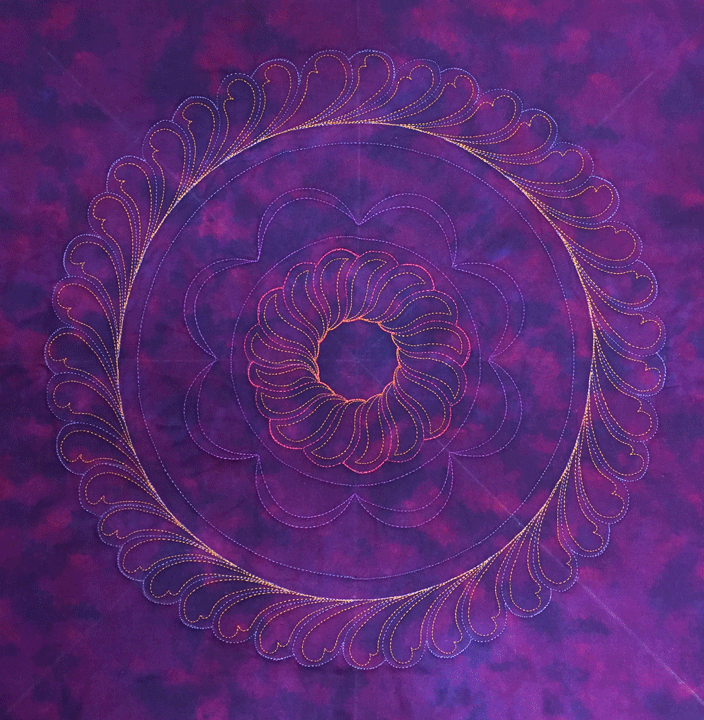
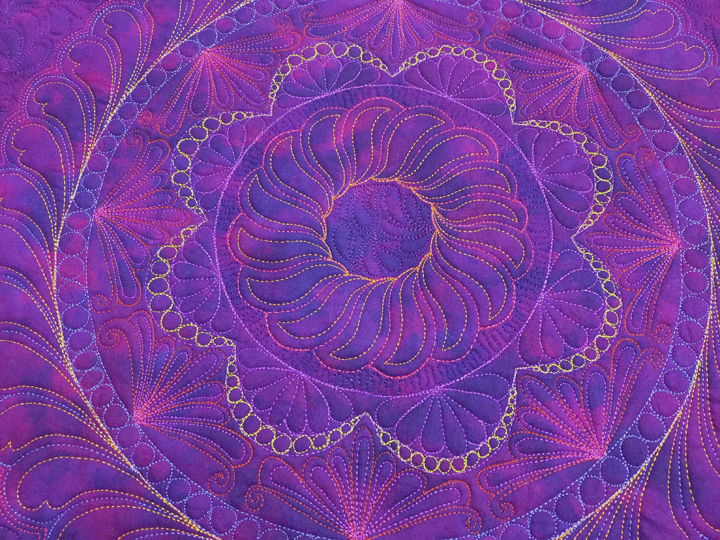
 I swapped to a terra-cotta Isacord polyester thread for the featherettes in the empty zone outside the flower design. These are all done freehand, but if you look at the shot below, you’ll see that I have temporary soap lines that are guiding me in how large/small to stitch my plumes:
 This is how things looked once those were done:
 I went back in and hyperquilted those outer featherettes using a rose colored polyester thread:
and one last closeup:
I went back in and hyperquilted those outer featherettes using a rose colored polyester thread:
and one last closeup:
Filed under
Free Motion Quilting, ruler work on a HDSM.
May 7th, 2017
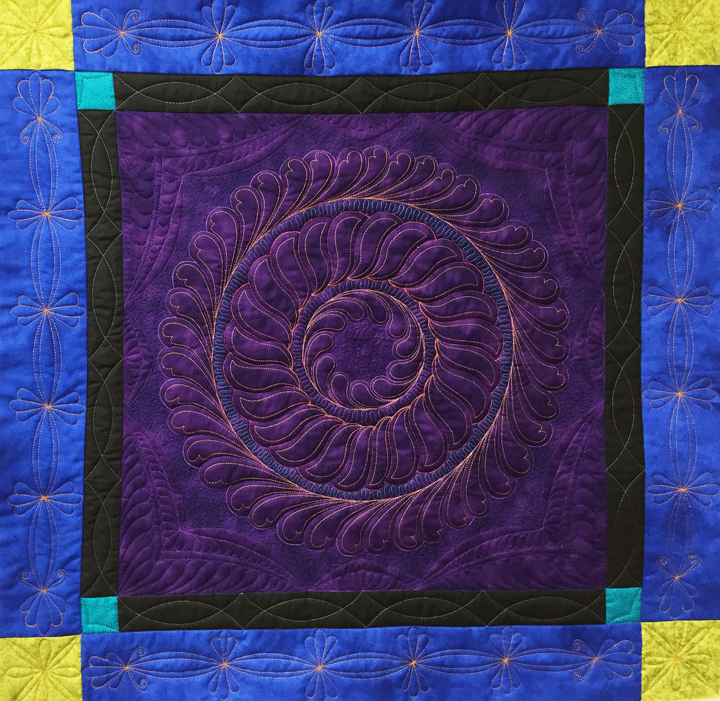
 The last few weeks have kind of whizzed by and the only quilting I’ve done have been demos in classes. I’m throwing in a few quilt photos here to thank you for coming to my blog even though I have no new work to blog about!
 (Doesn’t this table runner put you into a springtime mood?) Anyway, I was straightening out some drawers last Friday and came upon a bunch of paperwork from an event that had occurred literally 8 years ago to the day…how’s that for a coincidence?! Anyway, the event was that I was a stem cell donor for a young man with a lymphoma.
 The whole experience was very moving and ended up being pretty easy. One of the things I remember about it was that Mother’s Day was just after the donation, and I felt so happy all day because I kept thinking that this guy’s mom was probably feeling great, that her son had another chance. My guy did very well but then suddenly died 6 months later, just before Thanksgiving. Ever since then, I still think about that mom every Mother’s Day and wish I could reach out to her some way. It’s funny how you can feel so connected to people you really don’t know at all.
 If you’ve ever thought about being a stem cell donor, do it! If you are curious about how the process works, I wrote a blog post about it in May of 2009 and you can read that by clicking here. Hopefully, I will have a new post later this week with photos from some current quilting!
Filed under
Free Motion Quilting.