July 4th, 2017
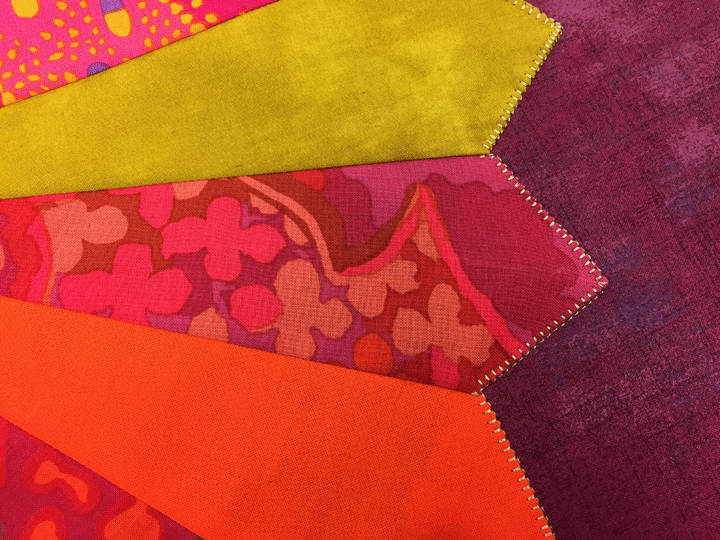
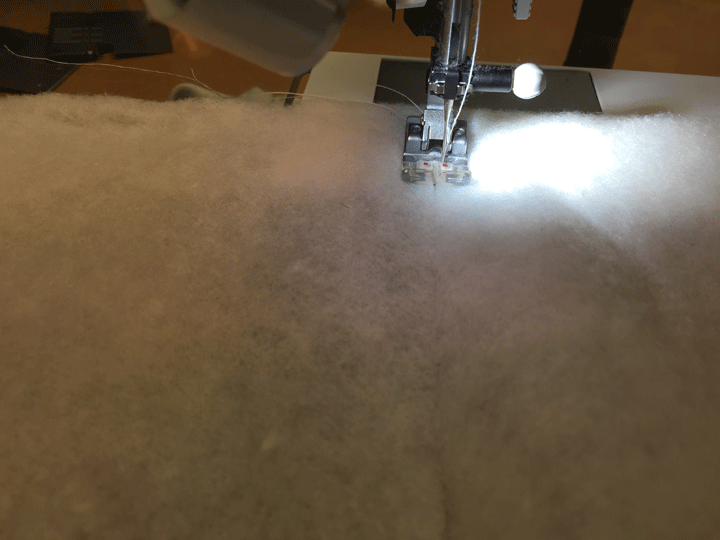
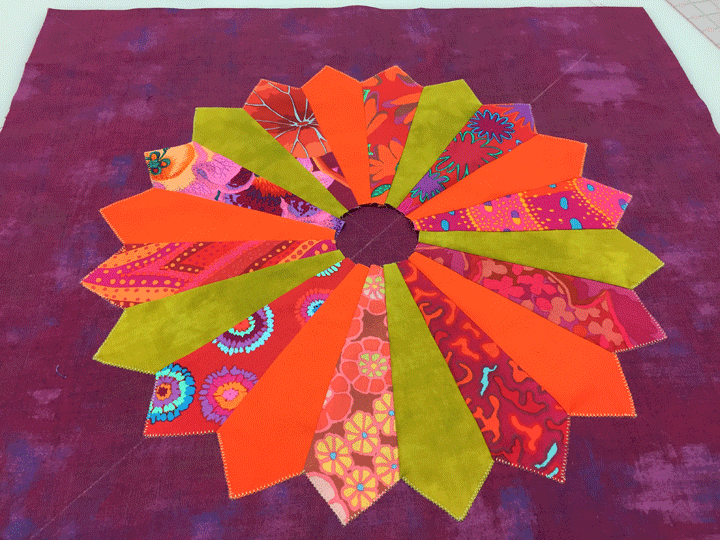 I cut a lot of squares for another chevron quilt last week, then used the small pieces at the end of each strip to cut fans for a Dresden plate quilt. I was so excited by working with these beautiful Kaffe Fassett fabrics that I cut up far more fans than I needed for the Dresden plate quilt I wanted to make. The Asheville Quilt Guild always has a small quilt auction to raise money each fall, so I stitched up a 25 in square block to donate. The shot above shows the beginnings of it. I’m hand appliquing the Dresden plates for my “real quilt,” and thought I’d machine applique it on my donation quilt. These are fairly large Dresden plates; I think they measure about 19 inches in diameter. You can see in the shot below that in my haste, I didn’t make the world’s greatest choice about the color of the thread or the size of blanket stitch:
 Oh well, chalk that up to being in too much of a hurry. In this next shot, you can see that I fused a layer of interfacing to the back side:
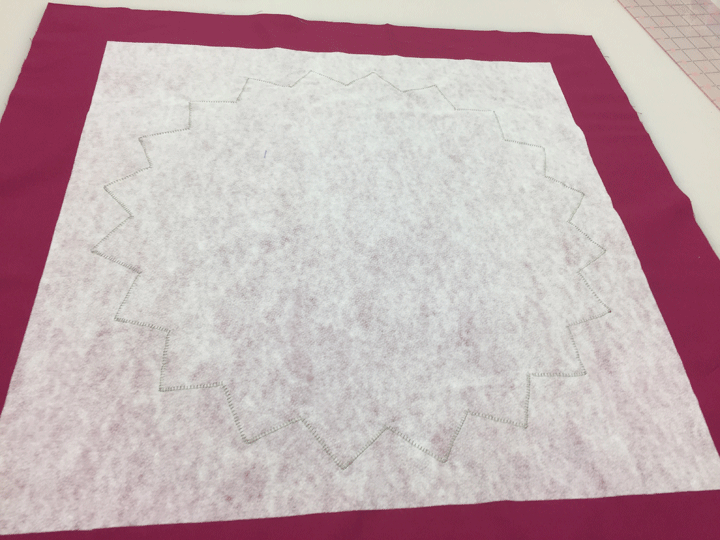 This was to stabilize it so the edge stitching wouldn’t cause any puckering. Next up, I cut away the background fabric that falls inside the applique:
 And just for fun, I decided to add a layer of trapunto. I zig-zagged a couple of batting scraps together for the trapunto layer:
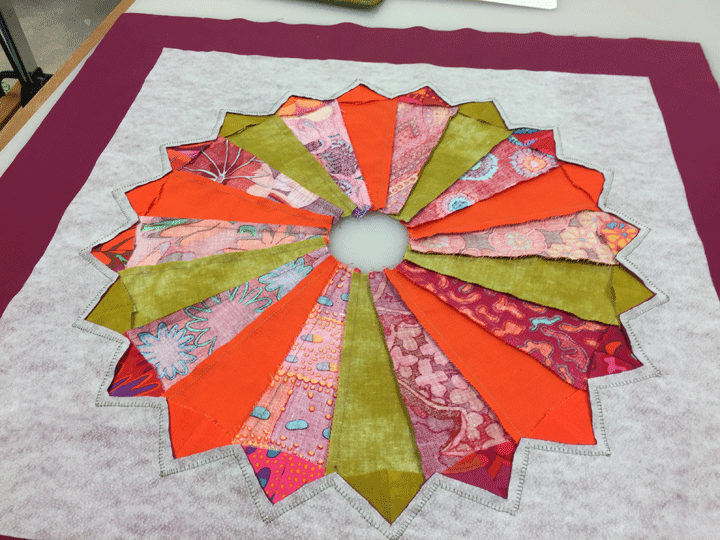
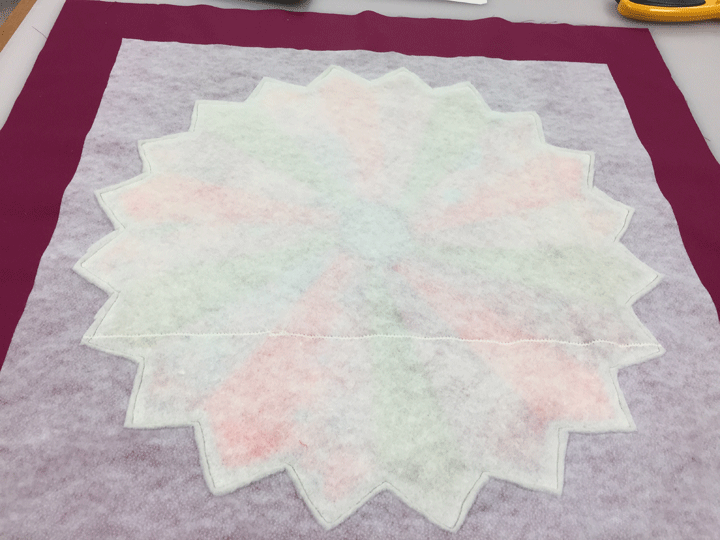
 …and then used invisible thread in my top needle to attach the batting to the applique section. In this last shot you can see the backside after the batting has been cut away:
 Now the fun part can begin! I am hoping to get this quilted within the next week, so stay tuned!
Filed under
Free Motion Quilting, Trapunto.
May 17th, 2017
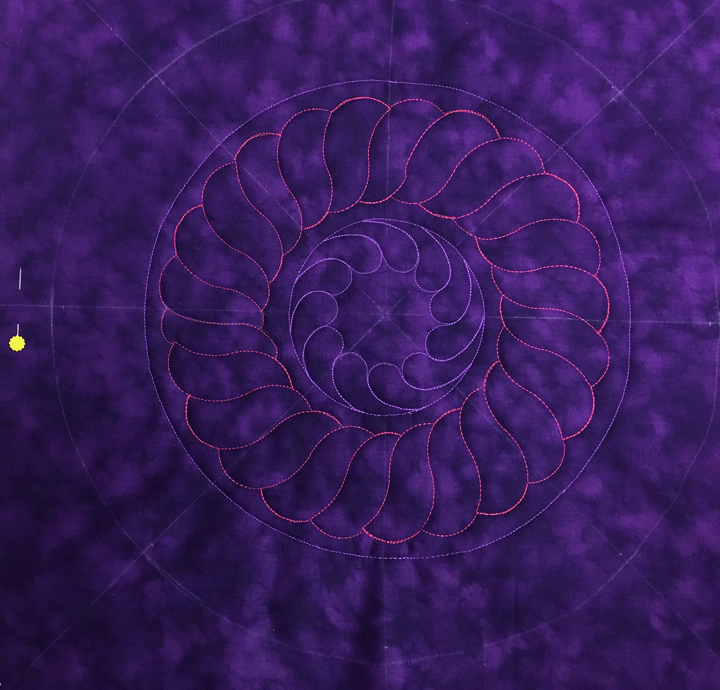
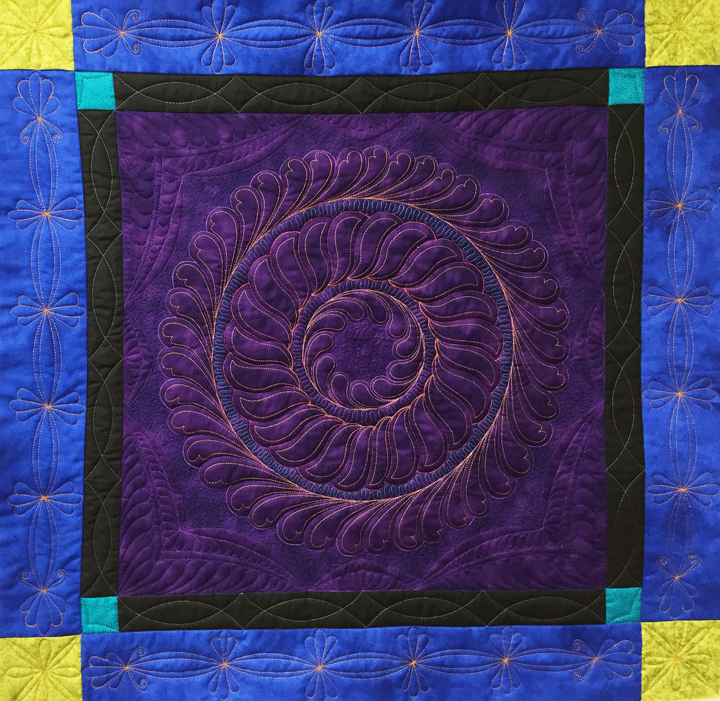 When you have an important motif (and that motif could be a quilted, appliqued, or pieced motif), you can frame it with your quilting design. The trapuntoed feathered wreath in the center block is important, and it’s been highlighted further through framing. Unfortunately, the overall size of my block didn’t leave me much room for framing, but there was enough room for a small frame design.
I began by using my original temporary marks that I used to create the trapuntoed section. The only thing new here, (and it’s hard to see), was that I added small tick marks 2 inches from either side of the short center lines:
When you have an important motif (and that motif could be a quilted, appliqued, or pieced motif), you can frame it with your quilting design. The trapuntoed feathered wreath in the center block is important, and it’s been highlighted further through framing. Unfortunately, the overall size of my block didn’t leave me much room for framing, but there was enough room for a small frame design.
I began by using my original temporary marks that I used to create the trapuntoed section. The only thing new here, (and it’s hard to see), was that I added small tick marks 2 inches from either side of the short center lines:
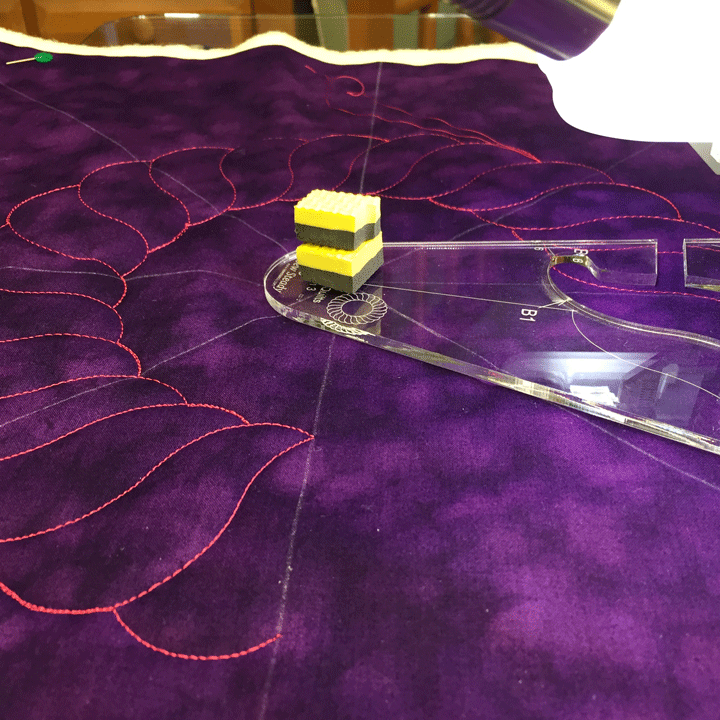
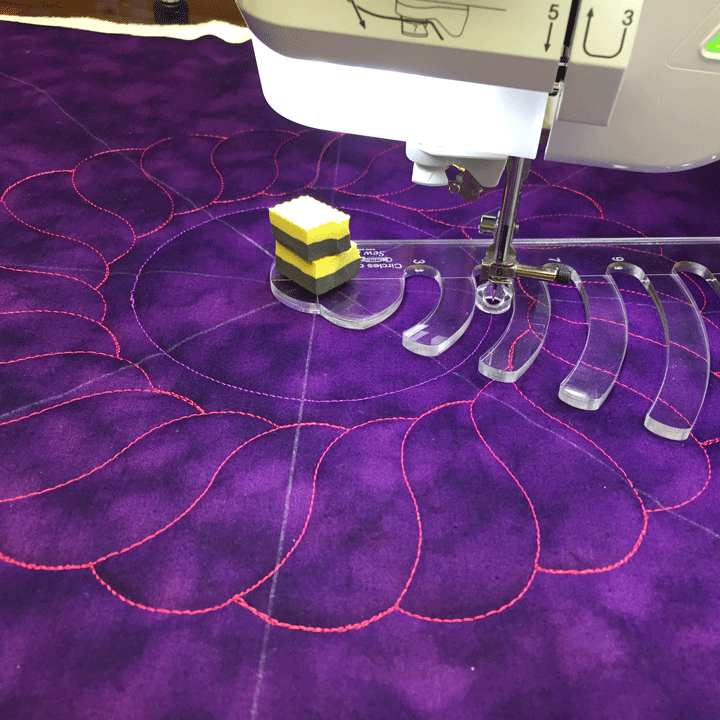
 I used those marks as my starting/stopping points and then used my PTD 8 arc ruler and PTD 6.5 ruler to create the first round of framework:
 I then went back in with the PTD 12 arc to create tapered swags on the larger curves, and used the same PTD 6.5 arc on the small center arches to create a tapered swag:
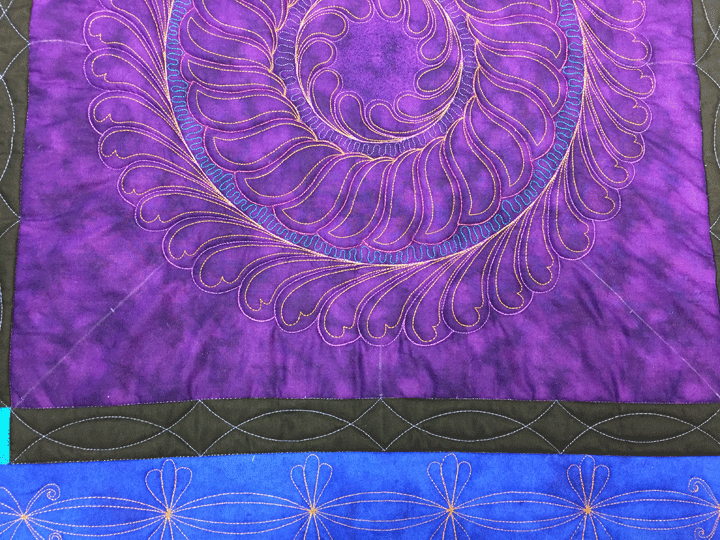
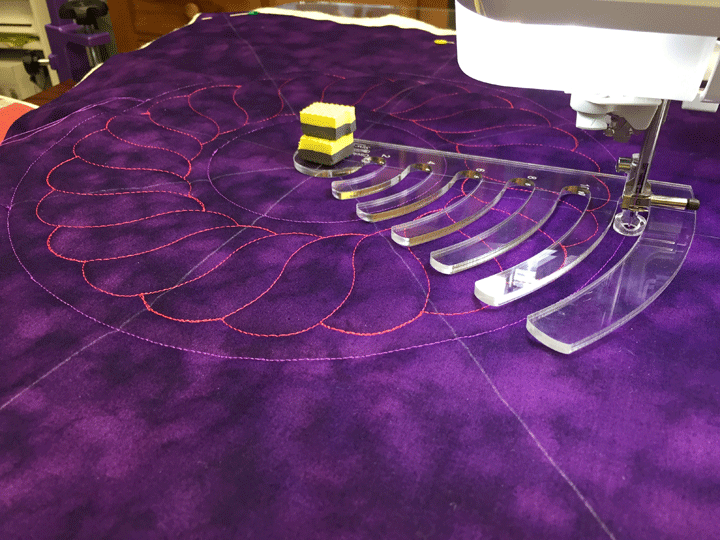
 If you look closely at the long diagonal soap lines in the corners, you’ll see a small tick mark about 1 inch from the swag cleavage points. I used those tick marks as may new starting/stopping points and then took my Quilted Pineapple 22 arc ruler to add in another arc. Once that arc was stitched, I added a new tick mark 1/2 inches down further and then used the same ruler to create a channel:
 Now that all the ruler work framing has been finished, the fill in work begins. I first added featherettes inside the widest channels:
 Next, I used a dark blue thread to stipple in the zone between the wreath and the frame. This will serve to highlight both the wreath and the frame:
 Lastly, I added another featherette, stitched in the same dark blue polyester thread, in the remaining space between the block’s edge and the ruler work framework. Here is a shot of one corner as it is being stitched:
 The goal in stitching these featherettes is to completely fill the empty space with the featherette. If you do that consistently, that will give the look of identical and mirror image featherettes. Of course, you are stitching everything freehand, so it is not identical at all, but it will give the illusion that it is. Here are some other shots:
 You can appreciate the texture better in tangential shots:
 Learning to create custom featherettes to fill spaces on a quilt is a very, very useful skill to develop. If you are interested in learning more, this is an old blog post that talks about them a bit and you can find it by clicking here.
 An even more in-depth instruction can be found in my Craftsy class called Ultimate Free Motion Feathers and you can find it by clicking here.
Filed under
Craftsy!, Free Motion Quilting, ruler work on a HDSM, Trapunto.
April 20th, 2017
 I started this quilt a couple months ago and you can read the step-by step process in older posts that you can access by clicking on the post names below:
Trapuntoed Ruler Work Mandals Part I
Trapuntoed Ruler Work Mandalas Part 2A
Trapuntoed Ruler Work Mandalas Part 2B
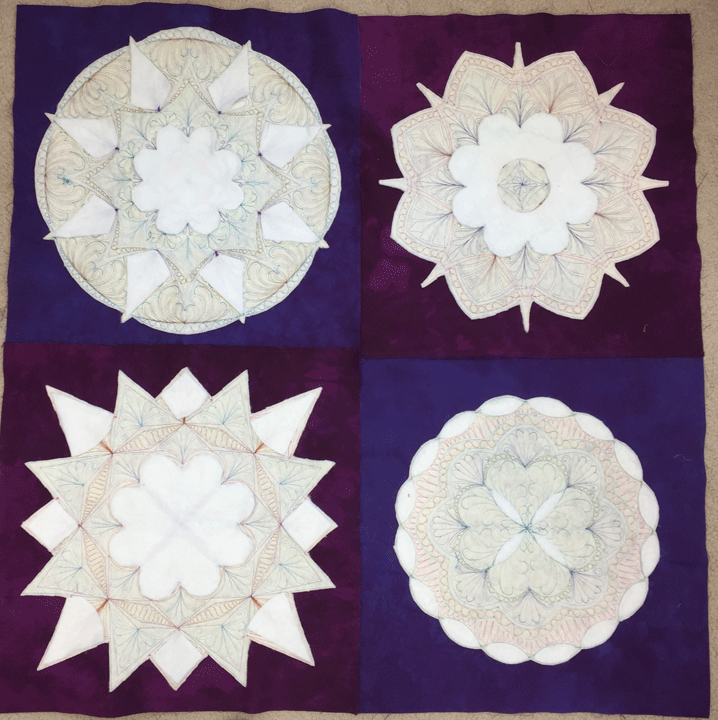
This quilt was my first experiment with using trapunto with ruler work quilted designs. I had a blast making all 4 blocks. As I was working on each one individually, I had an idea in my head about how I would quilt the surrounding area once they were all joined together in a quilt. Sadly, once I pieced them together, that design just wouldn’t work. Rats! Anyway, I quickly outlined all the various zones of each mandala with invisible thread (Monopoly clear by Superior Threads…can’t say enough wonderful things about this thread and I use it exclusively for all my invisible thread work, which is a lot!) Anyway, this part was very satisfying to me as I could quickly see the trapunto effects before I had even touched the quilting of surrounding areas:
I started this quilt a couple months ago and you can read the step-by step process in older posts that you can access by clicking on the post names below:
Trapuntoed Ruler Work Mandals Part I
Trapuntoed Ruler Work Mandalas Part 2A
Trapuntoed Ruler Work Mandalas Part 2B
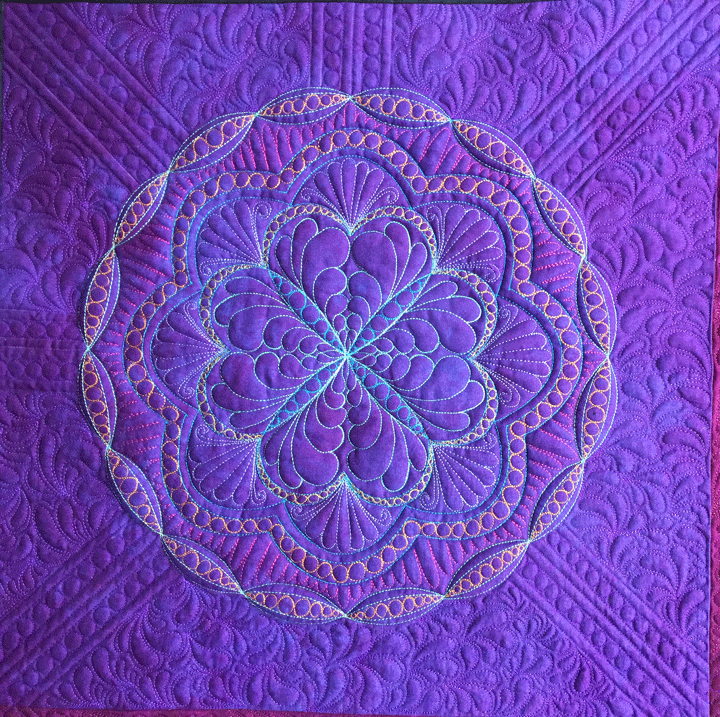
This quilt was my first experiment with using trapunto with ruler work quilted designs. I had a blast making all 4 blocks. As I was working on each one individually, I had an idea in my head about how I would quilt the surrounding area once they were all joined together in a quilt. Sadly, once I pieced them together, that design just wouldn’t work. Rats! Anyway, I quickly outlined all the various zones of each mandala with invisible thread (Monopoly clear by Superior Threads…can’t say enough wonderful things about this thread and I use it exclusively for all my invisible thread work, which is a lot!) Anyway, this part was very satisfying to me as I could quickly see the trapunto effects before I had even touched the quilting of surrounding areas:
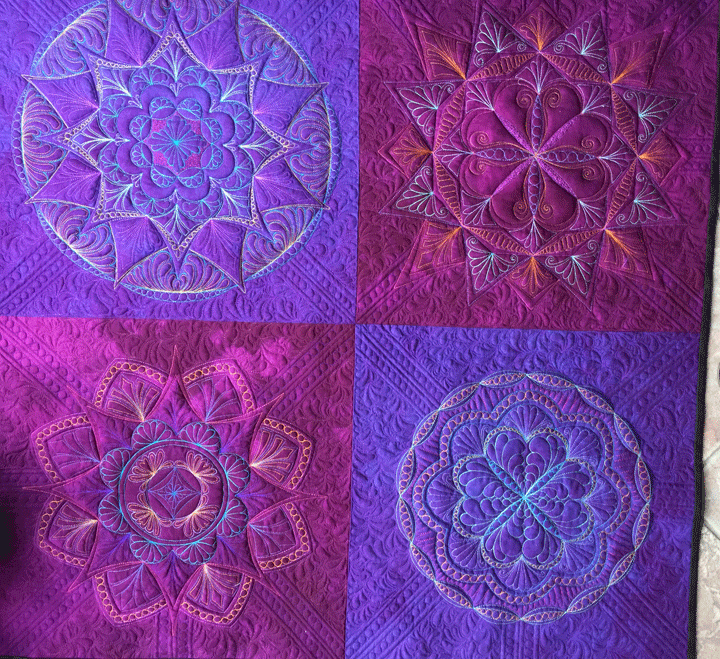
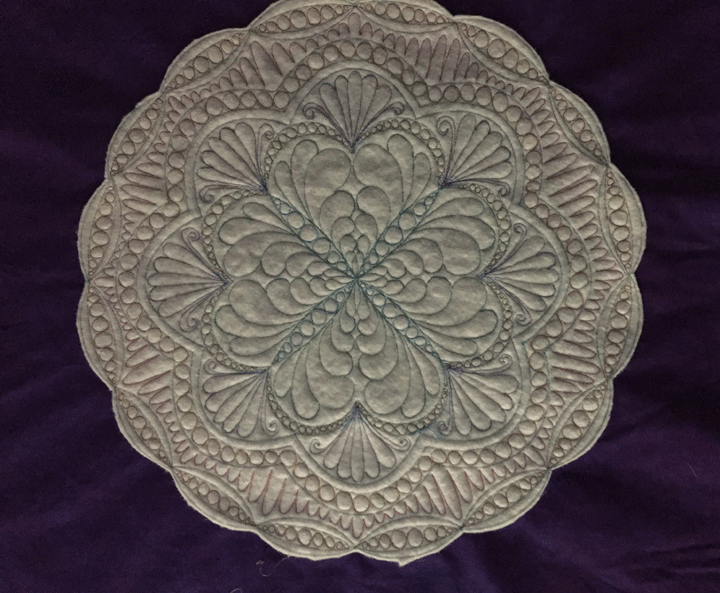
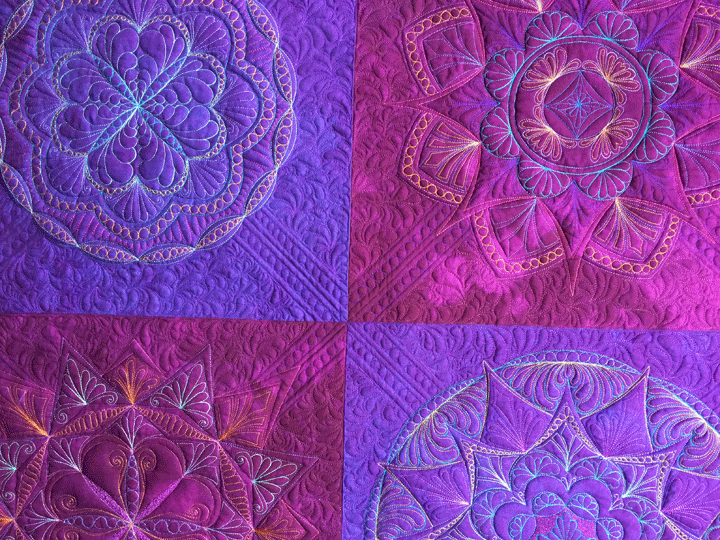
 Here is a shot of each block individually, and you can get a better sense of the wonderful texture created by the trapunto:
 …and number 2:
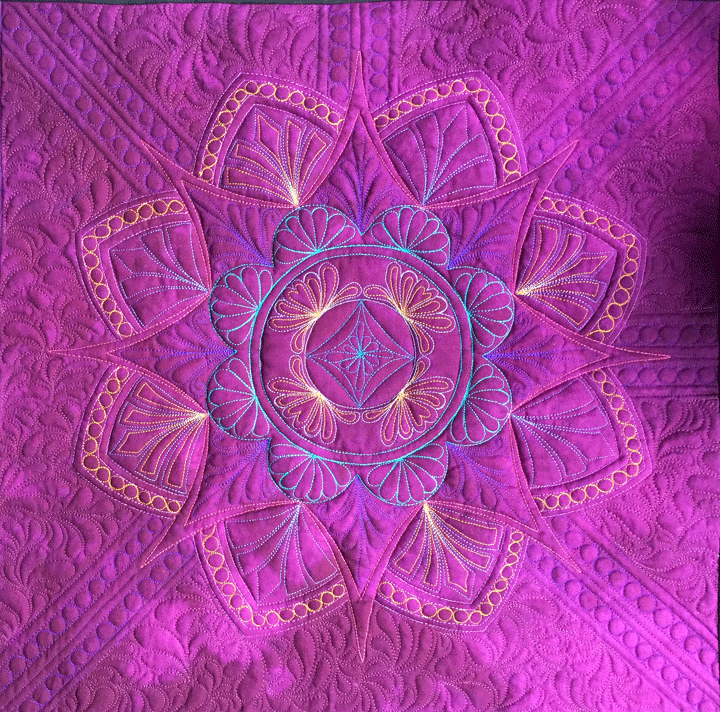 …and number 3 (my personal favorite!):
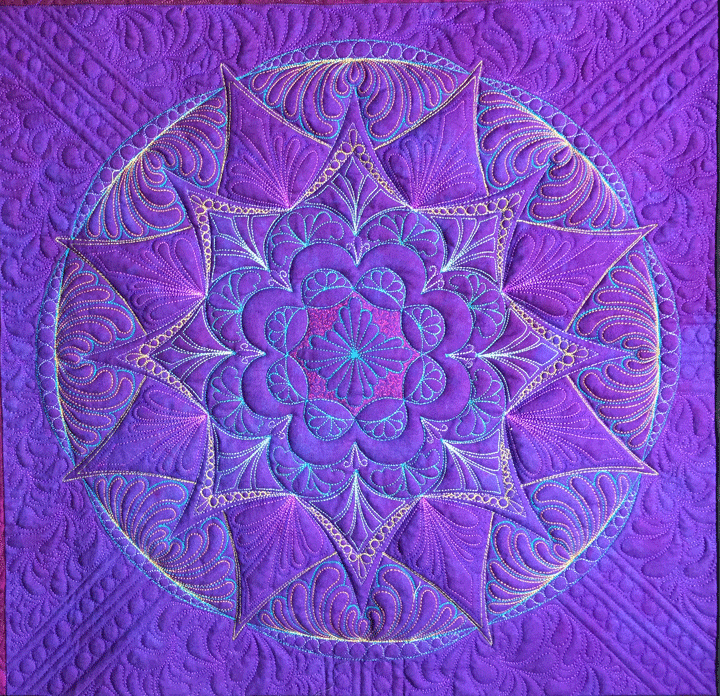 …and number 4:
 I’m writing this post in an airport and don’t have access to the quilt, but each block was either 20 or 22 inches square. Once each mandala had been created, I cut away the excess batting that fell outside the design. You can see what I’m describing in the photo below of the backside of mandala #1 below:
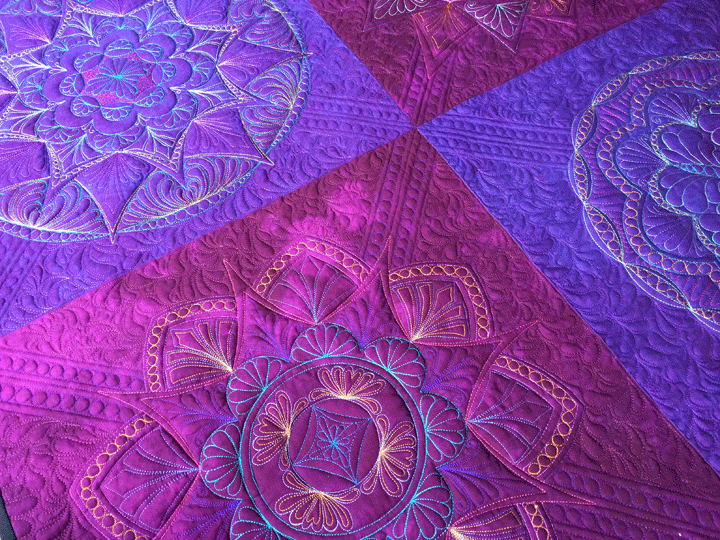
 Once all 4 blocks were completed, I decided that I wanted to create more texture by selectively adding another layer of extra batting behind only certain shapes within each mandala. My first layer of batting was Hobbs Tuscany Silk. (There is no reason for that beyond the fact that I have a ton of it I want to use up and I know if has enough loft to create some nice trapunto effects.) For my next layer of batting, I used the thinnest loft of Quilters Dream polyester batting. I used this because it’s fairly thin but it also creates nice definition once it’s been quilted, so it would add luscious texture to the top without adding much thickness. In the shot below, you can see how each of the 4 blocks has had extra batting selectively added to the backside:
 (The very white pieces are the Quilters Dream polyester batting and the “dirty white” is the Hobb’s Tuscany Silk batting.) My 3rd layer of batting (the batting that goes underneath the entire top) is Hobb’s Tuscany wool/cotton blend batting. I LOVE this batting. It has enough wool to give great definition to your quilt but the cotton component adds some weight and reduces the loftiness that comes with 100% wool batting. Here are some more shots of it from different angles:
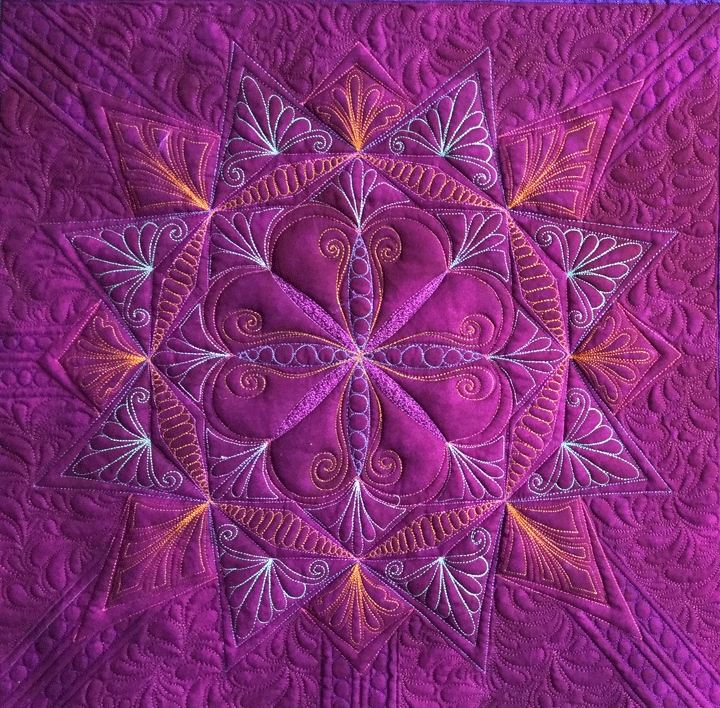
 The background quilting is uninspired and uninspiring. This was a situation where I literally had no ideas once I threw out my original concept. I sat on it for a few weeks and then decided I just needed to get the darn thing DONE!! Here’s another shot:
 ..and another:
 I’m ready to work on a quilt that isn’t purple or burgundy for awhile; I’m getting burned out with those colors!
Filed under
Free Motion Quilting, ruler work on a HDSM, Trapunto.
April 16th, 2017
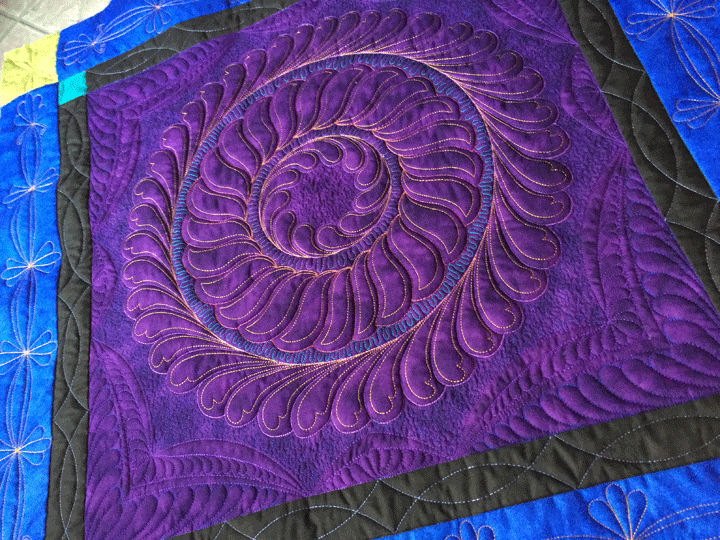
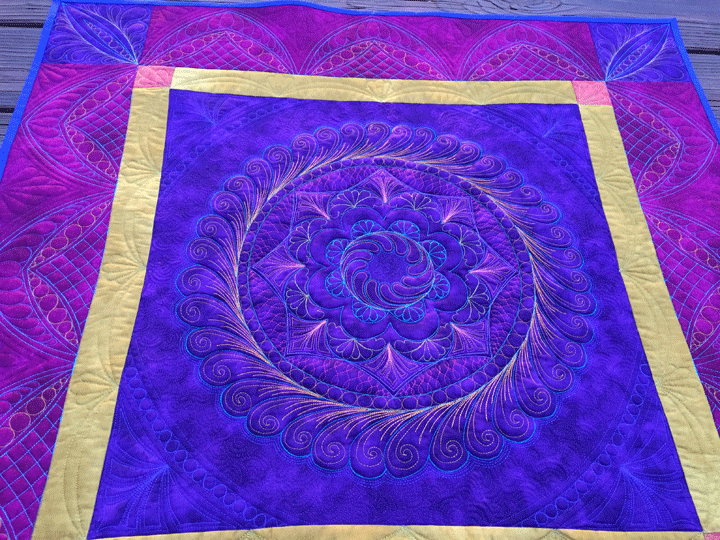
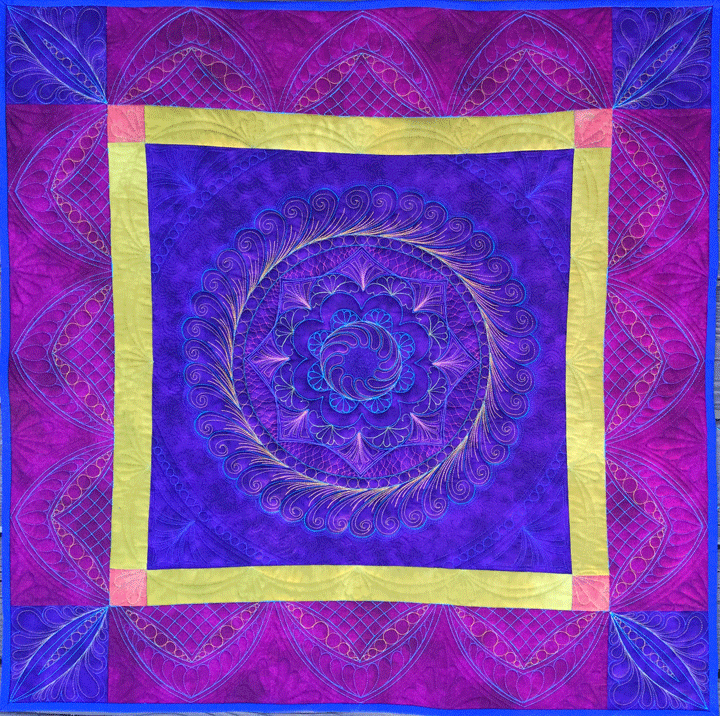 I finished this quilt (including the binding-can’t believe I got that part done so fast), over a week ago but I didn’t like any of my photos of it so I didn’t post and now I’m just posting because I have no other quilt pix to post! This was a fun project from start to finish and actually began only because I started the center block as a demo for a video we made about how to use our PTD flower templates. I didn’t want to waste the fabric block, so I finished it as a trapuntoed feathered wreath and then kept experimenting with it.
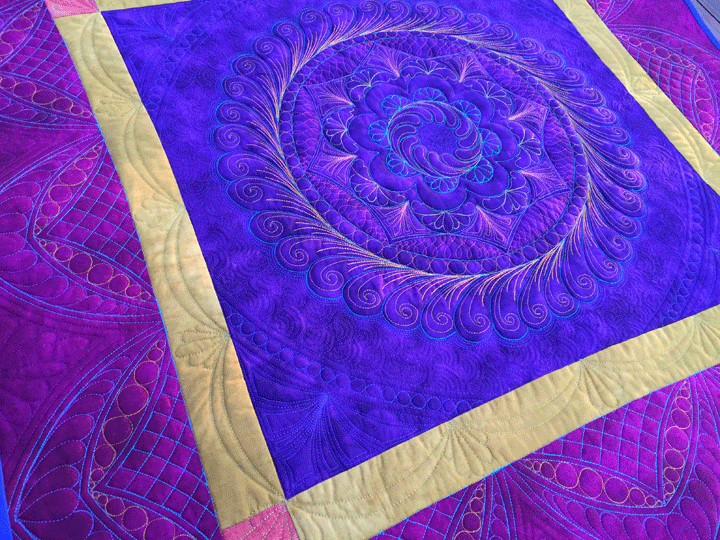 This was the first quilt where I’ve used the arched border design I used here. Until now, I had only used it as a design sample that I’d stitched out. I have to say that I really like how it came out. It’s made using the PTD 12 arc and PTD 6.5 arc and it incorporates curved cross-hatching, using a featherette to fill an empty space, and a single row of pearls that change sizes along the length of the melon shapes. Here’s a close-up that shows the details:
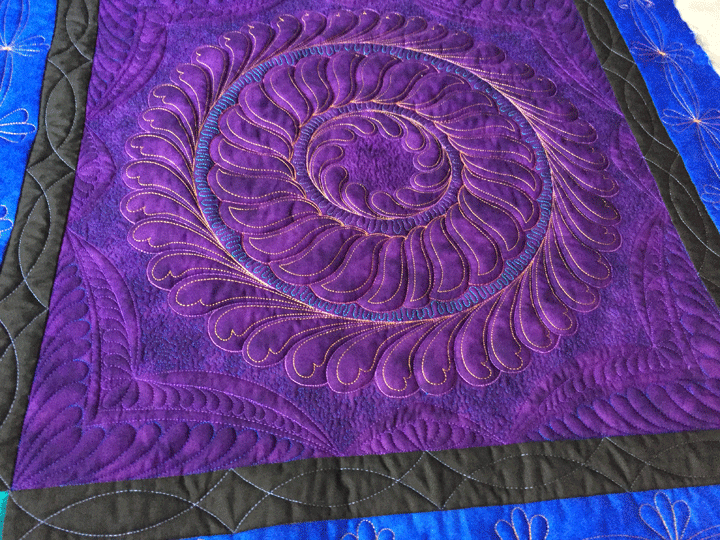
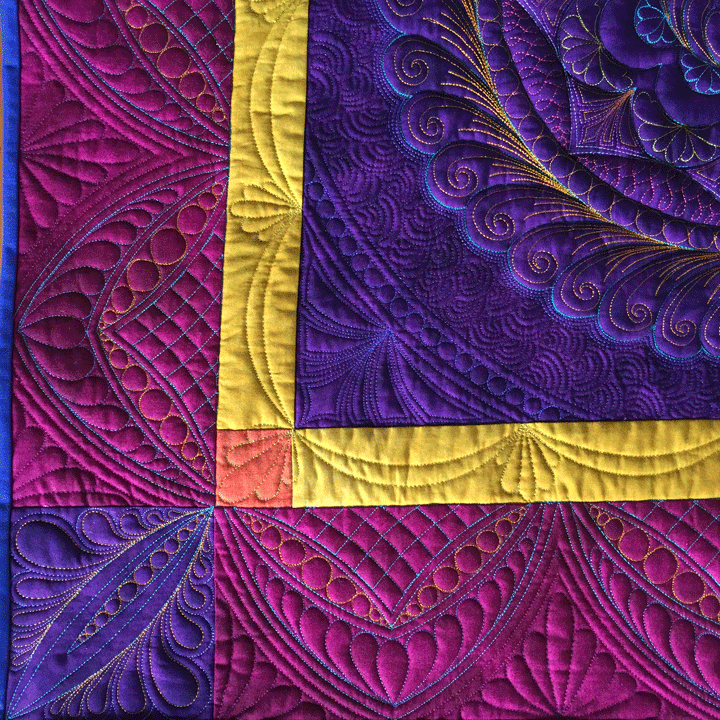
 I like how the series of arches form a unique kind of frame around the center section. I also like that the corner blocks are a part of the frame as well. Those were made using the PTD arc rulers as well and then I just created featherettes out of the melon shapes in each corner:
 This next picture was taken in different lighting and is a “crisper look” at that corner zone:
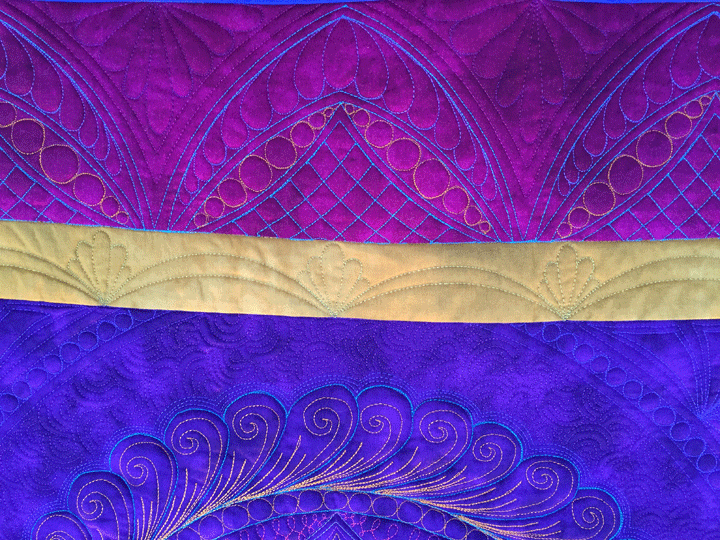
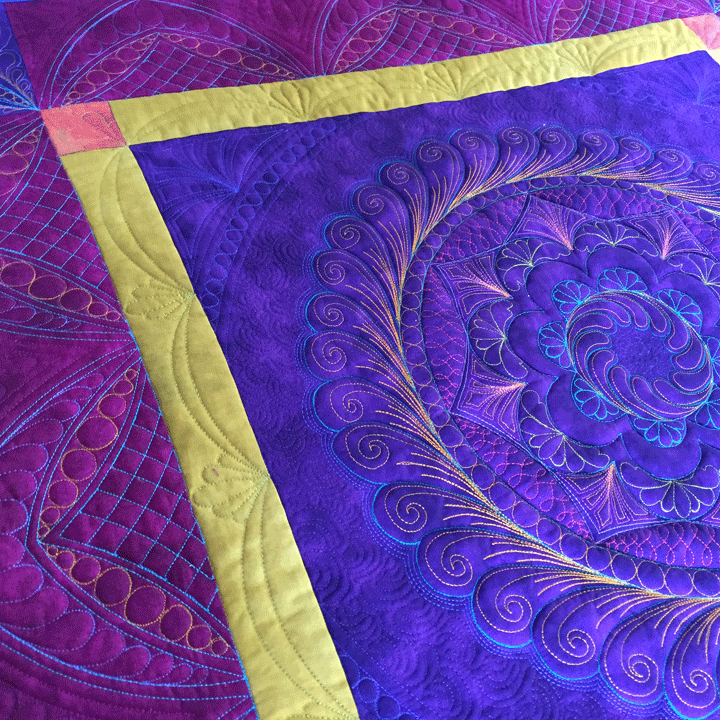
 I didn’t want to use a piano key border to fill the outermost “empty zone” created by the arched border. Part of my thinking was that a piano key border would be too formal for my quilt. I must be honest and also say that quilting a piano key border strikes me as an incredibly tedious experience. I am willing to “suffer” to some degree in quilting but it just didn’t seem worth it to commit to such tedium for a look that didn’t appeal to me. Instead, I used the same arc ruler to create a couple of channels and then threw in a featherette to fill each empty space. You can see that pretty clearly in this close up:
I was trying to make that area be secondary to the snazzy arched border, so I used “understated threads” in that zone. The ruler work channels were made in a solid polyester that was fairly close in color to the background fabric (just a tad bit different so it would be noticed), and then the featherettes are in a purple polyester thread. All threads used in machine quilting here are solids and either polyesters or rayons.
A couple more pics:
I didn’t want to use a piano key border to fill the outermost “empty zone” created by the arched border. Part of my thinking was that a piano key border would be too formal for my quilt. I must be honest and also say that quilting a piano key border strikes me as an incredibly tedious experience. I am willing to “suffer” to some degree in quilting but it just didn’t seem worth it to commit to such tedium for a look that didn’t appeal to me. Instead, I used the same arc ruler to create a couple of channels and then threw in a featherette to fill each empty space. You can see that pretty clearly in this close up:
I was trying to make that area be secondary to the snazzy arched border, so I used “understated threads” in that zone. The ruler work channels were made in a solid polyester that was fairly close in color to the background fabric (just a tad bit different so it would be noticed), and then the featherettes are in a purple polyester thread. All threads used in machine quilting here are solids and either polyesters or rayons.
A couple more pics:
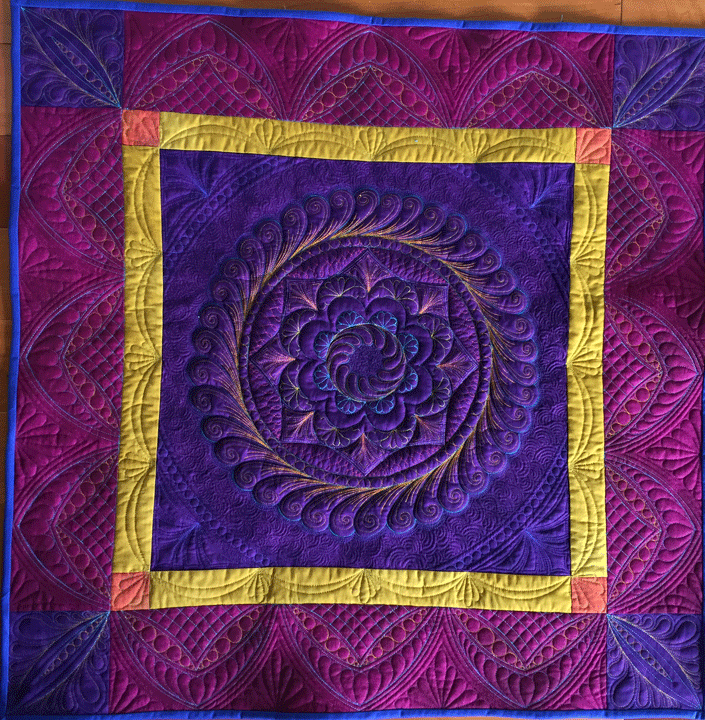 Sometimes machine quilting can be so very satisfying…
Filed under
Free Motion Quilting, ruler work on a HDSM, Trapunto.
April 12th, 2017
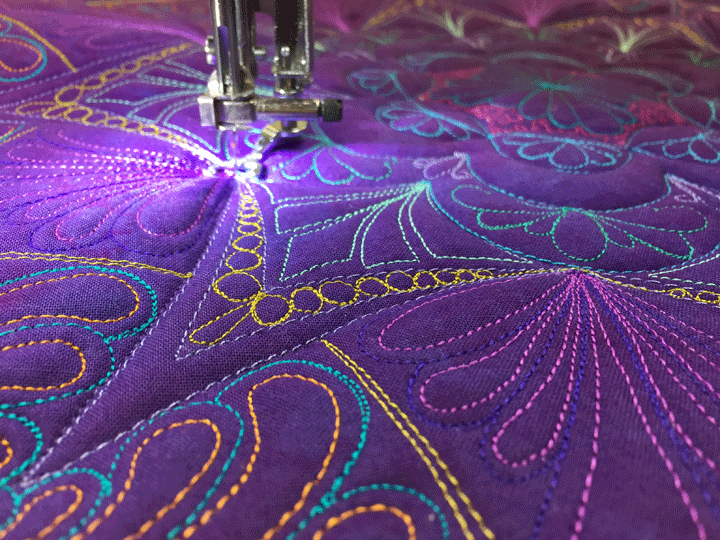
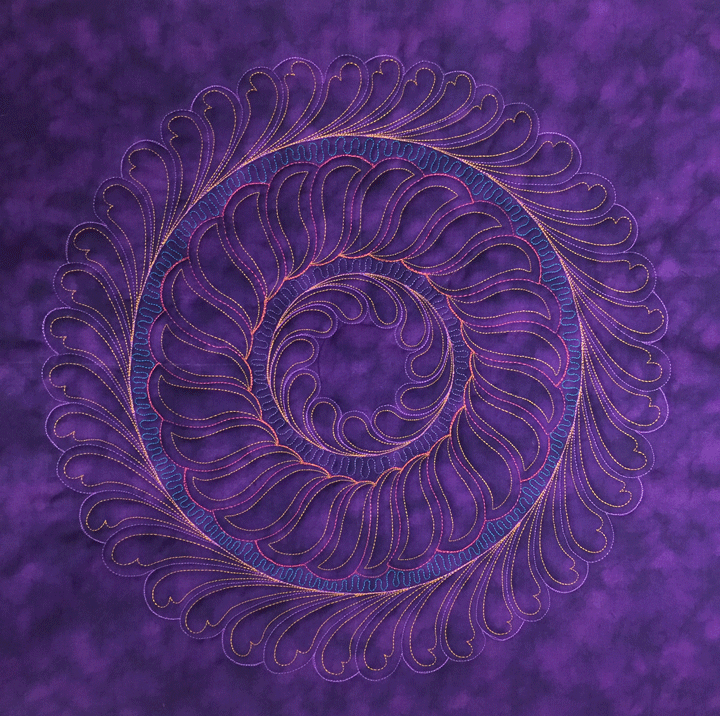 (I really have finished the last quilt I was blogging about and the borders came out great. I just haven’t gotten around to taking pictures for a blog post yet. It’s coming!) In the meantime, I made this new ruler work feathered wreath today. It starts with the Westalee Circles on Quilts Wreath #3 Template, which you can find by clicking here. This is my absolute favorite Westalee template because the “rope wreath” it creates is just plain fabulous:
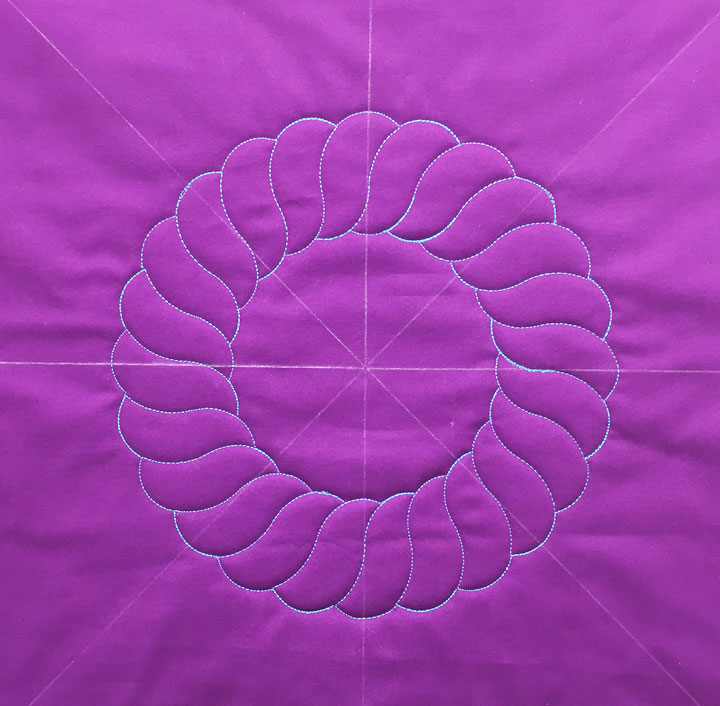 …and you might remember it from the mandala I made several months ago:
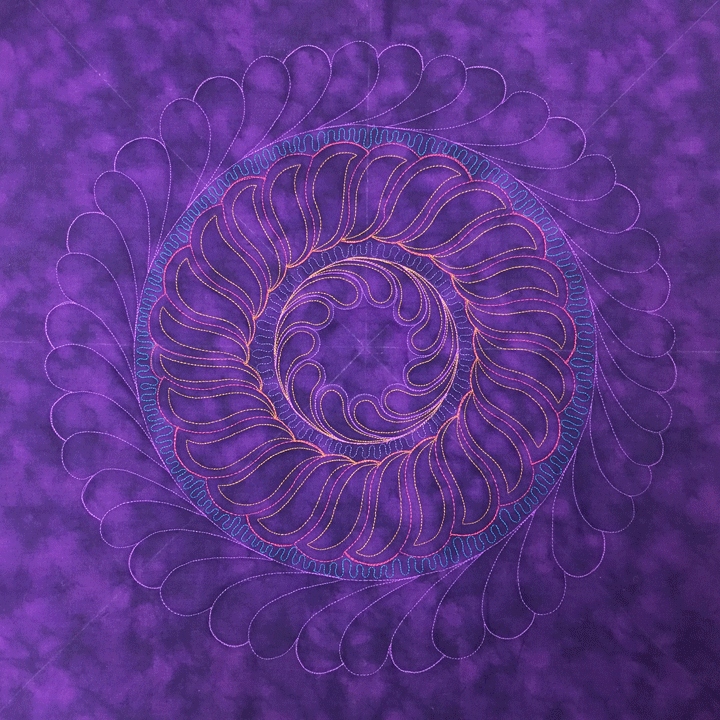
 The first time I stitched the rope wreath, it came out perfectly and seemed easy-peasy at the time. I fell in love with it but when I went to make another one, things didn’t line up properly when I arrived back at the place I’d begun. Sadly, this happened to me several times, regardless of what I did. I finally got frustrated and decided I needed some time away from that rope wreath template, and that was many months ago. Today, I got it out again and after 2 attempts where things did not join properly at the end, I just decided to join the ends freehand at the end. Here is a shot of my rope wreath part-way through:
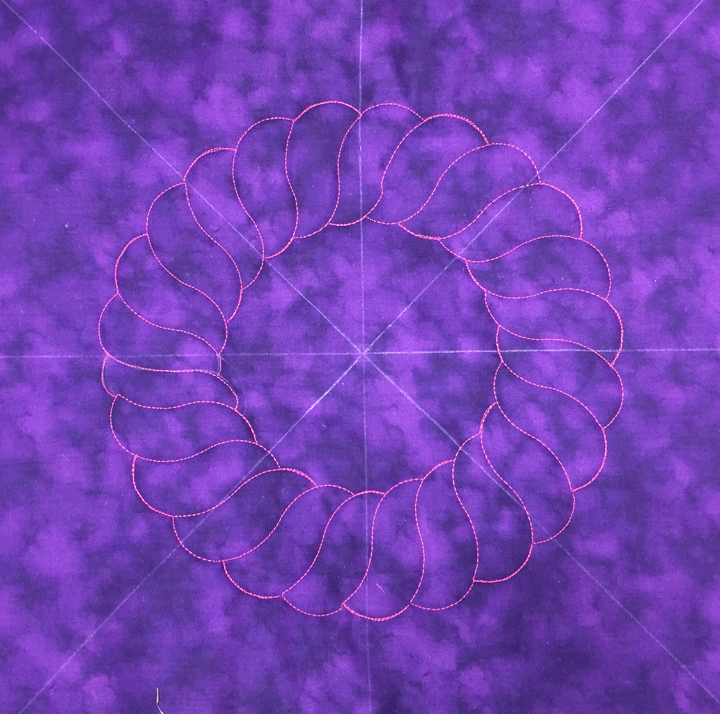
 …and here’s a shot of the finished wreath. If you examine it, you’ll see the awkward “join up,” but I’m ok with it:
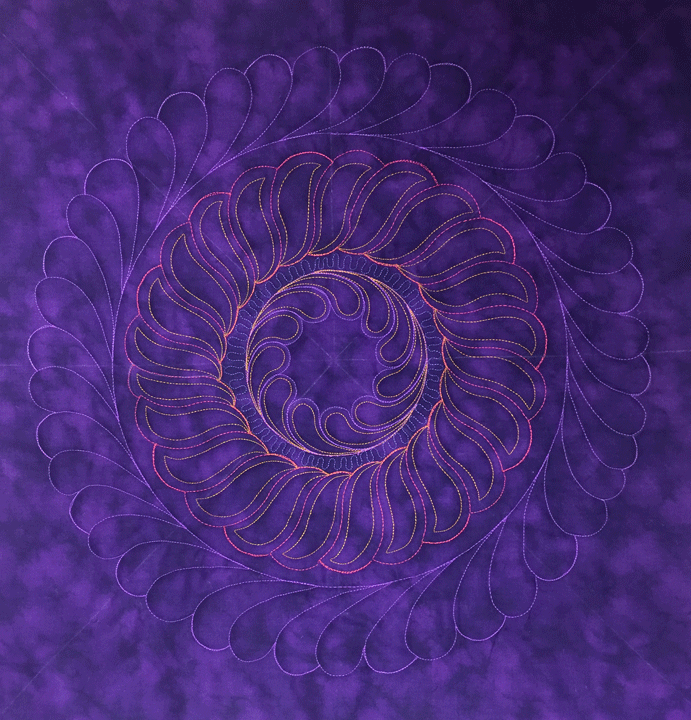
 Next up, I swapped out the wreath template for my Westalee Circles on Quilts template (which can be found by clicking here), and stitched a 5 in diameter inner circle. I needed this circle so I’d have a thread line from which to flow my inner plumes. Here’s a shot of that stitching in progress:
 I then swapped to a 12-inch circle template and did the same thing to stitch my outermost circle, as this would be the thread line from which would flow my outer plumes:
 I added my inner plumes and here’s what the design looked like at this point. Also notice that there is a faint circular soap line drawn outside the outermost circle. This will serve as my “boundary line” when I go to stitch my outer plumes free hand. (To see a tutorial about how to stitch wreath plumes freehand, click here and scroll to step 8.)
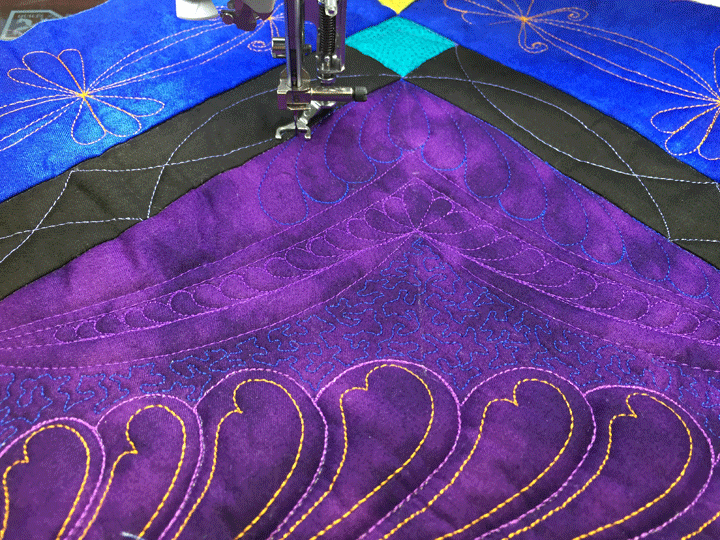
 I added some hyperquilting (simple in-lining) inside the inner plumes and also filled the narrow zone between the inner plumes and external rope wreath with the inchworm design. I then added all my external wreath plumes using the same polyester thread that I’d used for the inner plumes. Here’s how it looked at that point:
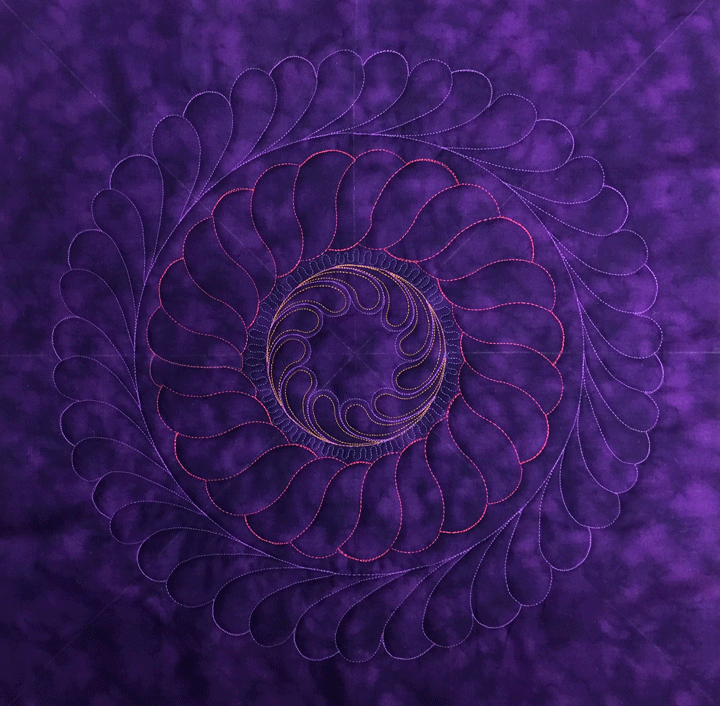 Next up, I hyperquilted the rope wreath with the same gold polyester thread I’d used to hyperquilt the inner plumes. This adds intricacy to an already beautiful rope wreath, and it also adds a sense of movement:
 (Now do you see why the Westalee Wreath #3 is my all-time favorite?!!) I then swapped to a turquoise rayon thread and stitched the inchworm design to fill the space between the rope wreath and the external plumes:
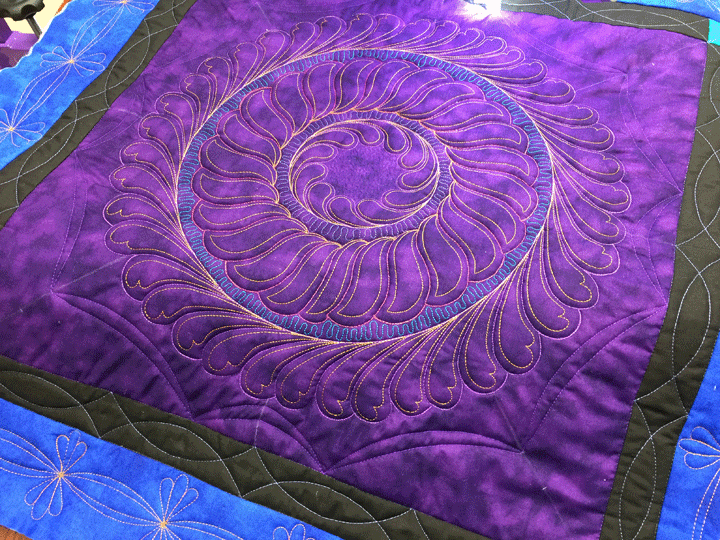
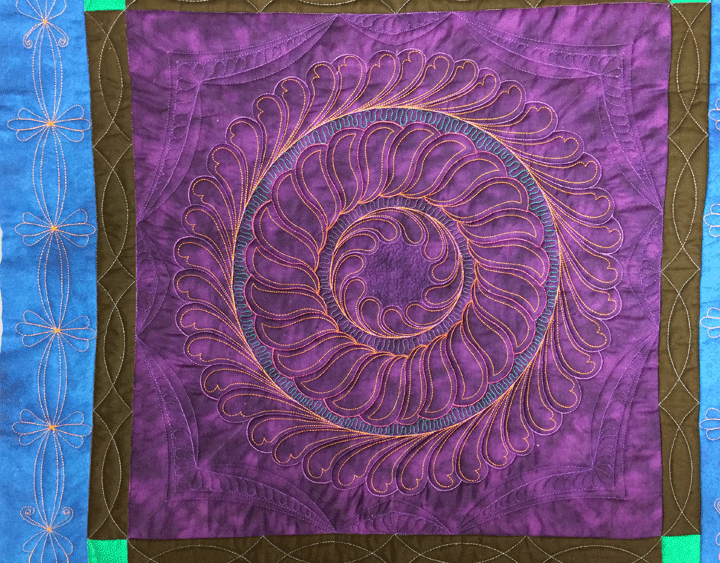
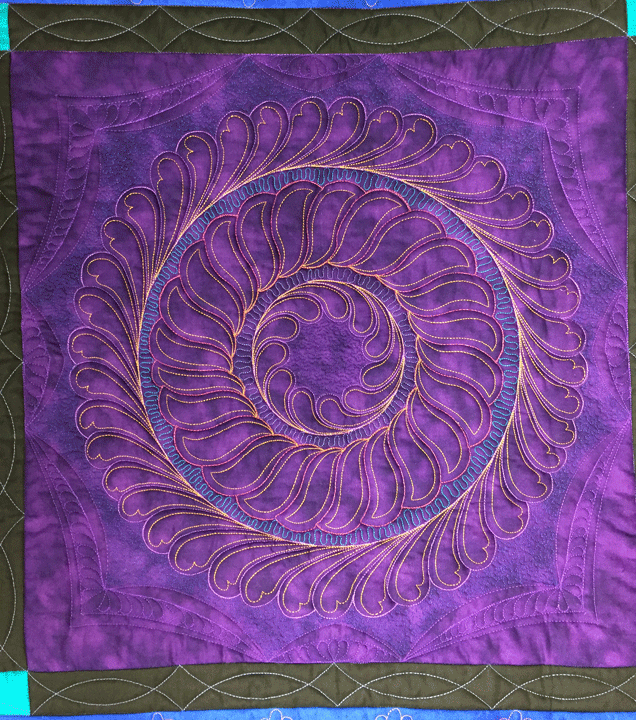
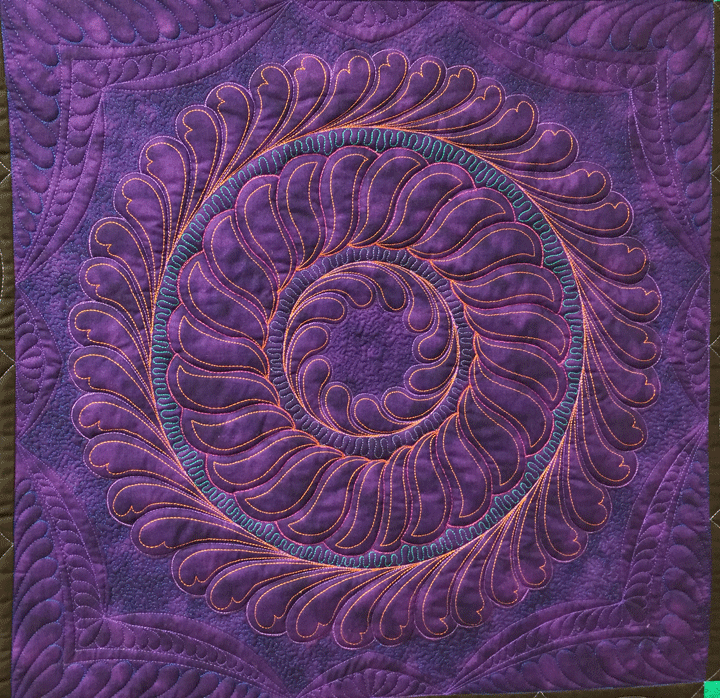
 In my last step, I hyperquilted the outside plumes with the heart-inlining design:
If you read my blog regularly, you know I am a creature of habit and love trapunto, so you also know this will be a trapuntoed wreath when fully complete. I’ll blog about all that later, but for now:
In my last step, I hyperquilted the outside plumes with the heart-inlining design:
If you read my blog regularly, you know I am a creature of habit and love trapunto, so you also know this will be a trapuntoed wreath when fully complete. I’ll blog about all that later, but for now:

Filed under
Free Motion Quilting, ruler work on a HDSM, Trapunto.

