

Jan 05 18
January 2018 Ruler Work Winter Course – Part II
Welcome back! Thanks so much to all of you for returning, and a special thanks to all of you who’ve written comments to me about the class. It is so wonderful to hear your thoughts and to know I’m helping you get hooked on this fun FMQing skill!
If you missed lesson #1, you’ll want to go back and read that lesson and also complete the ruler work exercises that go with lesson #1. You can find lesson #1 by clicking here. Know that each lesson builds on the preceding lessons, so it’s to your benefit to complete them in order. Your time is valuable, so I won’t keep repeating the same information in each post. Unless I state otherwise, assume that all stitching is to be done using a ruler foot, and we’ve already been through the drill of how to set up your sewing machine for ruler work.
Hopefully, you are now appreciating the power of channels and how channels empower quilting designs. In lesson #1, we worked with a straight line ruler to create a ruler work border design that featured tapered channels. In this lesson, we’ll again work with a straight line ruler, but we’ll learn about creating parallel channels. By the conclusion of this lesson, you should understand the difference between the two types of channels and you will have put that knowledge into action by creating both types of channels using a straight line ruler. Let’s get down to business!
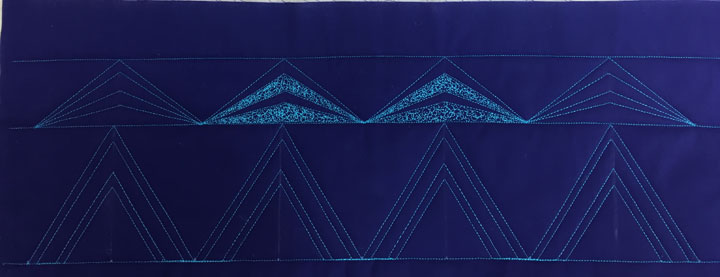
Pull out the small sandwich that you created last week. Today, we will be working on a border design to fill the 4-inch wide border zone that lies just below the 2 inch wide border zone we filled earlier. Again, use whatever straight line ruler you have lying around. Below is a photo of the ruler work framework that we will create:
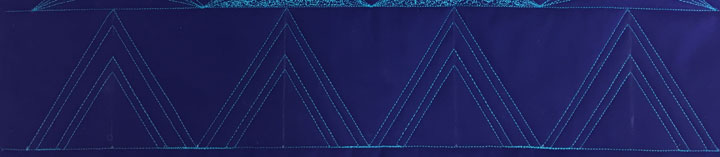
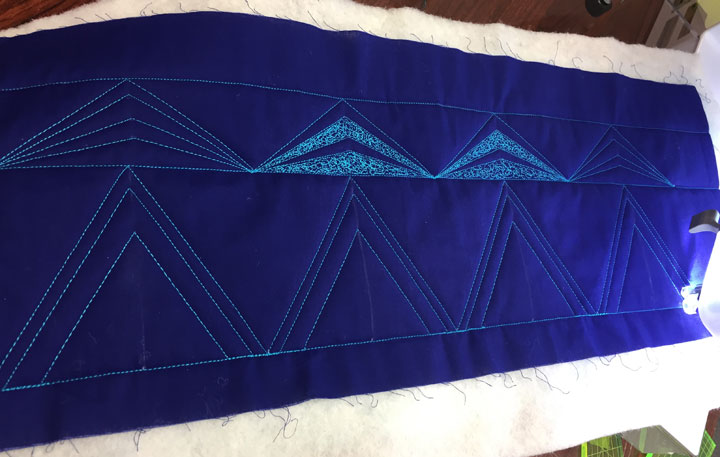
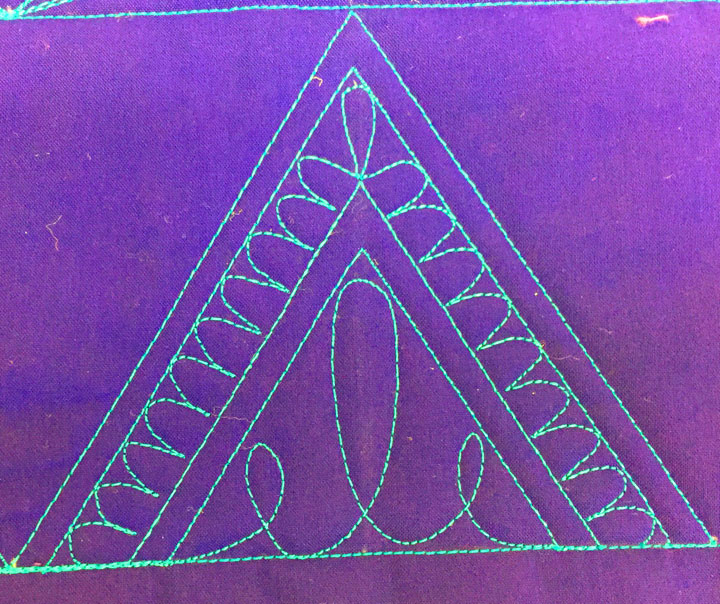
…and here’s what a framework like this might look like once filled:
Each of these “parent triangles” is 5 inches wide and 4 inches tall. To begin, we again need to make some temporary tick marks to guide our ruler work. Place a short tick mark at the base of the border about 1 inch from the left edge of your sandwich, then place tick marks every 5 inches across the border. Next, draw a temporary vertical line (from the bottom of the border to the top of the border), 2.5 inches from your first tick mark, then repeat this vertical line every 5 inches. (Know that you can easily throw in these vertical soap lines that are perpendicular to the border’s baseline by lining up a line on your marking ruler with your stitched baseline, then tracing along the edge of your marking ruler.) At this point, your marked sandwich should look like this:
This is just like before; all of these temporary marks are merely stopping and starting points that will guide our stitching as we create this design. We are ready to begin stitching. Remember, marked lines are where you want your stitched line to fall; they are NOT where you want to place the ruler’s edge!
Always begin by piercing the needle at the tick mark where you want to begin stitching. Next, align the ruler’s edge so it rests against the ruler foot, and then align the other edge of the ruler so that it falls 1/4 inch away from the desired endpoint for your stitched line. Here is my “set-up” just before I begin stitching this design:
Take some short locking stitches and you are off! Stitch this exactly like you did before, triangle after triangle, until you reach the final base of the 4th triangle. Once there, stop with your needle down, and your sandwich should look like this:
A couple things before we proceed…remember that on a “real” quilt, you would have marked all 4 borders before starting, and you would have sewn all 4 of these 4 border sides and your needle would normally be right back where you started. In our case, we will be working backward since we only have a short stretch of this border design. What I want you to know, though, is that you want to always be efficient in your stitching. This means that you would completely sew the ruler work framework for this design in one, continuous thread line. We will do that here, but we’ll be doing this a bit backwards at times just to accommodate our quilt sandwich.
Just like yesterday, look over your vertical soap lines to ensure that your stitching at the apex of each triangle “hits” the soap line. If you were off by a teeny bit, erase that soap line and mark a new perpendicular line before proceeding. Know that you need to do this every time you stitch a design like this where we have marked a center line that we will use to “play off of.” (Pardon that ending of a sentence w/TWO prepositions but it is what it is!) I won’t repeat the need to do this in future lessons, so please remember to get into this habit.
Now, this is where today’s “new information” begins. We are going to create a 1/4 inch parallel channel inside each of these triangles. This is a different type of channel than the tapered channel we learned earlier, so we will create it in a very different way. This will, however, be much easier than you think, and we don’t need to make any new marks!
Recall from lesson #1 that when the needle has been centered inside the ruler foot, the distance from the needle to the outside edge of the ruler foot is_____inches. If you answered “1/4 inch,” congratulations! If you didn’t know the correct answer, slap yourself in the head a couple times and then go back and re-read lesson #1! This very basic fact is essential to all parallel channel ruler work, so commit it to memory.
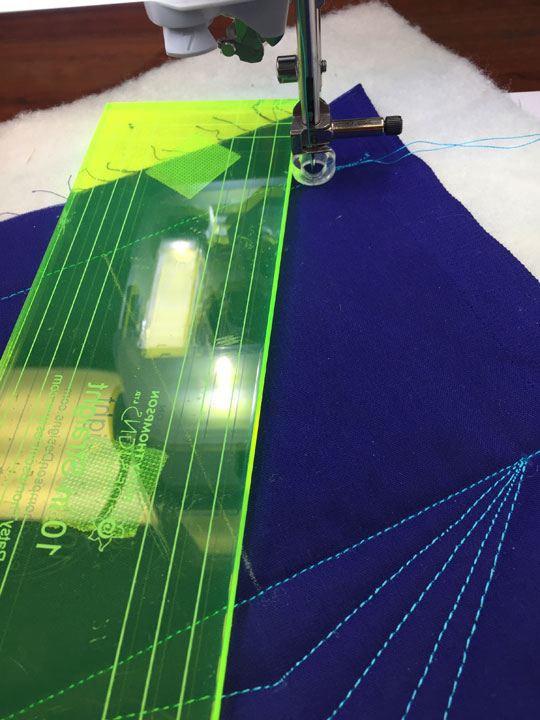
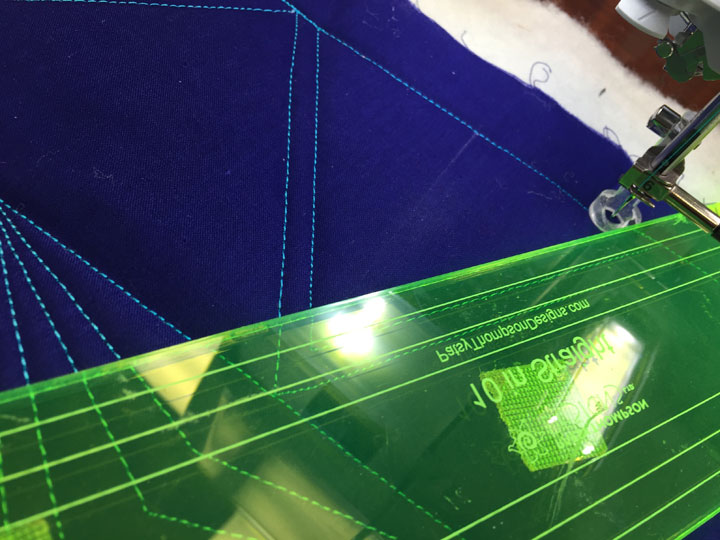
To create a 1/4 inch parallel channel, I need to get my needle 1/4 inches to the inside of the triangle, right? You bet we need to do that! So, I am slowly and carefully backtracking over my baseline until my needle is 1/4 inch inside the triangle, still piercing the baseline (and by the way, the baseline, on a real quilt, would be the seam’s ditch.) How do I know that I’ve backed up by 1/4 inch? Since the distance from the needle to the outer edge of the ruler foot is 1/4 inch, if the edge of the ruler foot is just barely visible inside my stitched line, I know I’ve hit the jackpot. I align the ruler’s edge so that one end is adjacent to the ruler foot, and then I line up the edge of the ruler with my already stitched line. Here is a photo of my setup before I start stitching:
Stitch that line, ensuring that you keep that ruler edge on the already stitched line, and stop stitching when your needle hits the middle soap line. Alter the position of the ruler so it abuts the other stitched side of the triangle, (and pivot your quilt if you wish), and stitch your way back to the triangle’s base. Your first triangle is stitched!
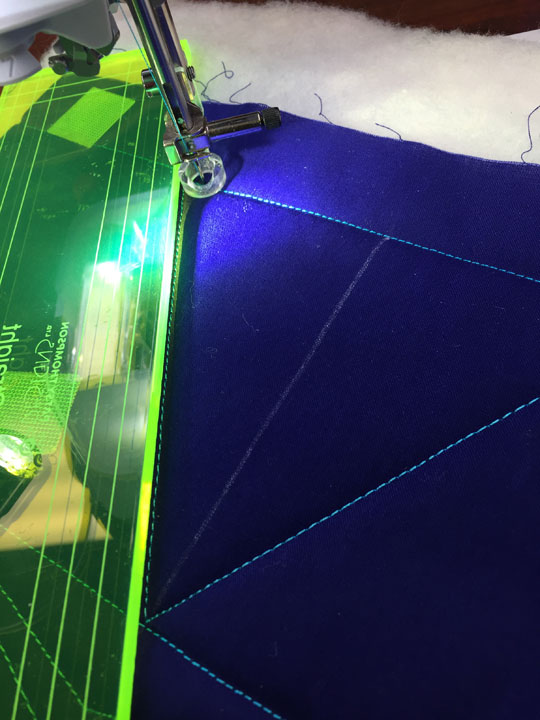
You need to carefully inch your way 1/4 inch into the neighboring triangle, so feel free to use your straight line ruler to help you as below:
Once into the next triangle, repeat this process and then finish placing a 1/4 inch wide parallel channel into all 4 triangles on this sandwich. Once you’re done, stop with your needle in the down position.
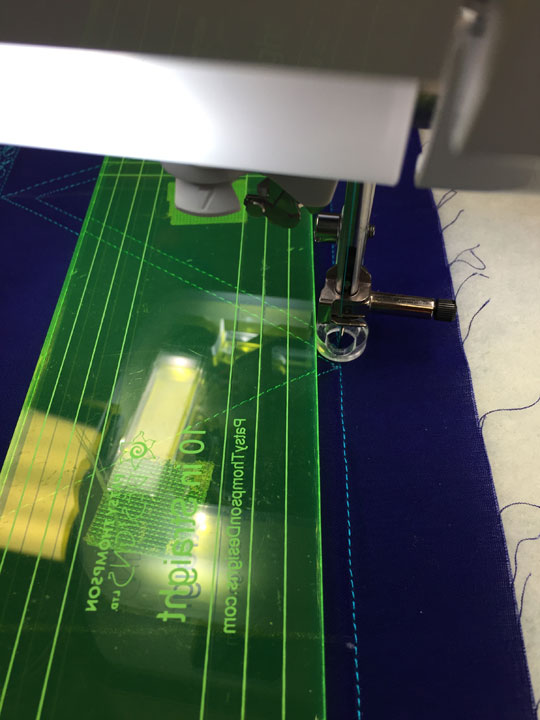
Now, that was easier than you thought, wasn’t it? Next up, we are going to stitch a 1/2 inch parallel channel inside the “new” parent triangles. If you are lucky and have markings etched on your straight line ruler, you can do this easily by aligning the first marked line on the ruler with the lines we just stitched. Quiz question: Since that first etched line on the ruler is 1/4 inch from the edge, how the heck will using it as a guide result in a 1/2 inch wide channel? Answer: Remember that the ruler foot will add another 1/4 inch, and since 1/4 in + 1/4 in = 1/2 inch, we are good to go! (Again, if you couldn’t answer that question correctly, you really do need to go back and re-read lesson #1. Hate to say it, but 3 strikes and you’re out!) You will need to carefully stitch along the baseline so that your needle is 1/2 inches inside the innermost triangle. You could place a little tick mark at 1/2 inches, but if you are lazy like me, you just “eyeball it,” then place the ruler do that the first marked line is directly above the stitched line, and then alter the position of the needle so it’s abutting the ruler foot’s edge. This is what my set-up looks like just before I begin stitching:
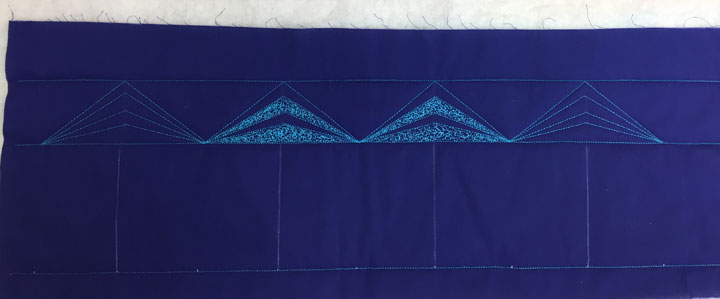
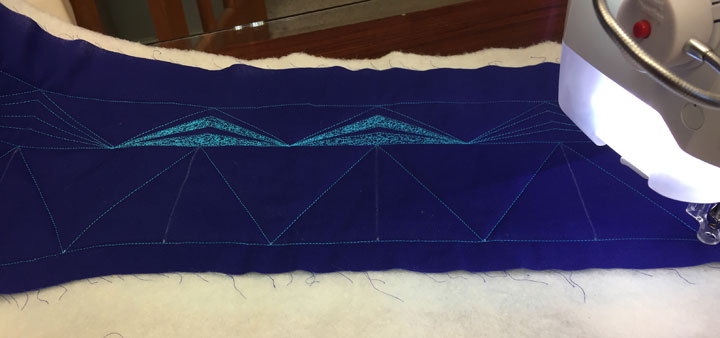
Note that the etched line is directly above the stitched line. Go ahead and stitch, but once your needle hits the middle soap line, stop stitching in needle down and re-position your ruler (and pivot your quilt if you wish), then stitch the opposite side that will take you back to the baseline. Because you’ll need to sneak along that baseline a fair distance to arrive at 1/2 inch inside the neighboring triangle, definitely use your straight line ruler to help you stay neatly on that baseline. Once you’re there, repeat the process and then finish stitching the 1/2 in parallel channel inside each of the remaining triangles. Once done, stop with your needle down and your sandwich should look like the photo below:
We’re not going to do it here, but does anybody know what we’d do if we wanted to stitch a 3/4inch wide channel? How about a 1 inch wide channel? If you guessed that you would use the remaining etched lines on your ruler, you are correct! Each of those etched lines will add an additional 1/4 inch, so it’s really pretty easy to stitch parallel channels using etched rulers and there is no marking needed. Isn’t it great when things are easy like this?!
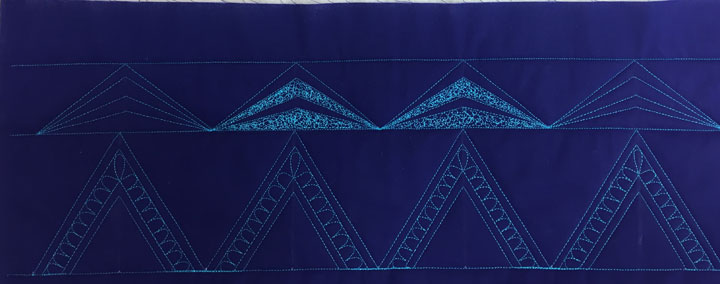
Back to our sandwich…we’re going to stitch one more 1/4 inch channel inside each triangle, so stitch inside the innermost triangle at one end by 1/4 inch and go for it! You know how to do this and if you’ve forgotten, read the paragraphs above where it has been discussed. Once done, end your thread line and know that your ruler work framework is complete! It should appear like the sandwich below:
If we examine it, we have a 1/4 in parallel channel, a 1/2 in parallel channel, a 1/4 in parallel channel, and a small triangle at the base. This is a good place to introduce Patsy’s Golden Rule #2:
Never fill a parallel channel that is 1/4 inch wide or less because it is so narrow that it will only look messy.
So, think of your 1/4 inch parallel channels as existing only to add intricacy and detail. This also means that if you have plans to fill a given channel with a specific design, make sure you create a channel that is larger than 1/4 inch wide.
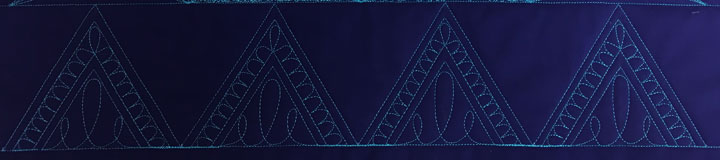
So, let’s start by filling that 1/2 inch wide channel. Visibility with a ruler foot is always compromised, so feel free to swap to your favorite free motion foot for this part. What I’ve stitched here is a design I call “fingertips.” Take care to orient the design so the fingertips point away from the center triangle, and as you work, keep them perpendicular to the baseline. I always work to have each side “end” at the center mark, and then I throw a tiny teardrop into the apex. Here is what my sandwich looked like once I’d filled the 1/2 in channel on all 4 triangles:
For the bottom triangle, I stitched a short chain of loop-d-loop, stretching the tips of the loops to fill the space. Notice that I made use of my center soap lines that we marked at the beginning to aim for a large loop right in the center:
If it’s helpful to you, here is a closeup shot of a completely filled triangle:
Hopefully, some questions are racing through your head, like:
*Could we have filled this framework with different designs? Yes!
*Could we do the same thing on the opposite side of the border that is now empty? Yes!
*Could we have filled the opposite side of the border with a different design? Yes!
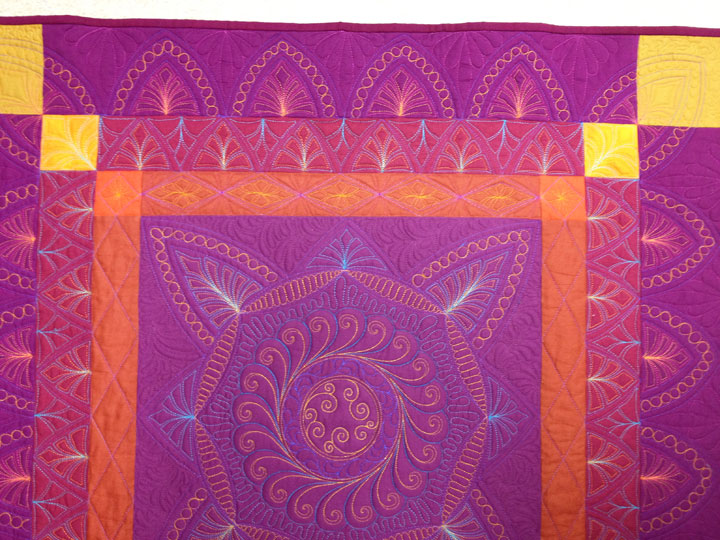
The photo below is of a different design, but the red middle border gives you an idea of how dramatically this changes the border aesthetic.
One more thing before you leave today’s lesson…know that your goals and my goals for all these lessons may not quite be the same. When I teach in any setting, my goal is to teach your broad skills and concepts that will help you spread your wings so you can apply those concepts/skills in a wide range of applications. The specific designs we stitch out as you are learning this are nice in and of themselves, but to me, they are merely practical examples to help you learn something. You will grow much more from this experience if you can allow yourself to think about what we’re doing in a larger context. (i.e. “What else can I do with tapered channels/parallel channels outside of just today’s border design?”) If you approach this class with a very literal black and white attitude, you will learn how to stitch some nice designs but you won’t be able to fly. I know you’re scared, but sometimes it pays to take that leap!
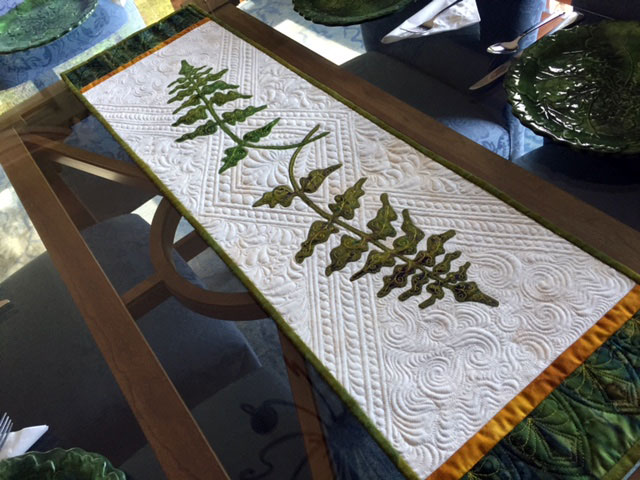
This table runner below is a nice example of how simple straight line parallel channels can add an architectural “feel” to the overall design and really make a simple applique design rock:
Here’s another table runner with straight line parallel channel work whose overall design is really heightened by the graphic nature of the ruler work background:
Lots to think about and we’ve just gotten started…
what perfect timing. I am working on a quilt that I will be able to use this technique. And here I was
worried I wouldn’t know how to match the quilting in the picture of the quilt. I will be practicing this a lot in prep for the new quilt. Whoo! Whoo! Go Patsy!
Great instruction! Thanks so much for sharing. Learning the basic concepts to fly in your own direction – love it. Thank you for all the wonderful tips. Your writing style is very amusing also. (g)
WooHoo! You are always so clear in your teaching. Ahem…your writing sounds exactly like your videos. 🙂
Thank you so much for these wonderful lessons Patsy! I love the systematic way you teach and your creativity is so inspiring. Your Craftsy classes introduced me to a whole new level of quilting, and I know already that these lessons will provide me with the structure and incentive to spread my wings even further. I’m off to my sewing machine to practise now! Brilliant!
(Lincolnshire,UK)
Thank you, thank you, thank you.
QuiltShopGal
http://www.quiltshopgal.com
Fantastic, learning how to line up is great, never know if I should see the line or not. So your instructions solved that for me. A question tho. Do you match the color of your top and bobbin threads?
Thanks for a wonderful class.
I just wanted to say thank-you for the great lessons. Your quilting and thread painting are both awesome and inspiring. I love your website!
This was fun. Loved it. Thanks so much. Have all of your free motion dvd’s. I must ck out your website for other dvd’s Now 🙂 Not ready for the “big time” yet but getting closer
Thank you Patsy for the lessons,just what I needed to get back into playing with my quilting again. I always enjoy learning new techniques. Thanks again and Happy New Year
Loving this, Patsy. I really want to be able to adapt this to my projects. Just a question re measurements – How do you determine the distance between the tick marks? I understand the height would relate to the height (width) of a border. I also presume that the length of the border would also have some influence. How are measurements (height of the channel and width of triangles and parallel or tapered channels) determined for a circular design? Hope you can enlighten me. Thanks.
Great tutorial thank you Patsy.
Thank you for sharing your skills. I have learned so much already!!
Ditto on Lyn’s. #10 questions, can you address some of our questions in the class rather individually without becoming bogged down? Love the class.
Thanks
This will all come out in due time and we will be making a circular design in the class, so you’ll see how easy it is. For this early part, I have to know everyone knows how to do these basic ruler work “maneuvers.” Once this basic stuff is covered, we’ll get into how to put these maneuvers into practical action and how you can “customize them” for the quilt you are working on. You are asking all the right stuff, it will just take a little longer to get there.
This will all come out in due time and we will be making a circular design in the class, so you’ll see how easy it is. For this early part, I have to know everyone knows how to do these basic ruler work “maneuvers.” Once this basic stuff is covered, we’ll get into how to put these maneuvers into practical action and how you can “customize them” for the quilt you are working on. You are asking all the right stuff, it will just take a little longer to get there.
Great class. Thank you! Always good to go back to basics. I noticed I am having problems keeping my parallel channel consistent. Always seems to be more narrow on the right side. Will have to practice this more.
Great class! I have dappled in ruler work but with no real direction. These lessons have given a good base line to work with and they look great! Thank you!
I like to put on Law & Order: SVU in the background while I quilt/sew.
Thank you for these blog lessons. I already feel like they are giving me so many ideas for my projects.
[…] Lesson #1 Lesson #2 […]
[…] Lesson #2 […]
Thank you for these. Right now I am on bed rest but read these on my I pad. I am practicing on paper with rulers and pencils. You have already answered so many questions I had when I tried this on my own. I am anxious to get better and be able to sew.
Thank you. Thoroughly enjoyed this lesson
Thank you, Patty! It’s really amazing how some simple fills in a structured parallel channel construct suddenly become superbly complex in perception!