January 2018 Ruler Work Winter Course Part IX

January 29th, 2018

We’ve made it to our final ruler work lesson, kind of a bittersweet moment.  I hope this has been a fun and educational experience for you! Learning to do ruler work has really breathed new life into my own free motion quilting and if I’ve infected you with this same enthusiasm, I’ve done my job.

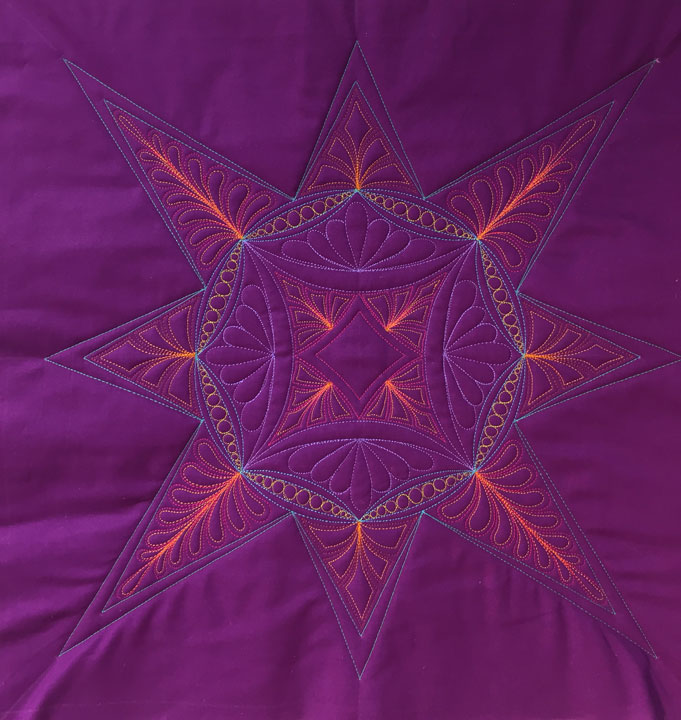
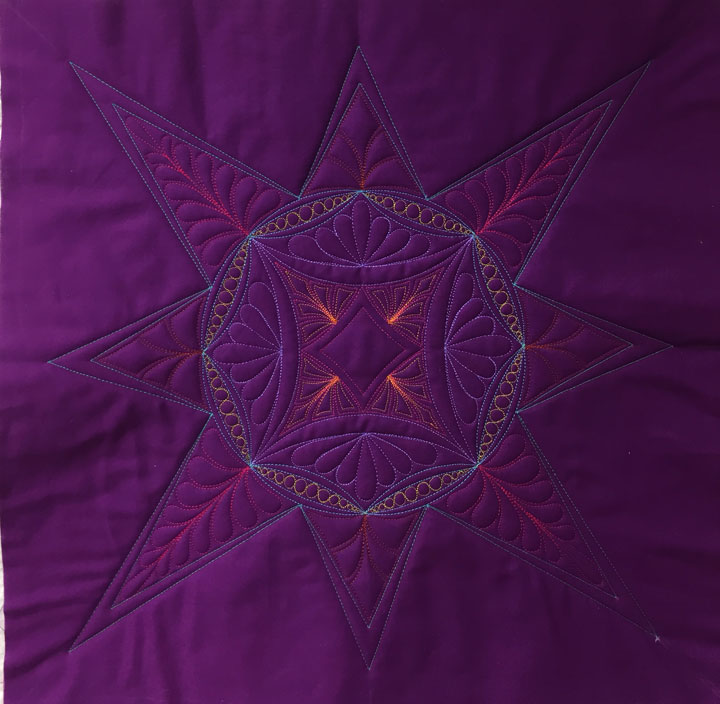
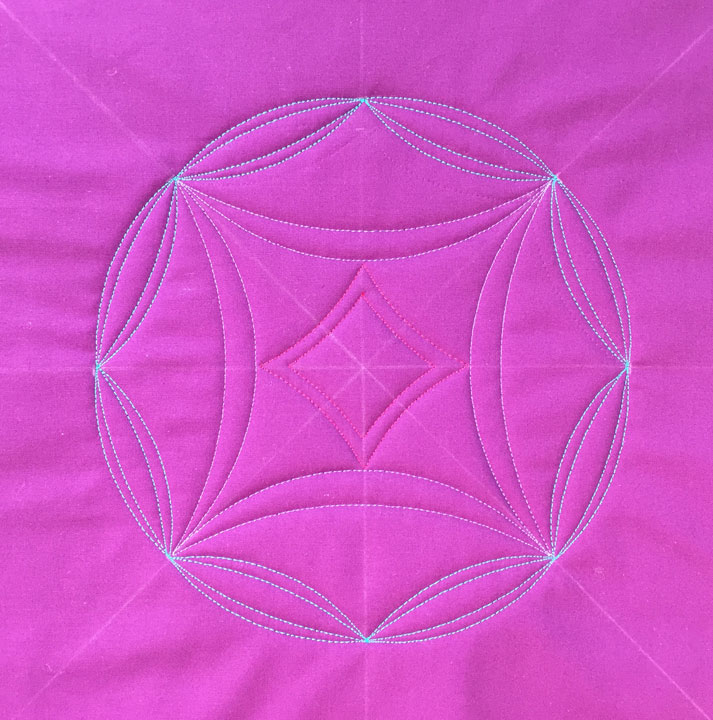
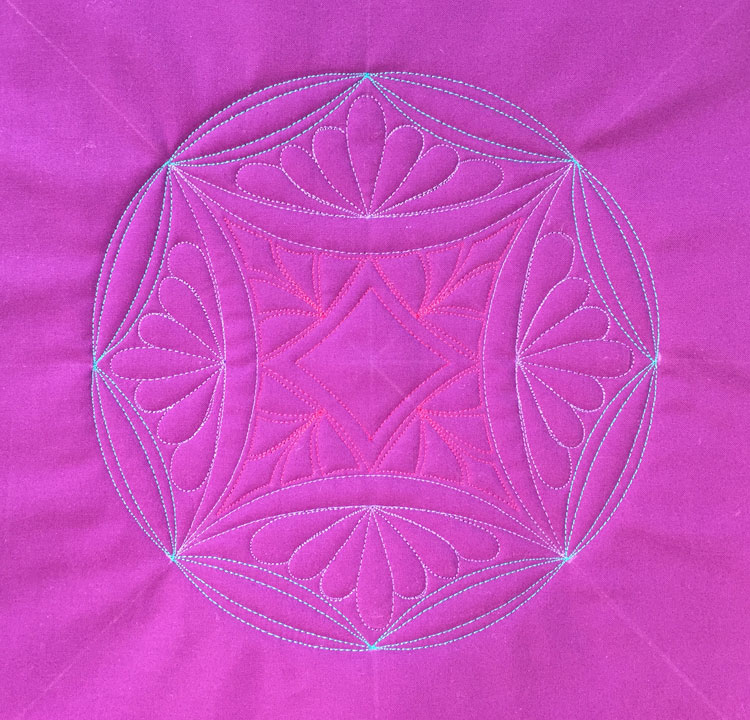
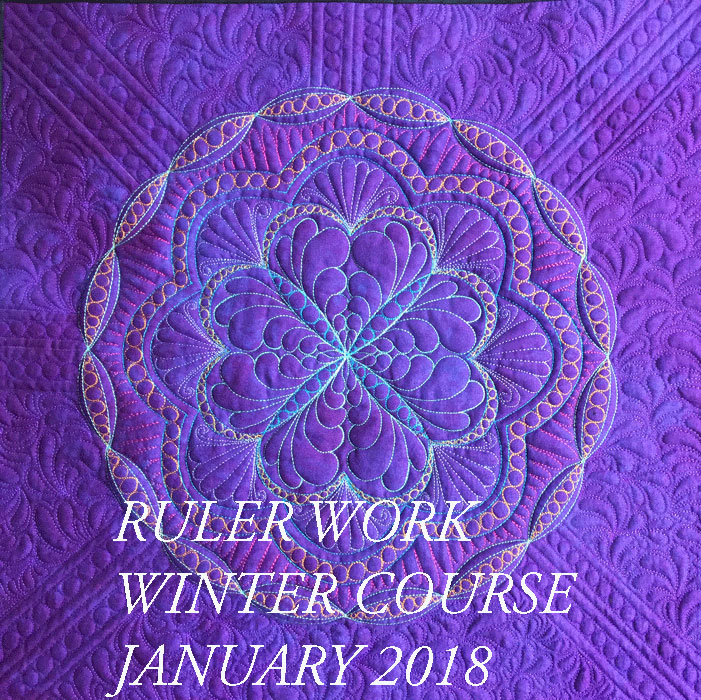
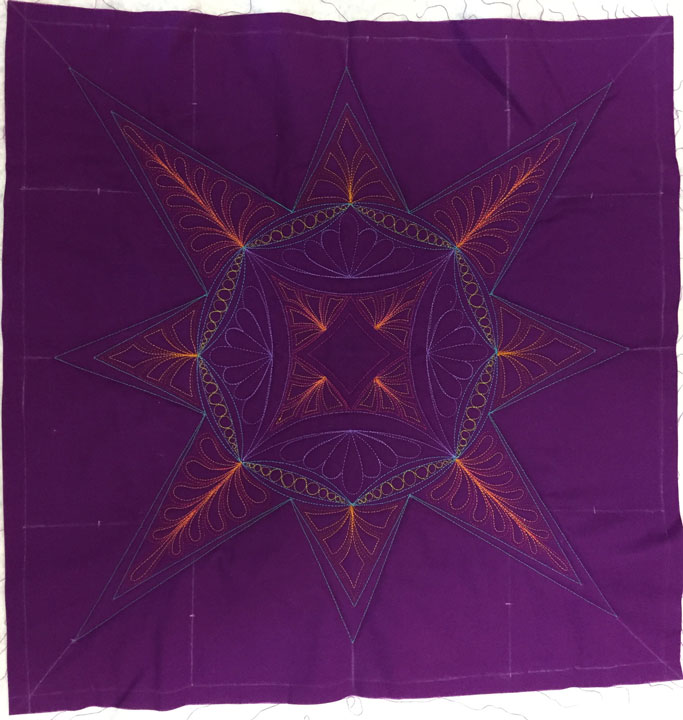
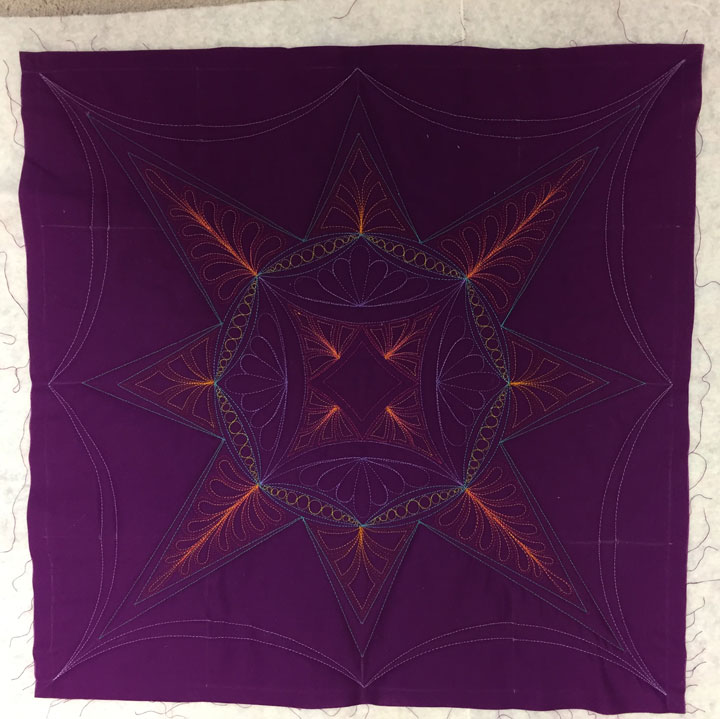
Today’s lesson will take your ruler work skills into the world of framing.  Being able to frame a pieced/appliqued/or quilted motif is an important skill. You probably don’t realize it, but you actually learned one effective framing tool two lessons ago.  I’m pointing this out because we didn’t use the technique for framing so you might not have noticed it.  Remember when we learned to create a circle of crescents?  Creating a circular framework is another nice way to frame an important motif.  You would not “fill in” the center of the circle, (since the center area would actually be whatever you were framing), but if you had space, you could build your circle outward to create a more intricate framing design.    In today’s framing lesson, we will be dealing with a different approach to framing, though.  In this case, we will use the boundaries of the quilt block as the starting point and we will build our framework by working “inward.”  Here is a shot of the finished quilt once the framing and fill-in work has been completed:


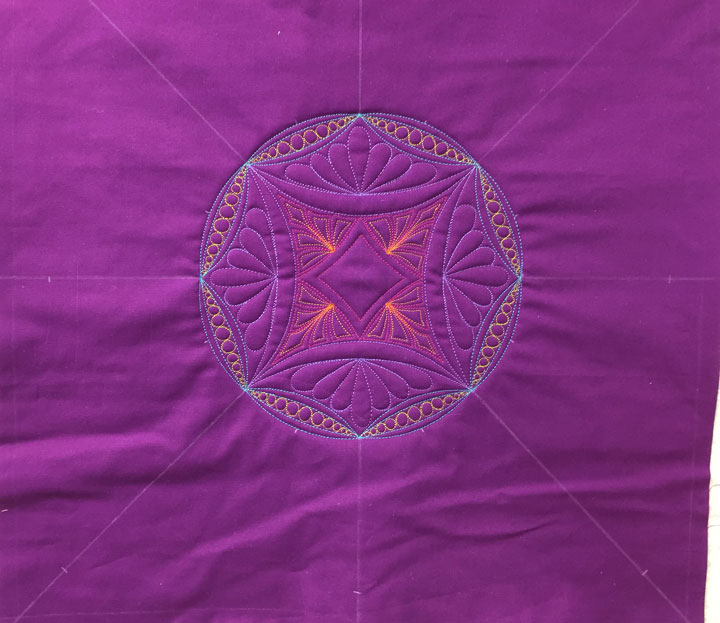
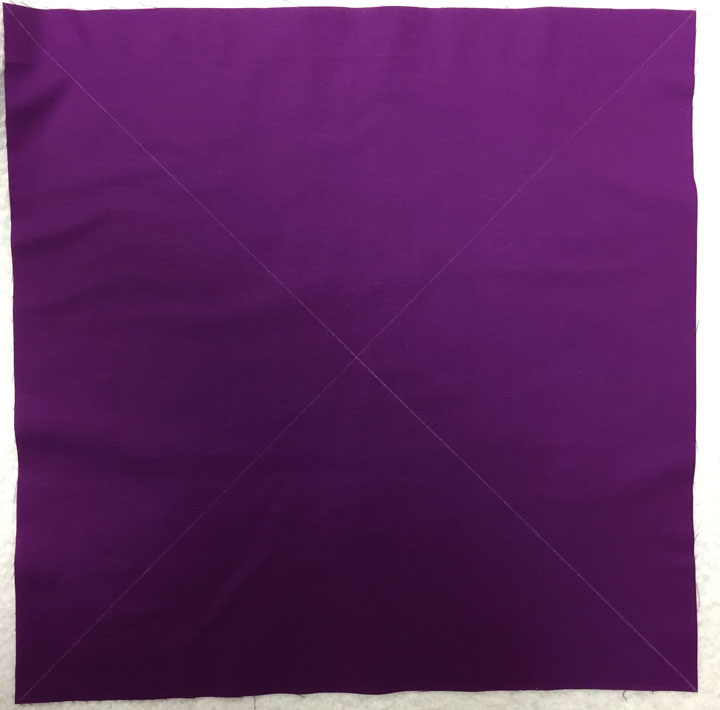
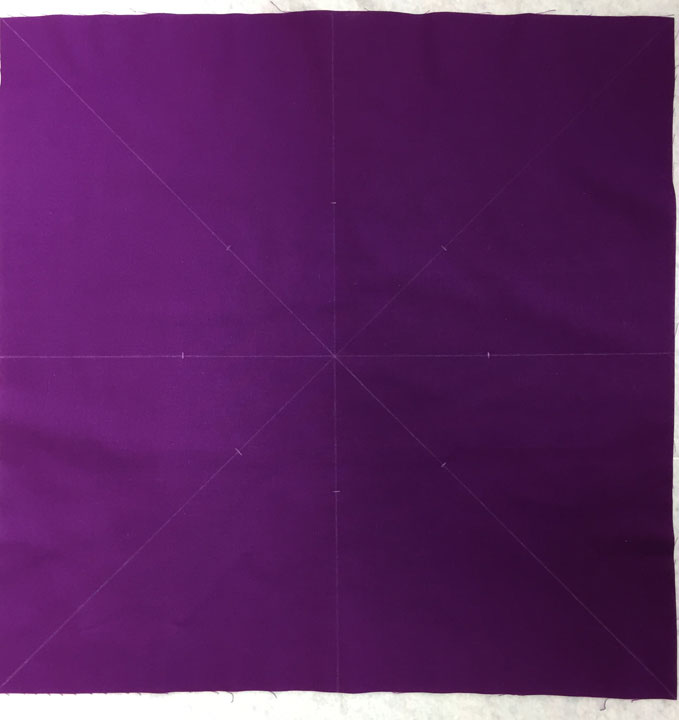
Before we begin, make sure that your temporary lines that fall 1/2 inch from all 4 edges of the quilt block are very obvious.  (You do not see the “empty” 1/2 inch of fabric that surrounds the finished design in the shot above.)  These previously marked soap lines mark the boundary of your framing design and serve to warn you that any stitching outside that boundary will fall into the seam allowance.  It is heartbreaking to make a beautiful design and then have a portion of that design be “chopped off” visually because it fell within a seam.  You only need to learn this lesson once when you have the misfortune to learn it “the hard way!”

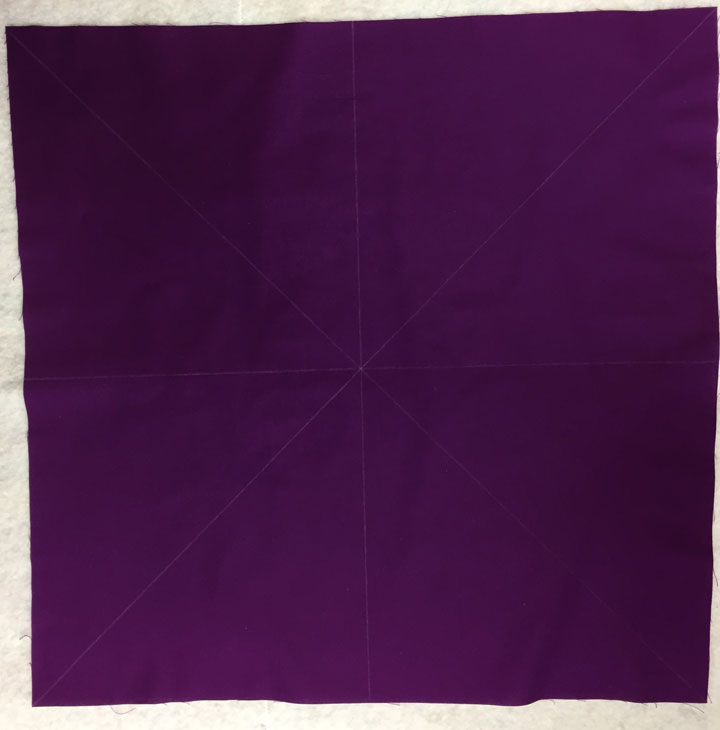
Next, ensure that all your soap lines from the original 8 lines we marked at the very beginning of lesson #7 are still visible.  If they’re not, darken them again as you’ll need to “play off those lines” in today’s lesson.

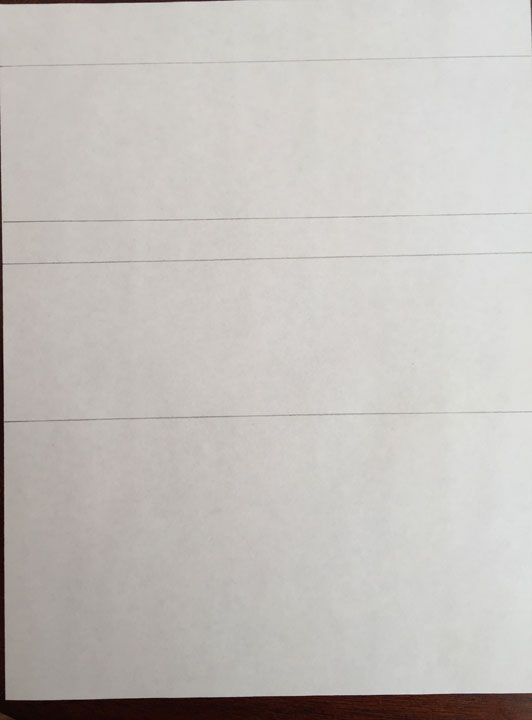
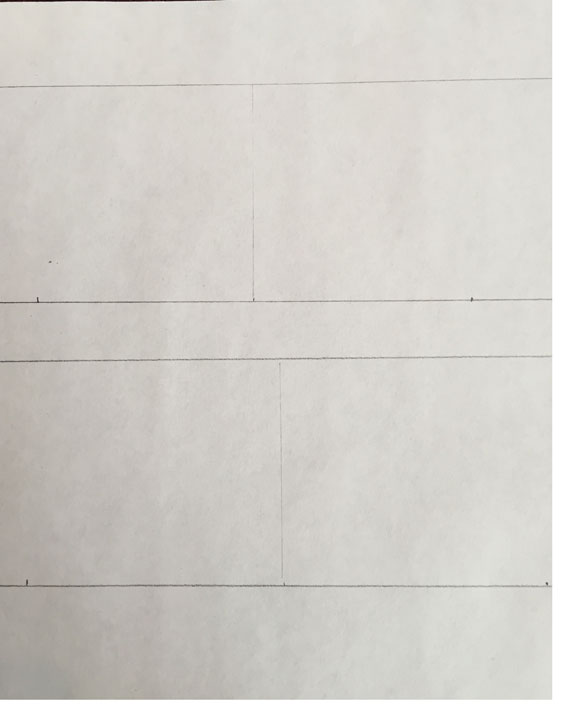
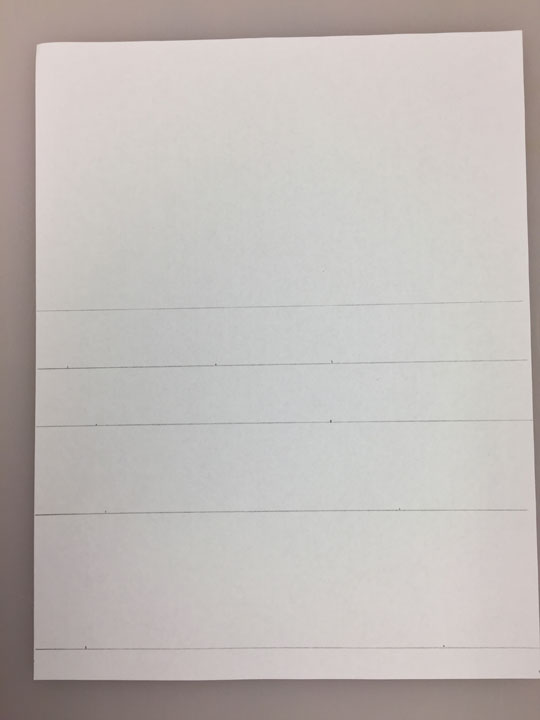
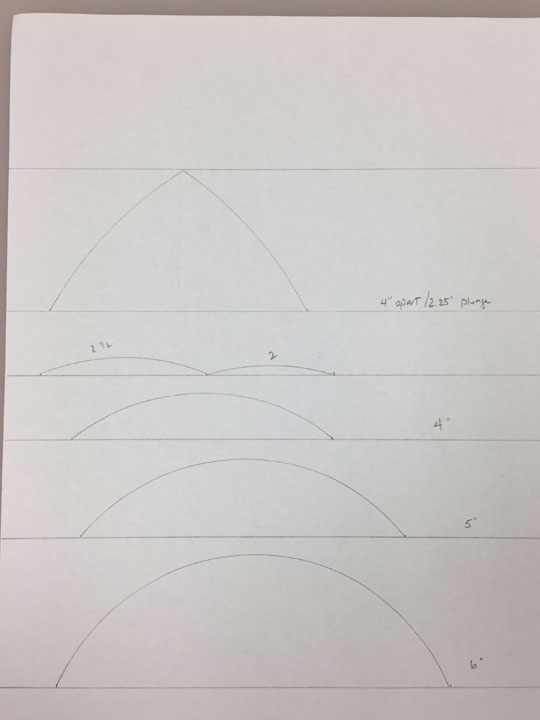
Finally, I want you to mark the midpoint between each corner and the midpoint line that you marked previously.  Measure and draw a temporary vertical line that’s perpendicular to the marked boundary line at each of these “bisections.”  These vertical lines that you’ve just marked will be the center of a series of arched swags that will run along the outer border of our design.  Mark a tick mark 2 inches from the bottom marked line upward along each of these 8 short vertical lines.  Your sandwich should now look like the photo below:


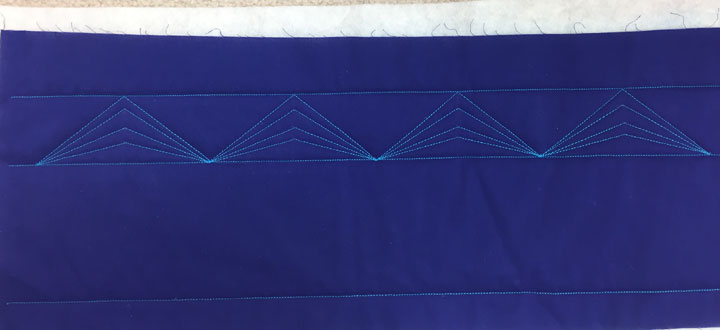
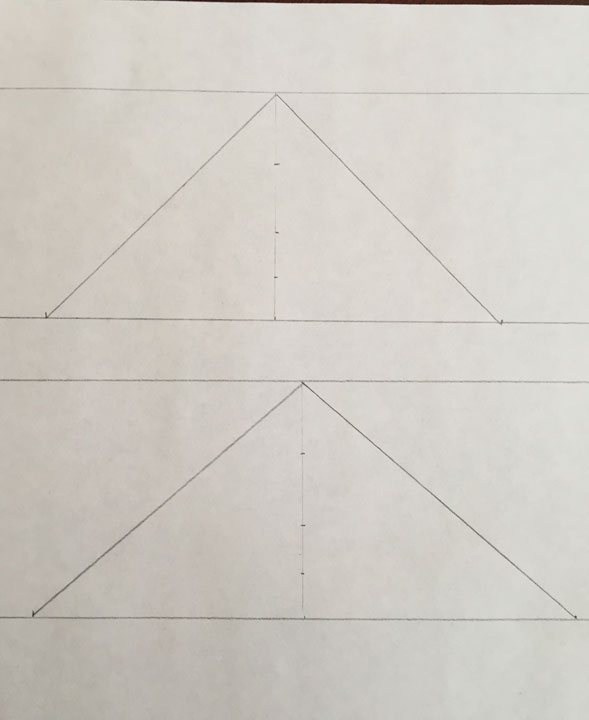
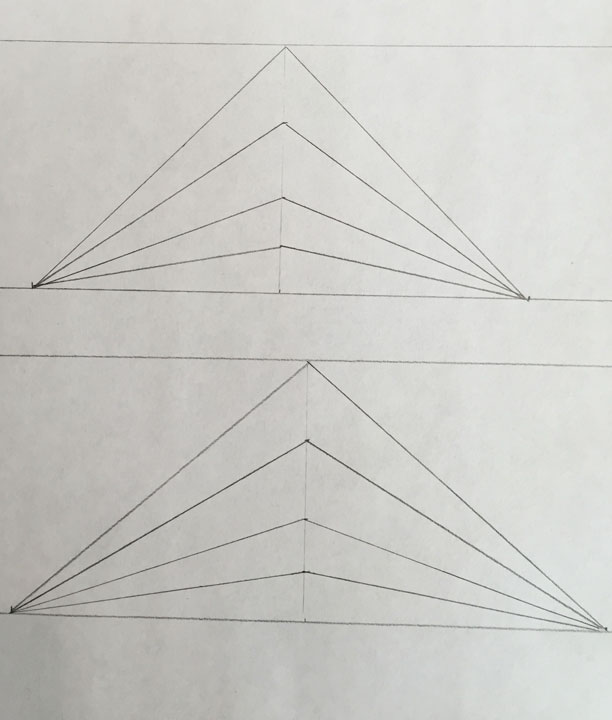
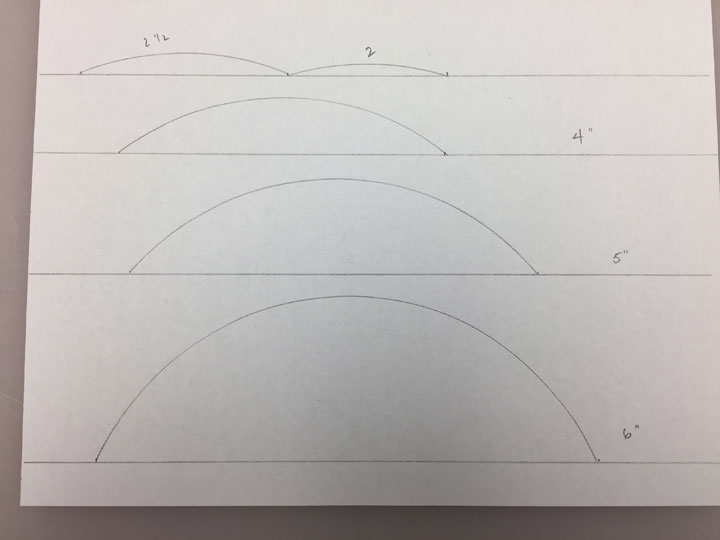
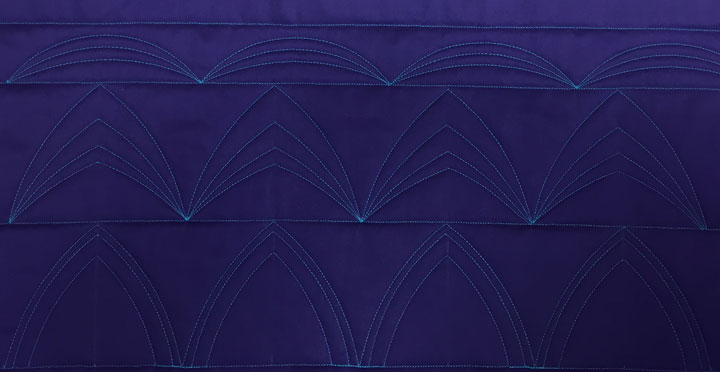
Before we move on with stitching, I want to jog your memory.  Think back to lesson #4 when we made a border design and we marked our sandwich to create a series of “parent arched swags” and the marked area looked like the marked area in the photo below:


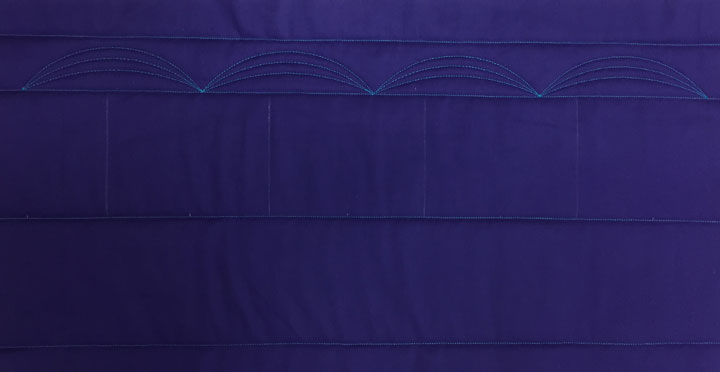
I bring this up because we are doing the same thing here.  The marked sandwich looks a bit different because we’re working off a soap line base now and our arched swags are shallower and wider than what we made in lesson #4, but this is exactly what we did before.  Remember, in ruler work, we are really doing the same things over and over again, but we are changing our starting and stopping points, and we are altering orientations, but we are essentially just creating parent shapes followed by channels.  Understanding the simplicity in this will help give you the confidence to create beautiful and intricate ruler work designs going forward.

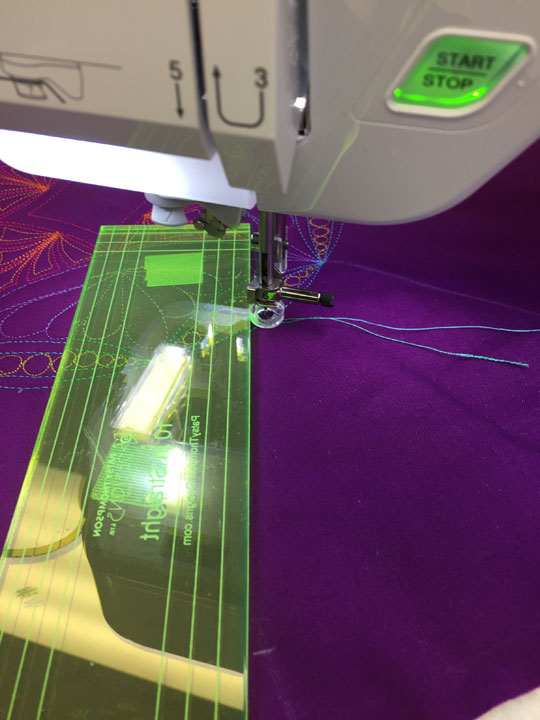
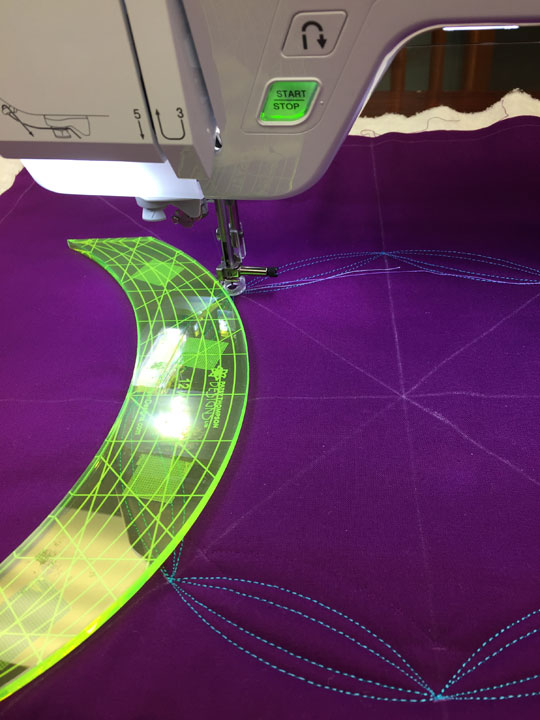
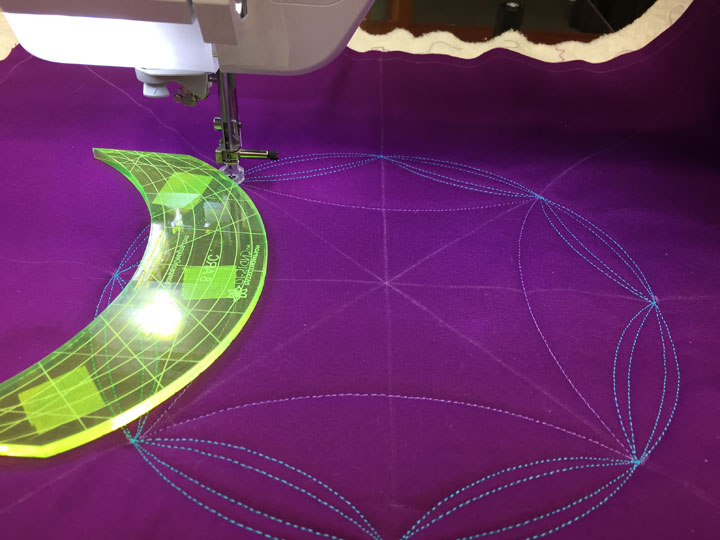
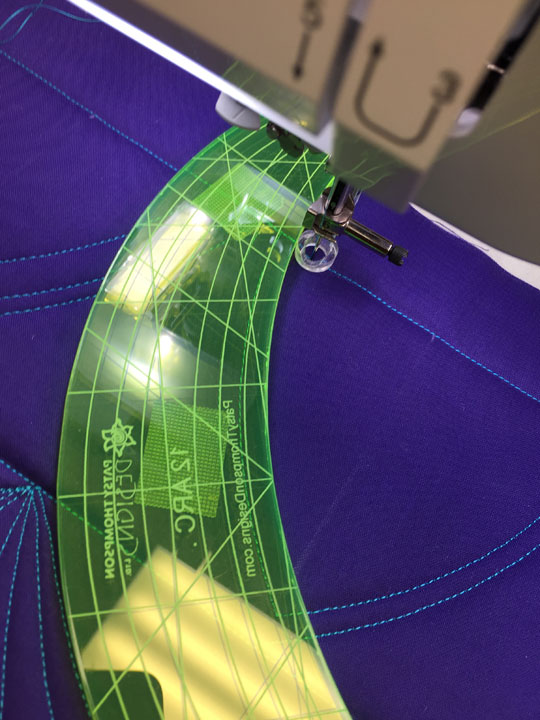
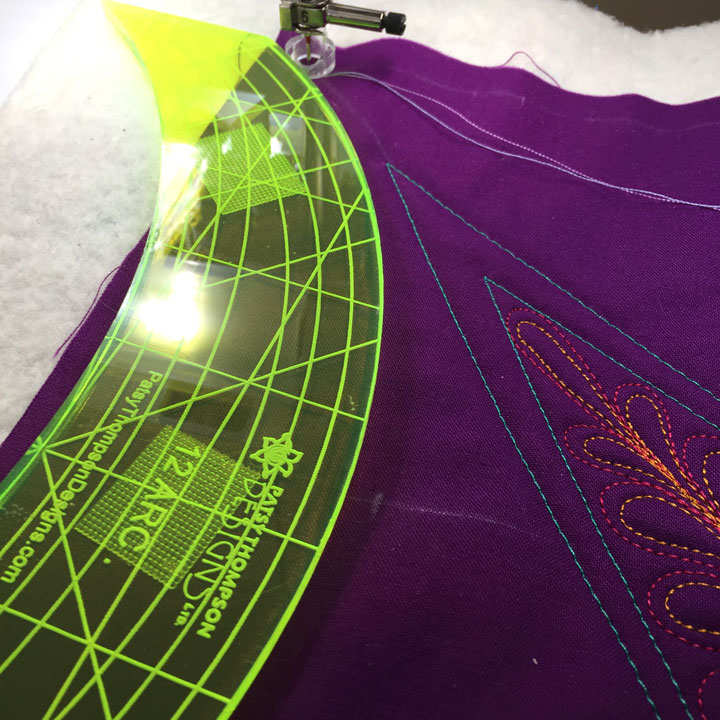
Now, let’s start stitching, shall we?  I am using my PTD 12 arc for today’s lesson, but use any arc ruler that is long enough and also has a subtle, or relatively shallow curve.  (*Important note: When I say you can use another arc ruler that has a shallow curve and is long enough, I am defining “long enough” as meaning that the expanse to be stitched must be less than 50% of the arc ruler’s length.  If you look at the picture below, you can see that I have positioned the ruler to illustrate that 1/2 the length of the PTD arc ruler is just slightly greater than the distance o be stitched.)  Pierce your needle in one of the corner intersections and align your ruler such that your stitched line will travel to the next tick mark.  Here is a shot of my set up before I began stitching:


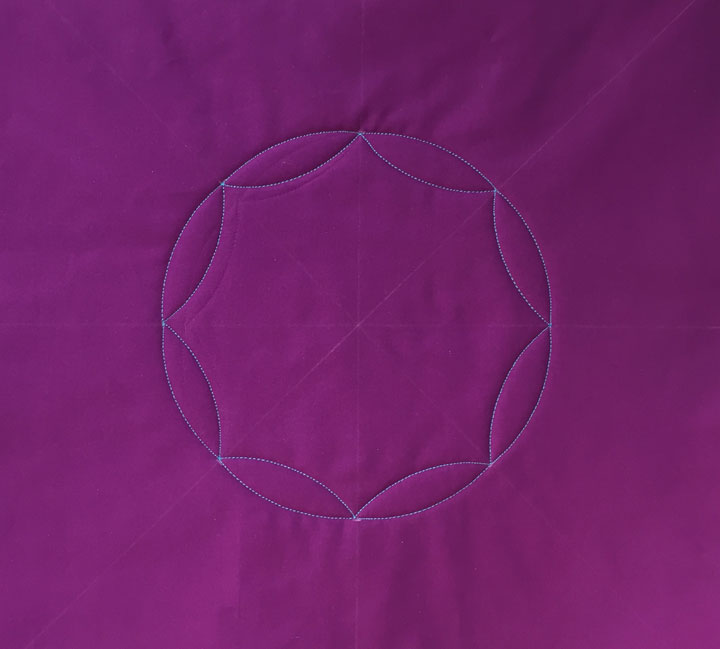
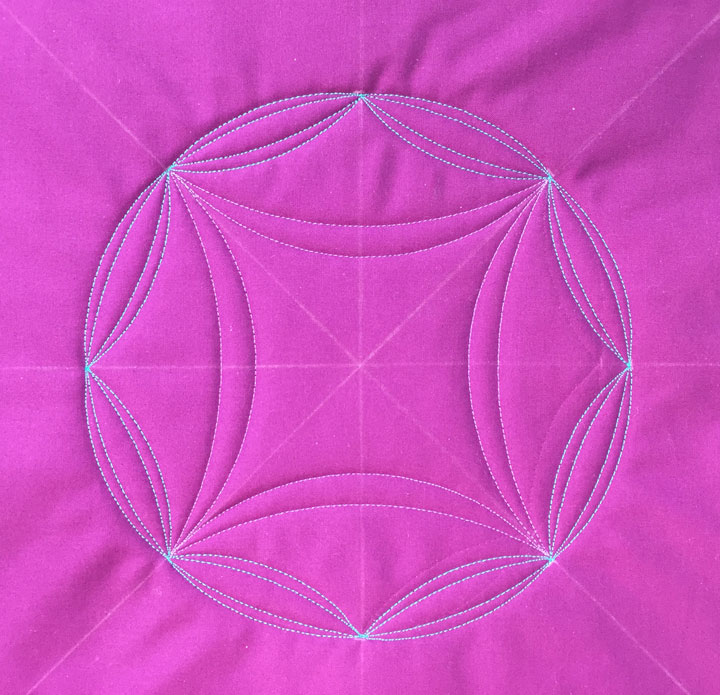
Go ahead and stitch this curve and once done, keep stitching until you meet back up with yourself where you originally began, then leave your needle down.  Here is what your sandwich should look like at that point:


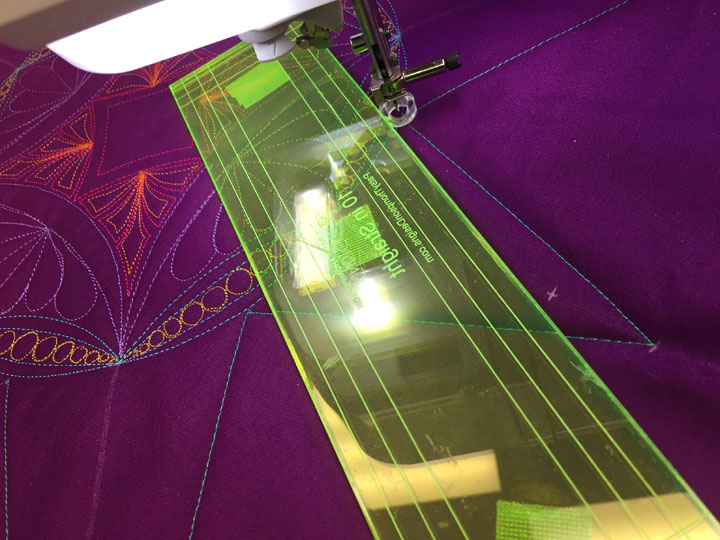
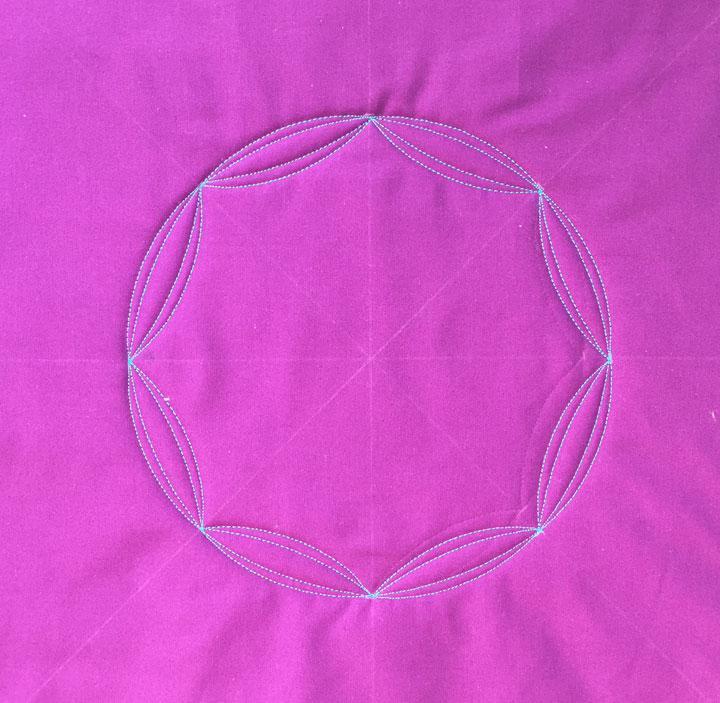
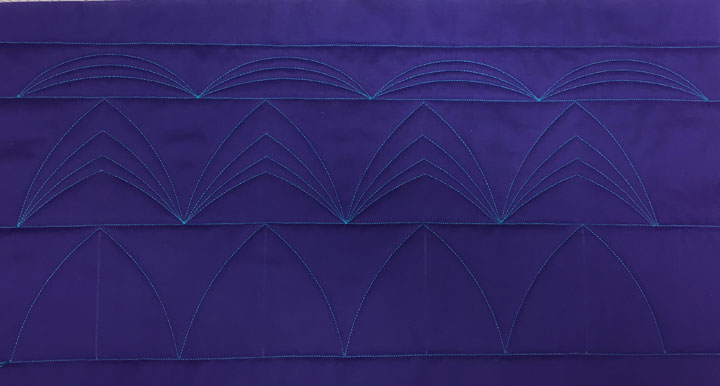
We’ll now throw in a tapered channel.  To do this, place a tick mark 1/2 inch below the stitched line on all 8 of your short vertical lines that mark the midpoint of each swag.  Your swag “bases” will be the pointed bases you’ve just stitched.  Line up your arc ruler as I have below and start stitching:


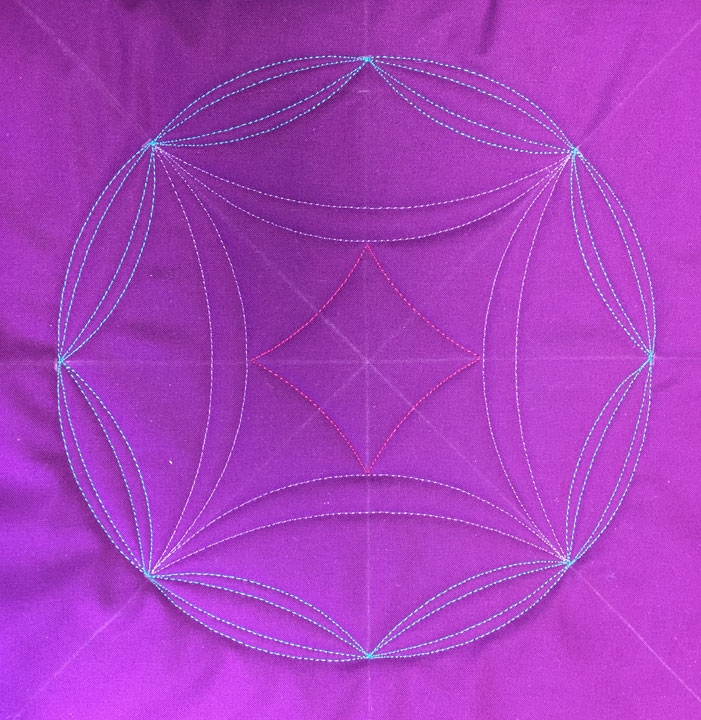
…and once you meet back up with the place you began stitching, end your thread line and your sandwich should look something like the photo below:


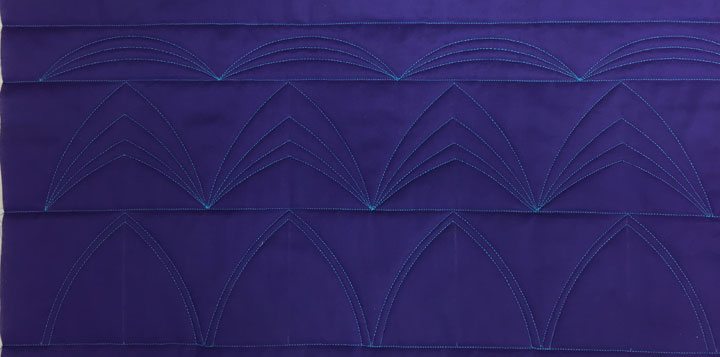
Before we move on, I need to point out something important.  These arched swags that frame our center design are very long, and we have really maxed out the length of the PTD12 arc ruler to create them.  You know because if you look at the photo above, you can see that the centers of each arched swag aren’t quite as “smooth” as what we want them to be.   (In truth, the “wonkiness” of this is accentuated in the photo because there are small chalk lines at each center point that make things look worse.)  This won’t be so noticeable once I’ve erased the chalk lines and filled in the tapered channel, but I don’t want to pass up this opportunity to let you know about this phenomenon.  What do you do when you want to frame something but the longest arc ruler you own is actually too short to create the framing above?  The answer is actually pretty easy…create a framing design that involves more than 2 sections!  In other words, subdivide this expanse into more subdivisions as each subdivision would then require a much shorter expanse of an arc ruler.  I didn’t do that here because this is your very first framing experience so I wanted to keep it simple, but know that there is almost always a work around to accommodate the rulers you have at hand.  When those options don’t seem as aesthetically pleasing to you, that’s when you break down and buy more rulers!  This kind of gets back to what I said when we first started playing with arc rulers; these are very, very versatile “design makers,” so it really pays off to accumulate as many different arc rulers as possible.  One manufacturer’s 12 arc is different from another manufacturer’s 12 arc ruler, etc., etc, so it’s easy to accumulate a large variety of curves over time.

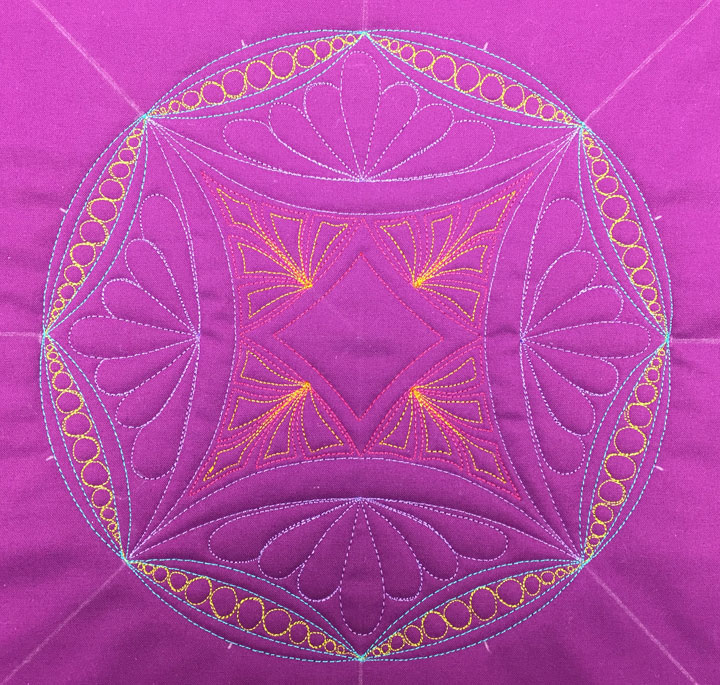
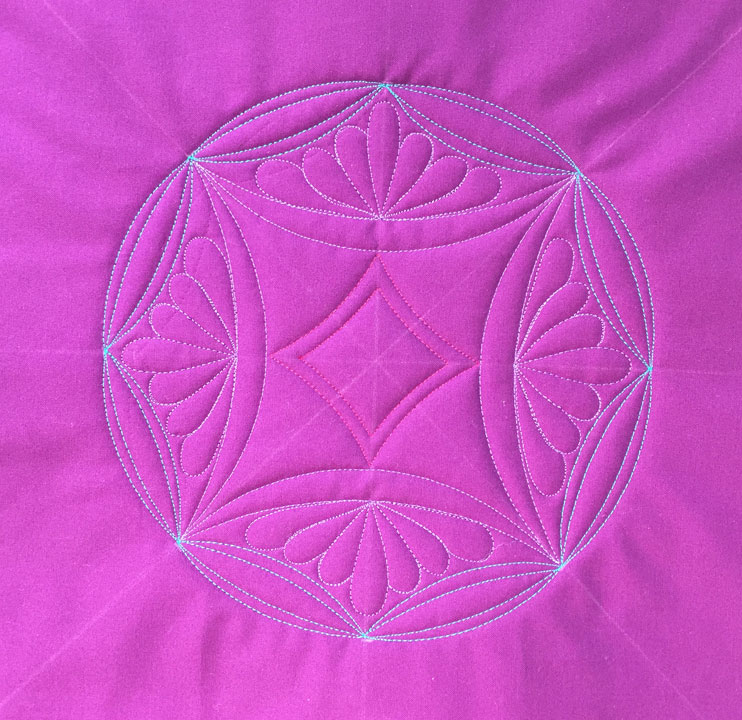
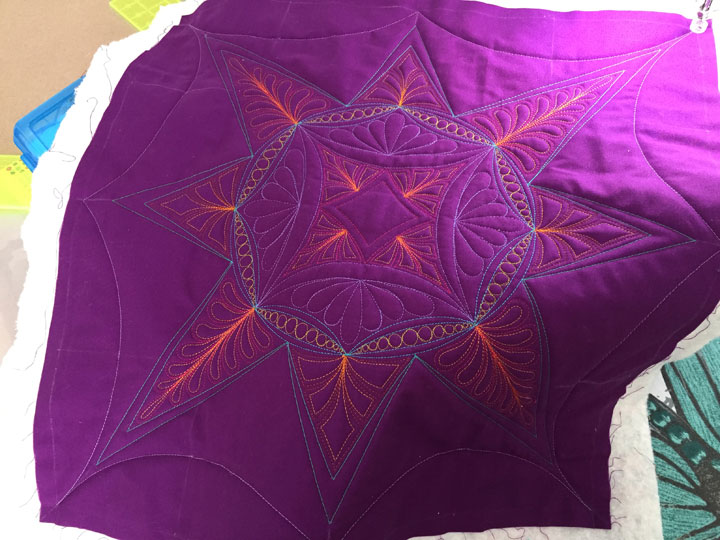
Now we’re ready to begin fill-in quilting.  I used my soap lines that denote the center of each swag and added a featherette inside of each arched swag.  Remember that your goal in stitching featherettes is to completely fill the “empty space,” and this is how you end up with symmetric appearing featherettes.  Here is what my sandwich looked like once the featherettes had been added:


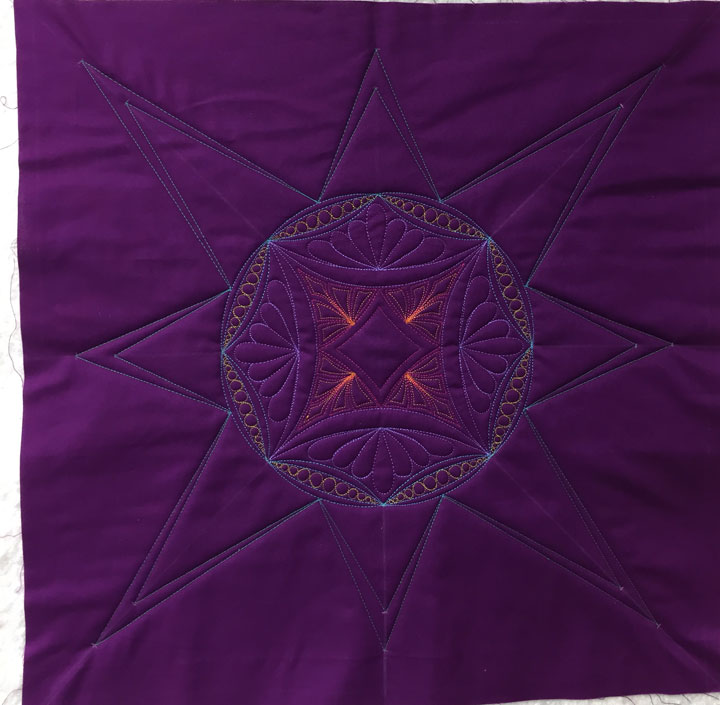
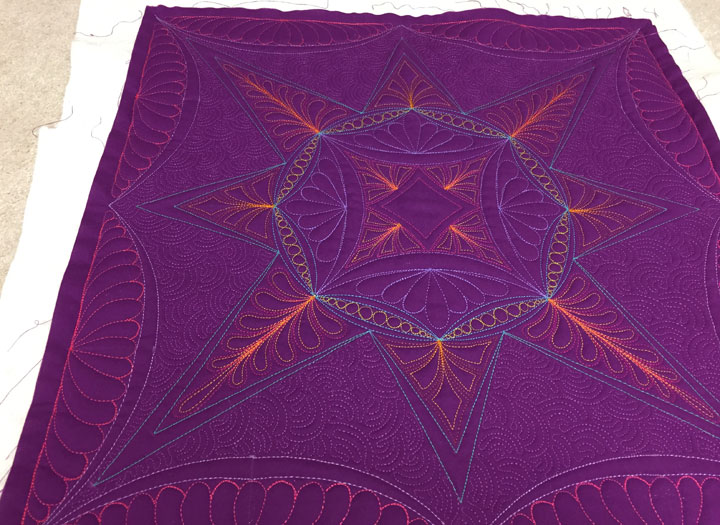
There isn’t much “empty space” left on this quilt, but the un-quilted sections really need to be quilted to help the quilt lie flat.  My goal here is really just to create a texture, not to quilt a fancy design that will compete with the star or the frame.  I am using a polyester thread whose color closely resembles the background fabric and quilting the background fill design called”igloos” in the remaining empty space.  This next shot shows some quilted sections next to un-quilted sections and it gives you a sense of how much this quilting will add to the finished piece:


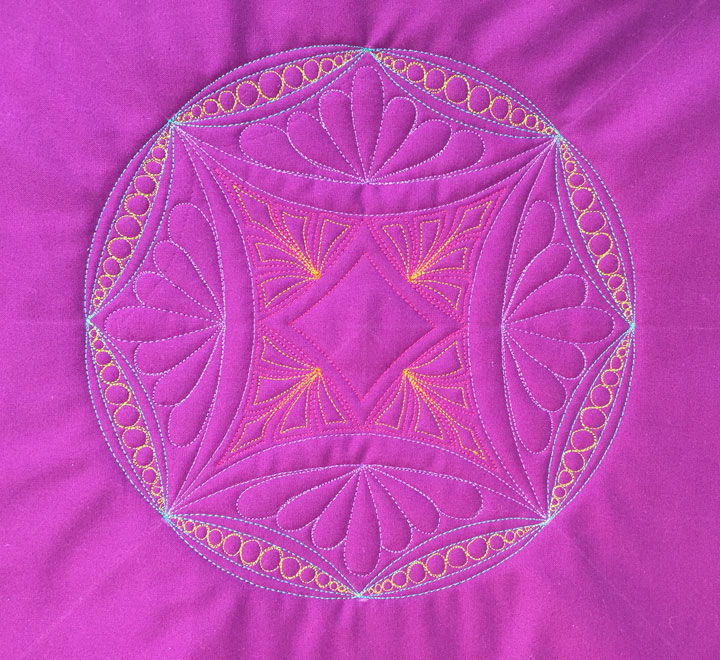
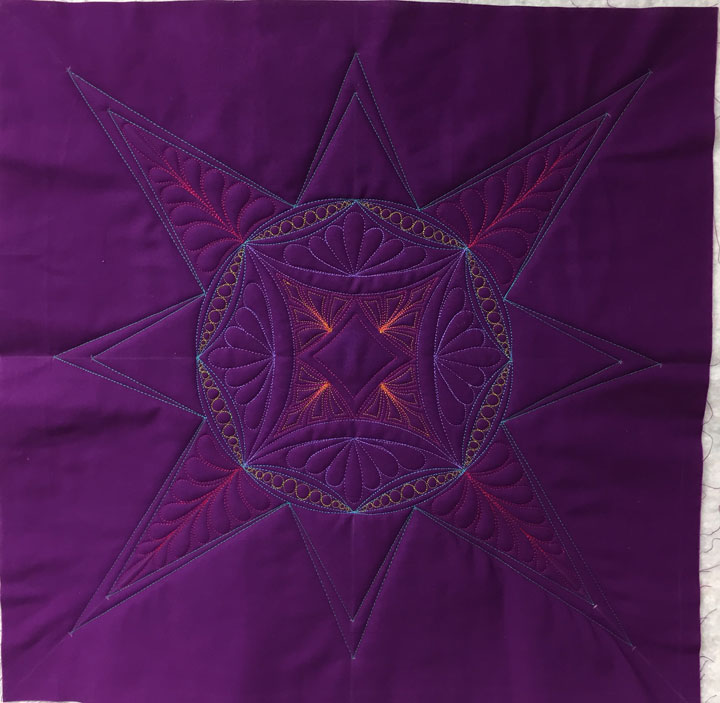
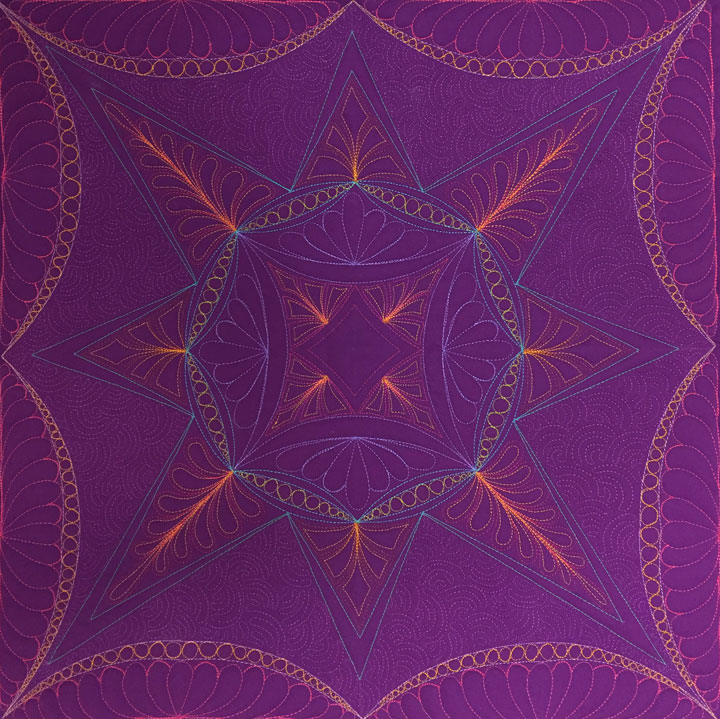
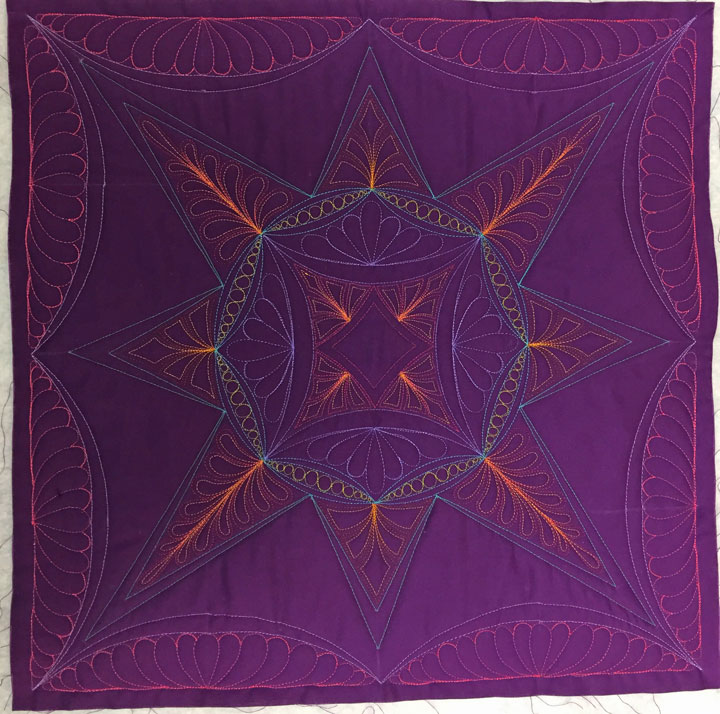
…and this next shot shows what the quilt looked like once the background quilting was complete:


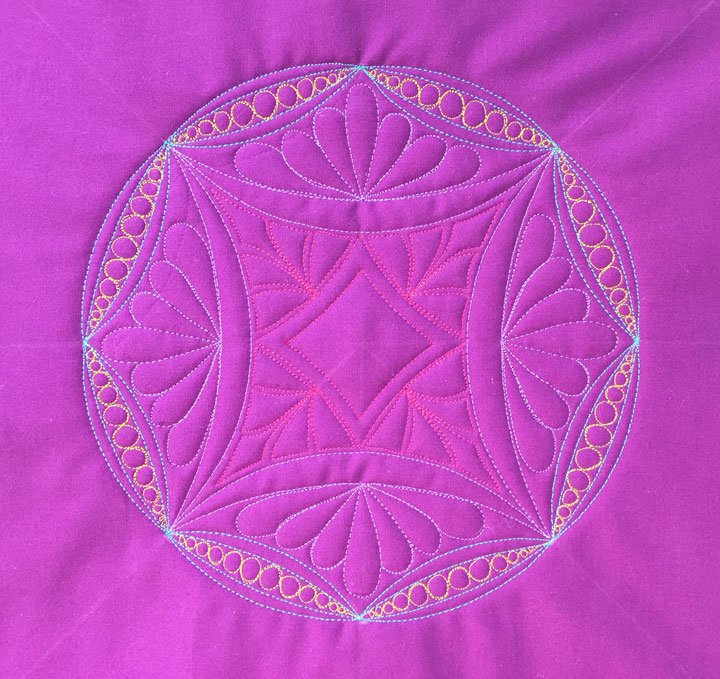
The last step was adding a row of pearls inside the narrow tapered channels of the arched swags.  Besides adding another detail and a different color to highlight the frame, notice that the single row of pearls draws the viewer’s eye around the frame.  There is something about that single row of pearls that makes the frame more definitive, so it’s  a powerful design choice:


This marks the end of our ruler work journey.  These lessons are an effort to pass along some of the concepts and skills that guide my own ruler work designs.  These lessons are meant to be much more than a few specific design lessons, so don’t fall into the trap of seeing them as just that.  Know that if you can allow yourself the freedom to dream about using these basic concepts in other layouts, there will be no end to what you’ll be able to quilt with rulers.  If you don’t believe me, scroll backwards in my blog to view old posts about how I’ve been quilting more complex designs and you will probably now understand how I do most everything I create!  If you are ever stumped about how to make something, come back and re-read lessons 1-6 as these really are the concepts from which everything I create evolves.  If you’re looking for even more inspiration, be on the lookout for our new DVD called “Ruler Work for the Sit-Down Quilter Volume 2,” which will hopefully be available in late winter.

I hope you’ll stop by my blog regularly. Although I won’t be posting a series of coordinated lessons, I have always (and will continue) to use this blog as a place where I post details about what I’m making and how I’m doing it.  It has been a real pleasure to hear from so many people all over the world who are sharing the same love of ruler work that I have.  I’ve been scratching my head, wondering why it took us home machine quilters so long to figure out how to enjoy the ruler work that long arm quilters have been using for decades! I guess it doesn’t matter now that we know how to do it, but it gives me hope that someone out there is probably on the verge of discovering the next fun thing we quilters can do with our sewing machines!  Have a great day and stay in touch!


January 2018 Ruler Work Winter Course Part VIII

January 26th, 2018

Today’s lesson picks up on the design we began in lesson #7, and I am using my PTD straight line ruler for today’s lesson.  We will be converting our circular design into a star in today’s lesson and here is what my sandwich looks like at the end of the lesson:


I’m using my straight line ruler because we have been focused primarily on curves in these lessons and I don’t want you to forget about your straight line ruler.  If you would rather use an arc ruler for this lesson, go for it.  (Your piece will end up looking more like a mandala than a star if you complete this portion with an arc.)  If I were doing this portion with an arc ruler, I would choose an arc that was a somewhat subtle curve, like the PTD 12 arc ruler.

As a reminder, your sandwich should look something like this before we begin:


Today, we will work on building this design from the center outward.  Know that there is no end to how large you could “build out” any given ruler work design.  The limiting factor will be the size of the quilt sandwich that holds the design. We don’t have a ton of space left on our sandwich, so we won’t be able to “build out” very far.  We will also be saving some of our “empty space” to learn some basic ruler work framing in the final lesson, so that will limit our “build out” even more.

We’ll begin by creating some new stopping and starting points for the next round of framework.  You will recall that we were able to use “every other tick mark” to build inwardly in the last lesson.  Another way to build is to define “halfway points” between existing design landmarks, and that is what we will be doing today.  Know that if you are ever looking to build any ruler work design outward, (i.e. to make it larger), repeatedly establishing new “halfway points” between your design elements will always be an effective way to work.  Each successive “row” of work will continue to offer symmetry as well as an easy framework upon which a new row may be added.

My goal here is to place a tick mark at the point that is 1/2 the distance between the beginning and ending of each outermost swag, or crescent.  I am being careful as I do this, but I’m not stressing out and demanding precision of myself.  It’s pretty easy to find this point; I simply lay my ruler down next to the crescent and center the distance over the crescent as shown below:


Can you see that the distance is just shy of 3.5 inches?  I then position my ruler so I have roughly the same amount of “ruler overhang” at the beginning and ending of the swag, then I place a tick mark at the midpoint, which is 1.75 inches.  I do this all the way around the circle, and this is what my sandwich looks like once that marking has been completed:


Next, I’m placing a tick mark 7 inches from the cleavage point on all my long diagonal lines, and I’m placing a tick mark 4 inches from the cleavage point on my short (or midpoint) lines.  This is what my sandwich looks like now:


Again, what we’ve done here is to create new starting and stopping points for our next round of stitching.  Pierce your needle at one of the tick marks along the edge of your circle of crescents and align your straight line ruler to stitch to the neighboring tick mark, as shown in the photo below:


Once you’ve worked your way around the entire circle, moving from tick mark to the neighboring tick mark, you’ll find you’ve added an 8-pointed star to the center circle of crescents.  Stop with your needle down, and here is what that looks like:


Now we’re going to add a tapered channel inside each “ray” of the star.  I placed a tick mark 1 1/2 inch below the tip of each ray that fell on the diagonal (the long rays), and a similar tick mark 1 inch below the tip of the short lines (short rays).  Remember, the base of each ray will be the same base as during our first round of stitching; the only thing we’ve changed is the location of the point at the end of each tapered channel.   Here is a shot of my set up just before I began stitching this next round:


…and here is what the star looked like once the tapered channels had been added:


Now we can begin filling in.  Again, what matters to me is that you learn how to do this kind of ruler work, so if you don’t want the same fill designs, use whatever you’d like.  I began by stitching a free-form feather inside the long rays:


…and then added an Aztec featherette inside the short rays:


I finished this off by hyperquilting both with gold polyester thread:


There’s no denying that the highlighting effect of the hyperquilting is pretty dramatic.  If your goal is to create a more subtle effect, I’d use a thread color that wasn’t as “loud.”

We have 1 more lesson to go in this month long ruler work journey!  See you back here next week and we’ll finish off this quilt sandwich!

January 2018 Ruler Work Winter Course Part VII

January 22nd, 2018

Welcome to lesson #7; we are getting close to the end now, aren’t we?  My hope is that you will recognize, as you go through these last lessons, that you already know a whole lot more than you realize.  These last few exercises are designed to help you “take that leap” where you put your newfound skills to work in ways you had not yet imagined.  You know how to make parallel channels and tapered channels using straight line rulers and curved rulers, but so far, you’ve only used these along the border edge of a border design.  Today, you will begin using these same skills to create a variety of ruler work designs that do not follow along the border edge.  Today’s lesson will teach you how easy it is to create a circular design using rulers and channel work.

To do this, I need you to make yourself a sandwich that measures 20 in x 20.  (Not roughly 20 in x 20 in; I need that top fabric piece to really measure 20 in x 20 in!)  You can finish this into a pillow or the front of a tote bag or whatever you want once we’re done, but we will be using this quilt sandwich for the remaining final 3 lessons.  Below is a shot of the portion of the design we will work on today:


…and here is what the ruler work framework appears in an “empty stage:”


Please do not freak out!!  If you have followed the ruler work lessons thus far, then you are fully capable of completing the ruler work framework above.  If the fill designs are freaking you out, don’t worry about them as there are many other fill designs you can use instead.  Now, let’s get to it!

Using a sliver of soap or some type of temporary marker, I want you to draw temporary lines from each corner to it’s opposite corner. Your sandwich should look like the photo below:


Note that where those 2 lines intersect is the dead center of the block, and it will become the dead center of your quilt design.  If you didn’t already know this, commit it to memory as it is very useful.  Always have a clear center point that marks your quilt block’s center, and make sure that point remains clear from the very beginning until the quilting design is completely finished.  You may need to darken that point a couple times as you work, and that’s ok as long as it’s the same point you started with.

Next, we will add 2 more lines that will go through that center point.  Align your ruler edge along the base of the top fabric, then slowly advance it so the other edge of the ruler goes right through the center point of the block.  The photo below illustrates what I’m trying to describe:


Trace that line with your temporary marker, then repeat the same thing on the neighboring side.  Your sandwich should now appear as below:


The reason I’m telling you to mark it this way is that I want you to have a specific point that is the center of your block.  You need a tiny point, not a smudge or a confusing set of lines that don’t quite intersect in a point, and if you mark it as above, you should have a clear point.  Know that if you are ever finding yourself in a spot where you want to fill a rectangular or square block with a  ruler design, marking it in this exact same way will help you.  These lines will allow you to create a symmetric ruler work design even when you’re working with blocks as small as 4 to 5 inch square blocks.

Next, draw a temporary line that is 1/2 inch inside the perimeter of your block, on all 4 sides.  This last set of marks is to create a boundary that will ultimately be used as a seam line if you make this into a pillow or tote bag once we are completely done.  We need to mark that boundary now so we deliberately leave that section outside of the design we will be making with rulers.

The last marks for today are easy.  Make a small tick mark along each of the 8 lines above that rests 4 1/2 inches from the dead center of the block.  Your sandwich is now ready for stitching and should look like the photo below:


I am using my PTD 6.5 arc ruler for this first round of stitching.  Pierce your needle in one of the tick marks that encircles the center point, and then stitch short curves that run from 1 tick mark to the neighboring tick mark.  Continue doing this all the way around the circle.  Once you return to the place that you began stitching, reverse the orientation of your arc ruler and now stitch a mirror image arc to travel to the next tick mark.  Repeat this all around the circle until you meet up with where you began stitching.  Stop with your needle down, and your sandwich should now look like the photo below:


Now I am swapping to my PTD 12 arc ruler.  I repeat the same process and this allows me to stitch a tapered channel on one side of my circle of swags.  Once I arrive back where I started, I reverse the orientation of this same arc ruler and repeat the process again.  Your sandwich should now appear as below:


We’re going to add more ruler work here, but before we do, I want to be sure you realize what you have just done.  Look at the design you’ve created and ponder this:

  1.  You have created a circle of crescents.  You now know how to create a series of tapered swag channels in any size circle you wish.  In this case, we have created a circle of crescents by stitching mirror image tapered swag channels that meet at the “cleavage points.”  This is your first foray into using a tapered swag channel to create a unique design.  Know that creating a circle of swags is but one of many, many, many ways you can manipulate swags into a design.  I sure hope you are feeling a bit empowered now!
  2.   If you are asking yourself how you would do this again on your “real quilt” with its own unique dimensions, you would begin by marking those 8 straight lines that we marked at the beginning, but you would change the position of the tick marks to create the size circle you desired.  (For example, if you wanted to create a 7-inch diameter circle, you would place a tick mark 3.5 inches from the center on all 8 lines; for a 12-inch diameter circle, you’d place a tick mark at 6 inches from the center at all 8 lines, etc..)  Yes, it really is that easy!
  3.   Now, here’s where you will need to start thinking…Can you count on the same arc rulers I used here to be able to make crescents that will look good in any size circle dimension?  No!  These rulers will work well on many sizes of circles., but not all sizes of circles.  This is because the distance between tick marks will change as you change the circle’s diameter.    This phenomena will happen with any design that involves swags, because you will be altering the space between tick marks and therefore altering the amount of “plunge” of each swag.  (Remember back to what you learned in lesson #6.)  Let’s say that all you have available are the 2 arc rulers we used for the circle of crescents above.  There are 2 ways that you could work around this: a.  convert this to a circle of arched swags.  This would also look great and would enable you to use the same arc rulers, OR b.  Bisect each of the marked lines we’ve been using for our tick marks and if you did this in equal halves, this would effectively create a circle of short swags and enable you to make a very large circle with beautiful crescents using the same arc rulers.

OK, so let’s get back to today’s quilting part of the lesson. Now we’re going to again play off our previously marked lines, but this time we an add a new “shape” into our framework by playing off “every other” tick mark.  I’ve swapped to a different color of thread for this part of the ruler work as this helps to define “areas” within the design, so feel free to swap thread colors of you’d like.  Position the quilt on the machine bed and view your circle as if it were a clock.  Pierce your needle in the “10:00 position,” or the cleavage between 2 crescents that falls at 10:00.  I am using my PTD 12 arc ruler for this next step as I prepare to stitch from the 10:00 position to the 8:00 position.  (In other words, I am aiming to hit every other cleavage point.)  The photo below, taken just before I began stitching this section, shows what I’m describing:


…and this next shot shows as the first 4 swags have been stitched, and I’ve left my needle pierced in the same place I began:


Next, you want to repeat the same exercise, but using an arc ruler whose curve is different enough from the original arc ruler that it will be interesting.  I am using the PTD8 arc ruler in the shot below:


…and now the goal is to stitch a series of tapered channels that play off the first round of stitching.  Here is a photo that shows the design once those tapered channels have been stitched:


Of course, we’re going to move on, but I need to point out a something that might not be obvious.  When you are “building” a ruler work framework/design, it is very easy to create designs by playing off those original lines we marked.  In this case, we are building the design “inwardly,” but the same holds true when building the design “outwardly.”

We’ll add one more element into our framework and then we’ll begin filling it in.  I’ve swapped threads 1 more time and using my PTD 6.5 arc ruler, I’ve created a short arc that goes from 12:00 to 9:00 to 6:00 to 3:00 and the back to 12:00.  (In regular language, I’ve done what we did earlier, but by rotating my starting point 1 cleavage point over, I’ve added a new element.)  The photo below shows what this looks like:


Using the same arc ruler, I then created a 1/4 inch parallel channel inside this and my finished ruler work framework looks like the photo below:


Ta-da!  Everything we’ve done today is exactly what you’ve been doing in the earlier exercises, we’ve just changed the starting and stopping points so that we are no longer working along the boundaries of a border.  Sometimes it helps to really think about what is familiar as it helps you realize that the skills you have can help you make much more complex designs than you may think.

We will be doing more ruler work on this design in the final 2 lessons, bit for today, let’s fill in what we have so far.  First up, I added a featherette inside each of the “curved triangle” zones in the middle section:


Next, I swapped thread colors again and stitched an Aztec featherette inside each of the long, skinny “curved triangular” zones:


I then swapped to a green/gold polyester thread and added a single row of pearls inside the crescents.  Notice that when you do this, you can do it as one continuous thread line, sneaking from one crescent into the next:


…and lastly, I used a gold polyester color thread and hyperquilted the aztec featherettes.  This adds an interesting “high-lighting: into this area of the design:


Could you throw something into that center diamond?  Yes!  Personally, I’m holding off right now as I don’t have an idea that is jumping out as a great way to fill it, but if you’ve got an idea, then go for it!

Hold onto this quilt sandwich and we will pick up here in the next lesson.  Today you have learned how to begin a ruler work framework, (in this case, a circle of crescents), and then to build on that framework working from the outside in.  In our next lesson, we will play with building on this framework toward the outside.  Until we meet again…


January 2018 Ruler Work Winter Course Part VI

January 19th, 2018

Welcome to lesson #6!  I’m glad you’ve made it this far, as today’s lesson will hopefully take the skills you have learned and place them into the realm of practical use.  You can do today’s lesson on paper or on fabric, but  I will be demonstrating it on paper because that is how I would handle the situation in “real life.”  My goal here is to show you how to solve these problems when you are dealing with a “real quilt” and trying to figure out dimensions.  Do not be put off by the mundane/boring nature of today’s lesson as this is the info that will allow you to use the skills you’ve been learning.  Sometimes, it pays off to read through “dry material” and I’m hoping you will find this worth your time.

You really do need to know what’s been covered so far in order to reap the rewards of today’s lesson, as all of these lessons build on preceding lessons.  Clicking on any of the links below will take you to the earlier lessons:

Lesson #1

Lesson #2

Lesson #3

Lesson #4

Lesson #5

OK, let’s get right to it!  To date, you have been creating various ruler work border designs because I’ve been feeding you specific dimensions that determine placement of your tick marks, and those tick marks determine the proportions of the final design.  One of the most wonderful things about ruler work is that it gives you the ability to customize a given design to fit exactly on your quilt.  If you really like that design and decide you want to use it again on a different quilt, you can easily “adapt” that design so it has been customized to fit exactly on that second quilt.  You will discover that this versatility is extremely useful.

Let’s look at a typical border that needs to be filled.  Let’s say that you have a 2 1/2 inch wide x 34 1/2 inch long border on a quilt that you want to fill with a ruler work design.  Let’s pretend that we want to fill that border with the design we learned in lesson #1.  To trigger your memory, the photo below shows this design made with the original proportions:


Recall that the dimensions for each “unit” of this design were 2 inch by 5 inches. If we were to keep the length of each unit at 5 inches, then we would have room for 34.5 divided by 5 = 6.9 units.  Well, we can’t have 6.9 repetitions of that design can we?  So, this means I could either have 7 repetitions of a 4.93 long unit (I got this number by taking 34.5 and dividing by 7), OR we could have 6 repetitions of a 5.75 inch long unit (I arrived at that by dividing 34.5 by 6.)   To see if either of these would be aesthetically pleasing, we need to test this on a piece of scrap paper.   First, I would  create an empty 2 1/2 inch wide border zone on that paper.  I have created 2 separate zones below as my paper isn’t wide enough to hold both options inside the same line:


Next, I am placing a tick mark at my “zero position,” then another tick mark at just slightly greater than 4 7/8 inches for option #1.  On my second border, I have another zero tick mark and then a tick mark at 5.75 inches.  This allows me to create a sample of a unit of the border design at each of the 2 lengths discussed above.  Next, I place a vertical line at the midpoint of each of those units, and my paper appears as below:


Draw that first parent triangle for each sample and then look at what you’ve drawn.  Recall that this design is a series of triangles with tapered straight line channels, but our original border was 2 inches wide and this new border on your real quilt is 2 1/2 inches wide, so these new triangles are 25% wider than the earlier design.  If we stick with “inner triangles” of the original height, they won’t look quite right, so we need to play with the proportions of these new “inner triangles.”  For me, the easiest (and fastest) way to do this is to lay my ruler next to that center vertical line and just kind of “eyeball” what might look good.  For this size, I am choosing to place a tick mark at 3/4 inches, 1 1/2 inches, and 2 inches below the apex of the parent triangle.  Do I know this will look good?  No, but I’m pretty sure it will.  (At some point, you need to learn to take chances and trust your instincts.  Remember, if this drawn sample looks awful, you will learn something from that, and over time, it’s these successes and failures that will build your confidence in making these kinds of guesses.  This is also just a piece of paper, so if it looks awful, you’ll try again on another piece of paper!)  This is what my paper looks like before I draw any more triangles:


…and here is the paper after both samples have been drawn:


I believe that either one of these would be fine, but I’m going to choose the 5.75 version for 2 reasons:

  1.  I like the proportions a little bit better, AND

      2.  This size will be less work for me since it has less repeats, so I know I can stitch it out        faster.

So, after my little “experiment,” I have determined that my new prototype unit will be 2 1/2 inches high and 5.75 inches long.  We’re almost done, but once I’ve determined my “prototype” proportions, there is one more step to take before marking the border zone.  You must measure each of the 4 sides of the border individually and then mark them individually.  The likelihood that all 4 sides will be the exact same length is very low, (for me, it would be 0%), so go into the process assuming they are all just a bit different.  You will then need to calculate the width of each repeat for each of the 4 sides.  (You would do this by taking the measured length and dividing by 6, since we have determined above that we will be having 6 repeats.)  It may well work out that the differences in the size of the units will be inconsequential, but sometimes they are not.  It’s always safest to work in a way that will cover you in situations where those differences are consequential!  What you are really doing here is avoiding the trap of using the measurements from side #1 on side #2, and finding out that a difference of 1/8 of an inch added up 5 times (0ver 5 repeats) might leave you with a final triangle unit that is 5/8 inch longer or shorter than every other triangle unit in that side of the border.  This additive effect creates enough of a difference that it would be noticeable, but if you spread out that difference among each unit in a given side, the world will believe that each unit on all 4 sides of the border is the same length.  That is the rationale for measuring each side individually and calculating the length of each unit for each side individually.

Now, let’s say that we were working on filling this border with a swag ruler work design, would this be as fast and easy?  No, but it wouldn’t be hard.  Remember that when you are working with arc rulers, you will alter the depth of the curve’s plunge into the border space every time you alter the length of each swag.  To illustrate this, take an 8 1/2 x 11 in piece of scrap paper and orient the paper in portrait orientation.  Beginning 1/2 inches above the bottom of the paper, draw a horizontal line across from the left side to the right side.  Next, mark a parallel line 2.25 in above that line, then 1.5 inches above the 2nd line, then 1 inch above the 3rd line, and lastly 2.25 inches above the 4th line.  (We have just created a series of border spaces of different widths.)

Now, beginning at your lowest line and then working upward, make a tick mark at 0 and 6 in; 0 and 5 inches; 0 and 4 inches.  On your next line up, mark a tick mark at 1, 2.5, and 4.5 inches. Your paper should now look like this:


Now, I am using my PTD 6.5 arc for this exercise and I’ve chosen it because it has the most dramatic curve of the 3 arc rulers in the PTD starter pack.  Using the tick marks on each line, I am tracing my swags and this is what I get:


What I’m trying to show you is what happens with the depth of the plunge of the curve as you alter the length of a given swag.  Remember, you will need to play around with lengths of swags as you determine the ideal swag length for that special border on your real quilt.  Is there a way to work around this?  I know of two ways:

1.  Begin building your stash of arc rulers

2.  Switch to a border composed of arched swags instead of pure swags.  This will resolve these issues completely since you have complete control of how deep of a plunge your arched swag will make by virtue of where you place your tick marks.

In the photo below, you can see how I’ve made a very “plunging” arched swag using a 4 inch long unit.  If you compare this to the depth of the swag we were able to make using a 4 inch long unit earlier, there is a huge difference.


OK, that’s it for today and that’s it for the “dry/mundane/boring posts!”  The final 3 posts will have you stitching again but using your skills in a very different way.  Prepare to have a ton of fun and to realize you have skills that will take you to very fun places and to beautiful design work!


January 2018 Ruler Work Winter Course Part V

January 15th, 2018


Today we hit the halfway point on this ruler work journey together!  This will be the last lesson where I’m laying down basic ruler work skills, so know that the lessons will be different after today.  (They will still be great, but they will force you to use the skills we’ve covered thus far in ways you might not think of, so it will be fun !)  These first 5 lessons really are the basis of pretty much everything I do in the world of ruler work, so if you see me doing something down the road and can’t understand how I did it, come back to these first 5 lessons as the info will be here.  Know that each lesson builds on the preceding lessons, so it’s to your benefit to complete them in order.  Your time and my time are valuable, so I won’t keep repeating the same information in each post.  You can find the earlier lessons by clicking on the links below:

Lesson #1

Lesson #2

Lesson #3

Lesson #4

In our last 2 lessons, you learned how to create tapered channels using an arc ruler and today, you’ll learn how to create parallel channels using an arc ruler.  This is very similar to creating parallel channels with a straight line ruler, so this should prove pretty easy for you.  I will be using my PTD 12 arc ruler for this, but use whatever arc ruler you have lying around.  We will be working inside the lower 4 inch wide border on the sandwich you made earlier.

Below is a photo of the ruler work framework we will be completing today:


…and here is a shot of what it might look like once filled:


Each of these arched swag “units” is 5 inches wide and 4 inches tall.  I am using my PTD 12 arc ruler for this, but use whatever arc ruler you have available.  As always, we’ll begin by marking some tick marks to guide our stitching.  Using a temporary marker, place one tick mark at the base of the border zone at least 1 inch to the left of the fabric’s edge.  Place a similar tick mark every 5 inches thereafter.  Next, mark a vertical line 2.5 inches from the left-most tick mark, then repeat that line every 5 inches.  Your sandwich should now appear as follows:


The first run will be identical to our last exercise.  Pierce your needle at the base of the border on the first tick mark, then position your ruler to stitch to the apex of the neighboring vertical line.  Now, re-position your ruler and stitch the next curve that will take you back to the baseline, then stitch the remaining parent arched swags in this border.  Once done, your sandwich should appear as below:


We’ll place a 1/4 inch parallel channel inside each parent arched swag.  Remember there is no need for further marking as we can rely on the etched lines on the ruler to guide us in creating parallel channels.  To create a 1/4 in parallel channel, you’ll simply place your arch ruler edge right up against the stitched line you just stitched, and this will give you a 1/4 inch wide channel.  Here is a shot of my setup just before I began stitching:


Once your stitching reaches the vertical soap line, stop stitching and re-adjust your ruler, then keep going.  Complete those 1/4 inch channels for the entire border and your sandwich should appear as below:


Next up, we’ll add a 1/2 inch wide channel inside each arched swag.  You’ll need to enter 1/2 inch inside the innermost arched swag at the end, then place the first etched line on your ruler directly over that stitched line.  Here is a shot of my setup before I began stitching:


Stitch those out and your sandwich should appear as below:


Throw in your final 1/4 inch wide channel, and your framework is complete:


Now we are ready to fill in some channels.  Remember that the 1/4 inch channels are too narrow to hold anything, so those 2 channels will remain empty.  I added a single row of pearls into the 1/2 inch channel and a featherette into the bottom triangular area.  Here is a shot of these filled in:


Do you see the mauve-colored structures in the base of each arched swag?  Those are called featherettes.  We’ll talk more about them below, but before we get to that topic, this last shot shows the border design after the featherettes have been hyperquilted with gold polyester thread:


When you hyperquilt a quilted design, it adds a bit of flair, or a highlight, especially if it’s stitched in a high contrast thread.  For feathers and featherettes, it always creates areas that are almost “electrified” if you use a gold or silver rayon or polyester thread.   This is because you have to repeatedly bring your stitching line back to the spine (in a feather), or back to a center base (in a featherette.)  Having these areas where there is increased density of thread being laid down is what causes the highlighting.  In general, if you have a border design that you like but you think it’s a bit ho-hum, think of hyperquilting a section of it because it will almost always bring that design newfound life!

Of course, there are many ways these channels and spaces could be filled, so choose something else that appeals to you if you are turned off by the thought of a featherette.  I am betting that many of you are intimidated by the thought of a featherette, but this is something that’s really worth trying because it will add a sophistication to your ruler work.  Many people find a basic featherette easier to stitch than a feather, so many people learn to stitch feathers because they’ve mastered a featherette.  I’m going to give you the basics of featherettes below, but spend some time looking at the photo of a basic featherette above as you try to understand these concepts:

  1.  There is a difference between a featherette and a feather.   In a feather, the plumes all flow from a spine.  In a featherette, the plumes all flow from a single point, OR the plumes flow from a structure that is not a spine.  Can you see that the plumes in the photo above all flow from a point at the center base of the triangular zone? (They do, and this makes featherettes easy to stitch, because you are repeatedly bringing your thread line back to that same point.)
  2. A featherette is nearly always highly symmetric, either from side to side or top to bottom or all of the above.  In the featherette above, there is a central plume and then the side plumes on either side are roughly symmetric.  How in the world can you do that kind of freehand work??????  See below, and play with this by drawing on scrap paper.  Drawing will teach you a lot about proportion and shapes of plumes.  (I know, I can hear you groaning “but I can’t draw!”  Trust me, I couldn’t draw before either.  The more you do it, the better you get!)

For me, the easiest way to build “featherette skills” is to draw a few isoscoles triangles on a piece of scrap paper.  (An isosceles triangle has 2 sides that are equal.)  If you look at the space created with ruler work that holds each featherette above, can you see that the space is actually is a triangle?  If you go intro the challenge of drawing a freehand featherette with the goal of filling the entire space inside the triangle with plumes, it’s not so hard to do this.  Begin by drawing a teardrop whose base is in the dead center of the triangle and stretch that teardrop/plume so it reaches the top of the center of that space, then carry the pencil all the way back to the center base again.  Now swing up and out and to the right and draw a “hook” shape that eventually meets up w/that center plume.  Carefully backtrack just a bit over the “tip” of the hook you’ve just stitched, then swing out to the right and down to that center base point again, and you’ve just added another plume. If you are working inside a triangle that is roughly the same size as the triangle inside the ruler work arched swag you should have space for 1 more plume on that first side.  I would sneak out, creeping along then next to the baseline, then swing up and stitch the final hook shape.  Now you can carefully backtrack down your already stitched line to arrive back at the center point.  Once there, you can repeat the same process on the opposite side.

*****The key to this coming out and appearing symmetric is that you are filling the exact same shape on either side of that center plume.  So, if you hold yourself “accountable” to stretching/contracting your plumes so they fill the entire space, you should end up with a featherette that is symmetric!  If there is a part of you wondering if this is using the bumpback feather technique, you are correct!

I’m not going to repeat previous posts here, but if you’re wanting to learn how to quilt various featherettes, you can find an old post by clicking here.

There’s a lot of info in this post and if you’re feeling overwhelmed, skip the featherette part and stitch with creating the ruler work framework.  Patience, grasshopper!